

npm 为你和你的团队打开了连接整个 JavaScript 天才世界的一扇大门。它是世界上最大的软件注册表,每星期大约有 30 亿次的下载量,包含超过 600000 个 包(package) (即,代码模块)。来自各大洲的开源软件开发者使用 npm 互相分享和借鉴。包的结构使您能够轻松跟踪依赖项和版本。
下面是关于 npm 的快速介绍:
npm 由三个独立的部分组成:
网站 是开发者查找包(package)、设置参数以及管理 npm 使用体验的主要途径。
注册表 是一个巨大的数据库,保存了每个包(package)的信息。
CLI 通过命令行或终端运行。开发者通过 CLI 与 npm 打交道。
Adapt packages to your apps, or incorporate them as they are.
Download standalone tools you can use right away.
Run packages without downloading using npx.
Share code with any npm user, any where.
Restrict code to specific developers.
Form virtual teams (orgs).
Manage multiple versions of code and code dependencies.
Update applications easily when underlying code is updated.
Discover multiple ways to solve the same puzzle.
Find other developers who are working on similar problems.
These are just a few examples of ways developers use npm. If you'd like to add a bullet point, comment here.
To find packages, start with the npm search bar.
While browsing, you'll find:
(To understand the difference between node modules and packages, click here).
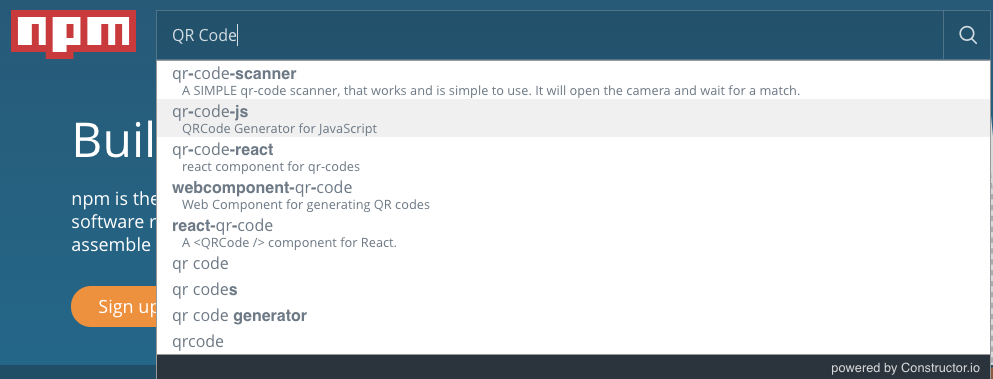
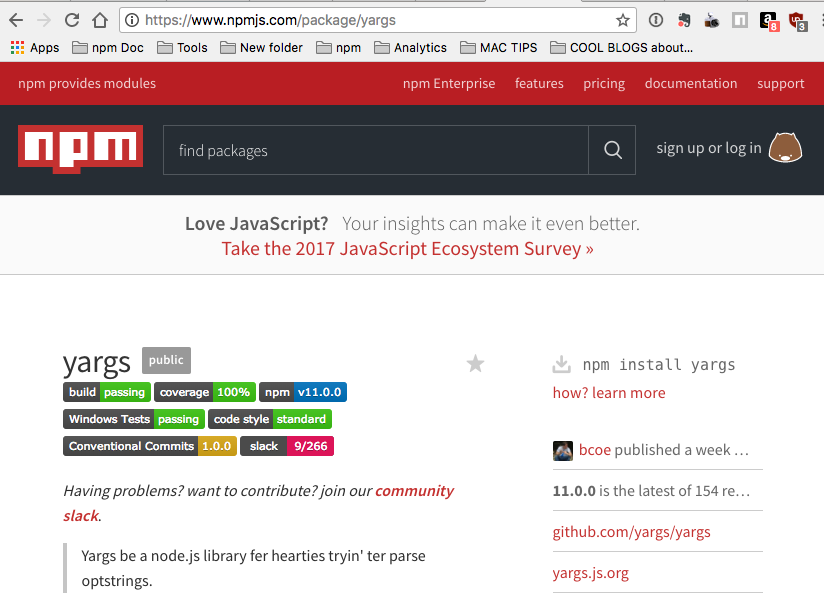
For example, suppose you wanted to use bar codes (QR codes) in your application. Rather than spend weeks figuring out how to do this, why not see if someone has posted a package that creates QR codes? Start by entering a value in the search bar:

Related options will appear:
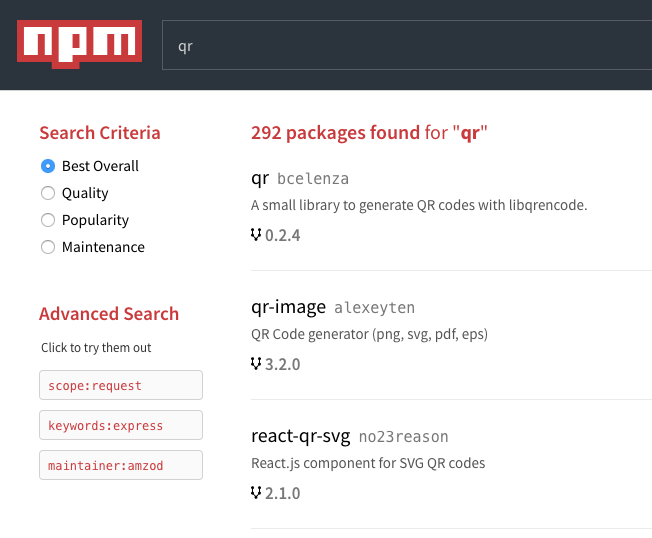
Or, click, to filter the possibilities even more:
When you choose a package to explore, more information appears. This information is written by the package author(s) so details vary.
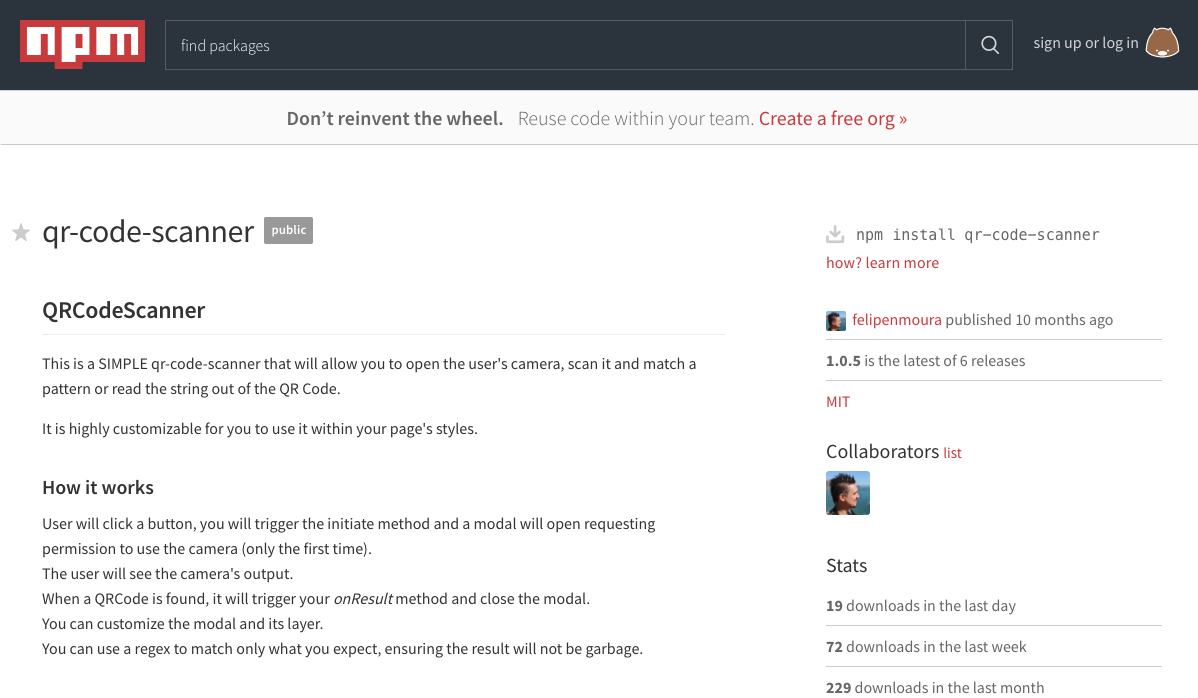
Now, you can read the developer's instructions to discover how to use this package.
Now that you know what npm is, and a bit about how to use it, it's time to get started. Install npm. We look forward to seeing what you will create!
To learn more about npm as a product, new features on the way, and interesting uses of npm, sign up for our newsletter at npm-weekly.
To explore additional features that you might wish to use as your project evolves, click here.
Last modified February 13, 2023 Found a typo? Send a pull request!
npm is written in Node.js, so you need to install Node.js in order to use npm. You can install npm via the Node.js website, or by installing a Node Version Manager or NVM. This chapter explains both options.
If you just want to get started exploring npm, using the Node.js installation method is fastest. If you are an advanced developer ready to jump in and work with versions, use the node version manager. If you aren't sure, please read this chapter before you decide. You can always change how you run npm in the future.
If you're using OS X or Windows, use one of the installers from the Node.js download page. Be sure to install the version labeled LTS. Other versions have not yet been tested with npm.
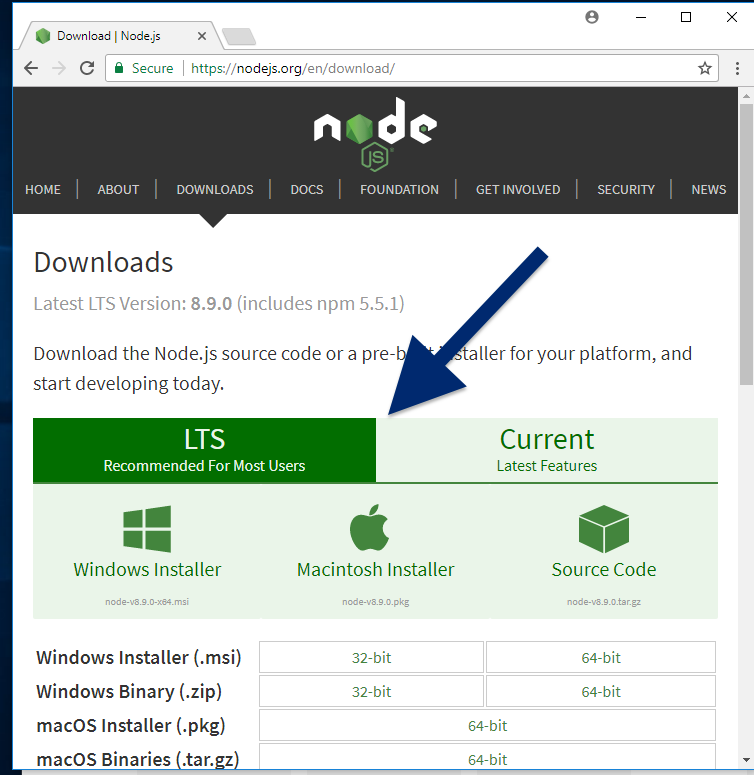
If you're using Linux, you can find installers by scrolling on the Node.js download page, or, check NodeSource's binary distributions to see if there's a more recent version that works with your system.
After installing, run node -v. The version should be v8.9.1 or higher.
When you install node.js, npm is automatically installed. However, npm gets updated more frequently than Node.js, so be sure that you have the latest version.
To test, run npm -v.
To be sure that this matches the latest version, scroll to the bottom of this page. If the version you see does not match the latest version, run:
npm install npm@latest -g.
This will install the latest official, tested version of npm.
To install a version that will be released in the future, run:
npm install npm@next -g.
Since npm and node.js products are managed by different entities, updates and maintenance can become complex. Also, the Node.js installation process installs npm in a directory that only has local permissions. This can cause permissions errors when you attempt to run packages globally.
To solve both these issues, many developers opt to use a node version manager, or nvm, to install npm. The version manager will avoid permissions errors, and will solve the complexities of updating Node.js and npm.
In addition, developers can use an nvm to test their applications on multiple versions of npm. The nvm enables you to easily switch npm as well as node versions. This makes it easier to ensure that your applications work for most users, even if they are using other versions of npm. If you decide to install a version manager, use the instructions for the version manager you select to learn how to switch versions, and to learn how to keep up-to-date with the latest version of npm.
Click here to learn how to install nvm for MacOs.
To install and manage npm and Node.js on Windows, we suggest nvm-windows.
Click here to learn how to install nvm for Linux.
For more advanced users
If you want to try the next, unreleased version of npm to test that packages you have created will work with the planned next release of npm, use this command:
npm install npm@next -g
This may simply reinstall the current version, depending on the development cycle. Also, this early version is not final. So features may or may not match what is ultimately released.
To learn more about how to use nvm, click here.
Last modified February 13, 2023 Found a typo? Send a pull request!
If you see an EACCES error when you try to install a package globally, read this chapter. This error can often be avoided if you change the directory where npm is installed. To do this, either:
Reinstall npm with a version manager (recommended),
or
Change npm's default directory manually.
This is the best way to avoid permissions issues. This is described in Chapter 2. You do not need to remove your current version of npm or Node.js before installing a node version manager.
This section does not apply to Microsoft Windows. This chapter will be updated to address Windows in the near future.
To minimize the chance of permissions errors, you can configure npm to use a different directory. In this example, it will be a hidden directory on your home folder.
Back-up your computer before you start.
Make a directory for global installations:
mkdir ~/.npm-global
Configure npm to use the new directory path:
npm config set prefix '~/.npm-global'
Open or create a ~/.profile file and add this line:
export PATH=~/.npm-global/bin:$PATH
Back on the command line, update your system variables:
source ~/.profile
Test: Download a package globally without using sudo.
npm install -g jshint
Instead of steps 2-4, you can use the corresponding ENV variable (e.g. if you don't want to modify ~/.profile):
NPM_CONFIG_PREFIX=~/.npm-global
If you are using npm version 5.2 or greater, explore npx as an alternative way to run global commands, especially if you just need a command occassionally. Click here to read an excellent article about npx.
Last modified February 13, 2023 Found a typo? Send a pull request!
有两种方式用来安装 npm 包:本地安装和全局安装。至于选择哪种方式来安装,取决于我们如何使用这个包。
require 加载,那么你应该选择本地安装,这种方式也是 npm install 命令的默认行为。想要了解更多关于 install 命令行的行为,可以查看 CLI 文档。
可以使用下面的命令来安装一个包:
> npm install <package_name>
上述命令执行之后将会在当前的目录下创建一个 node_modules 的目录(如果不存在的话),然后将下载的包保存到这个目录下。
为了确认 npm install 是正常工作的,可以检查 node_modules 目录是否存在,并且里面是否含有你安装的包的文件夹。
安装一个叫做 lodash 的包。安装成功之后,如果 node_modules 目录下存在一个名为 lodash 的文件夹,则说明成功安装了这个包。
C:\ npm install lodash
C:\ dir node_modules

#=> lodash
> npm install lodash
> ls node_modules

#=> lodash
在本地目录中如果没有 package.json 这个文件的话,那么最新版本的包会被安装。
如果存在 package.json 文件,则会在 package.json 文件中查找针对这个包所约定的语义化版本规则,然后安装符合此规则的最新版本。
一旦将包安装到 node_modules 目录中,你就可以使用它了。比如在你所创建的 Node.js 模块中,你可以 require 这个包。
创建一个名为 index.js 的文件,并保存如下代码:
// index.jsvar lodash = ; var output = lodash;console;运行 node index.js 命令。应当输出 [2, 3]。
如果你没能正确安装 lodash,你将会看到如下的错误信息:
module.js:340
    throw err;
          ^
Error: Cannot find module 'lodash'
可以在 index.js 所在的目录中运行 npm install lodash 命令来修复这个问题。
Last modified February 13, 2023 Found a typo? Send a pull request!
The best way to manage locally installed npm packages is to create a
package.json file.
A package.json file:
A package.json must have:
"name"
"version"
x.x.xFor example:
{
  "name": "my-awesome-package",
  "version": "1.0.0"
}
package.jsonThere are two basic ways to create a package.json file.
To create a package.json with values that you supply, run:
> npm init
This will initiate a command line questionnaire that will conclude with the
creation of a package.json in the directory in which you initiated the command.
package.jsonTo get a default package.json, run npm init with the --yes
or -y flag:
> npm init --yes
This method will generate a default package.json using information extracted from the current directory.
> npm init --yes
Wrote to /home/ag_dubs/my_package/package.json:

{
  "name": "my_package",
  "description": "",
  "version": "1.0.0",
  "main": "index.js",
  "scripts": {
    "test": "echo \"Error: no test specified\" && exit 1"
  },
  "repository": {
    "type": "git",
    "url": "https://github.com/ashleygwilliams/my_package.git"
  },
  "keywords": [],
  "author": "",
  "license": "ISC",
  "bugs": {
    "url": "https://github.com/ashleygwilliams/my_package/issues"
  },
  "homepage": "https://github.com/ashleygwilliams/my_package"
}
name: the current directory nameversion: always 1.0.0description: info from the readme, or an empty string ""main: always index.jsscripts: by default creates an empty test scriptkeywords: emptyauthor: emptylicense: ISCbugs: info from the current directory, if presenthomepage: info from the current directory, if presentYou can also set several config options for the init command. Some useful ones:
> npm set init.author.email "wombat@npmjs.com"
> npm set init.author.name "ag_dubs"
> npm set init.license "MIT"
If there is no description field in the package.json, npm uses the first line of the README.md or README instead. The description helps people find your package when searching npm, so it's definitely useful to make a custom description in the package.json to make your package easier to find.
package.json questionnaireIf you expect to create many package.json files, you might wish to customize the questions asked during the init process, so that the files always contain key information that you expect. You can customize the fields as well as the questions that are asked.
To do this, you create a custom .npm-init.js in your home directory
~/.npm-init.js.
A simple .npm-init.js might look something like this:
module.exports = {
  customField: 'Custom Field',
  otherCustomField: 'This field is really cool'
}
Running npm init with this file in your home directory would output a package.json that included these lines:
{
  customField: 'Custom Field',
  otherCustomField: 'This field is really cool'
}
You can also customize the questions by using the prompt function.
module.exports = prompt("what's your favorite flavor of ice cream, buddy?", "I LIKE THEM ALL");
To learn more about how to create advanced customizations, check out the docs for init-package-json
To specify the packages your project depends on, you need to
list the packages you'd like to use in your package.json file. There are
2 types of packages you can list:
"dependencies": These packages are required by your application in production."devDependencies": These packages are only needed for development and testing.package.jsonYou can manually edit your package.json. You'll need to create an attribute
in the package object called dependencies that points to an object. This object will hold attributes that name the packages you'd like to use. It will point to a semver expression that specifies the versions of that project that are compatible with your project.
If you have dependencies you only need to use during local development,
follow the same instructions as above but use the attribute called devDependencies.
For example, the project below uses any version of the package my_dep that matches major version 1 in production and requires any version of the package my_test_framework that matches major version 3, but only for development:
{
  "name": "my_package",
  "version": "1.0.0",
  "dependencies": {
    "my_dep": "^1.0.0"
  },
  "devDependencies" : {
    "my_test_framework": "^3.1.0"
  }
}
--save and --save-dev install flagsThe easier (and more awesome) way to add dependencies to your package.json is to do
so from the command line, flagging the npm install command with either --save or
--save-dev, depending on how you'd like to use that dependency.
To add an entry to your package.json's dependencies:
npm install <package_name> --save
To add an entry to your package.json's devDependencies:
npm install <package_name> --save-dev
npm uses Semantic Versioning, or, as we often refer to it, SemVer, to manage versions and ranges of versions of packages.
If you have a package.json file in your directory and you run npm install, npm will look at the dependencies that are listed in that file and download the latest versions, using semantic versioning.
To understand more about the power of package.json, see the video "Installing npm packages locally" which you can find in Chapter 8.
To learn more about semantic versioning, see Getting Started "Semver" page.
Last modified February 13, 2023 Found a typo? Send a pull request!
定期更新你的应用所依赖的包(package)是个好习惯。因为依赖包的开发者更新了代码,你的应用也就能够获得提升。
为了完成这个任务需要:
package.json 文件所在的目录中执行 npm update 命令。npm outdated 命令。不应该有任何输出。Last modified February 13, 2023 Found a typo? Send a pull request!
如需删除 node_modules 目录下面的包(package),请执行:
npm uninstall <package>:
npm uninstall lodash
如需从 package.json 文件中删除依赖,需要在命令后添加参数 --save:
npm uninstall --save lodash
注意:如果你将安装的包作为 "devDependency"(也就是通过 --save-dev 参数保存的),那么 --save 无法将其从 package.json 文件中删除。所以必须通过 --save-dev 参数可以将其卸载。
为了确定 npm uninstall 命令执行成功,请找到 node_modules 目录,并在此目录下检查你所卸载的包(package)所对应的目录是否消失了。
通过如下命令:
ls node_modules 在 Unix 系统中使用,例如 "OSX"dir node_modules 在 Windows 系统中使用。安装 lodash。为了确认安装成功,请检查 node_modules 目录下是否存在 lodash 目录。
通过 npm uninstall 命令卸载 lodash。为了确认执行成功,请检查 node_modules 目录下不存在 lodash 目录。
> npm install lodash
> dir node_modules               # Unix 系统使用 `ls node_modules` 命令
#=> lodash

> npm uninstall lodash
> dir node_modules               # Unix 系统使用 `ls node_modules` 命令

#=>
Last modified February 13, 2023 Found a typo? Send a pull request!
有两种方式用来安装 npm 包:本地安装和全局安装。选用哪种方式来安装,取决于你如何使用这个包。
如果你想将其作为一个命令行工具,那么你应该将其安装到全局。这种安装方式后可以让你在任何目录下使用这个包。比如 grunt 就应该以这种方式安装。
If you want to depend on the package from your own module, then install it locally. This is the choice you would use if you are using require statements, for example.
将包安装到全局,你应该使用 npm install -g <package> 命令,例如:
npm install -g jshint
如果你遇到 EACCES 错误,请查看第 3 章。
小技巧:如果你安装的 npm 是 5.2 或更高版本,可以使用 npx 运行全局安装的包。
Last modified February 13, 2023 Found a typo? Send a pull request!
Requires version 2.6.1 or greater. See below if you are using an older version.
To update global packages, type:
npm update -g <package>
For example, to update a packages called jshint, you'd type:
npm update -g jshint
To find out which packages need to be updated, type:
npm outdated -g --depth=0.
To update all global packages, type:
npm update -g.
For npm versions less than 2.6.1, run this script to update all outdated global packages.
However, please consider upgrading to the latest version of npm. To do this, type:
npm install npm@latest -g.
Last modified February 13, 2023 Found a typo? Send a pull request!
通过如下命令将包(package)安装到全局:
npm uninstall -g <package>
例如安装 jshint 包到全局,使用如下命令:
npm uninstall -g jshint
Last modified February 13, 2023 Found a typo? Send a pull request!
Node.js 模块是一种可以发布到 npm 的包。当你创建一个新模块时,创建 package.json 文件是第一步。
你可以使用 npm init 命令创建 package.json 文件。命令行中将会提示 package.json 字段中需要你输入的值。名称(name) 和 版本(version) 这两个字段是必填的。你还需要输入 入口文件字段(main) 字段,当然,可以使用默认值 index.js。这些步骤在第 5 章 有详细的讲解。
如果你想为作者(author)字段添加信息,你可以使用以下格式(邮箱、网址都是选填的):
Your Name <email@example.com> (http://example.com)
创建 package.json 文件之后,还需要创建模块的入口文件。如果使用默认值,文件名是 index.js。
在此文件中,添加一个函数,作为 exports对象的一个属性。这样,require 此文件之后,这个函数在其他代码中就可以使用了。
exports.printMsg = function() {
  console.log("This is a message from the demo package");
}
试一试:
cd 进入这个新目录。npm install <package> 命令。node test.js 命令。是否输出 console.log 中填写的信息?To understand types of packages, click here.
Last modified February 13, 2023 Found a typo? Send a pull request!
You can publish any directory that has a package.json file. This chapter explains how to publish a package for the first time, and how to update it later.
Before you begin, it's a good idea to review npm's policies, in case you have questions about site etiquette, naming, licensing, or other guidelines.
To publish, you must be a user on the npm registry. If you aren't a user, create an account by using npm adduser. If you created a user account on the site, use npm login to access your account from your terminal.
Test:
Type npm whoami from a terminal to see if you are already logged in (technically, this also means that your credentials have been stored locally).
Check that your username has been added to the registry at https://npmjs.com/~username
For example,
https://www.npmjs.com/~carolynawombat
Note that everything in the directory will be included unless it is ignored by a local .gitignore or .npmignore file. To learn how to use these commands, see npm-developers.
Read Working with package.json to be sure that the details you want are reflected in your package.
Choose a unique name for your package. Try to choose a descriptive name that:
Note: The first 3 caveats don't apply if you are using scopes.
npm recommends that you include a readme file to document your package. The readme file must have the filename readme.md. The file extension .md indicates that the file is a markdown file. This file will appear on the npm website when someone finds your package.
Before you begin, please look at some of the package pages to get ideas for the information you can add to your readme file, and to see why this is so important.
Create a file using any text editor.
Save it in the project directory with the name readme.md
When you publish, this documenation will display on the web page where people download your package.
Use npm publish to publish the package.
Go to https://npmjs.com/package/<package>. You should see a page all about your new package. It might look a bit like this:
When you make changes, you can update the package using
npm version <update_type>
where <update_type> is one of the semantic versioning release types, patch, minor, or major.
This command will change the version number in package.json.
Note: this will also add a tag with the updated release number to your git repository if you have linked one to your npm account.
After updating the version number, run npm publish again.
Test: Go to https://npmjs.com/package/<package>. The package number should be updated.
The README displayed on the site will not be updated unless a new version of your package is published, so you need to run npm version patch and npm publish to update the documentation displayed on the site.
To find out more about node modules and packages, see here.
To learn about semantic versioning, click here.
To learn more about tags, click here.
To learn more about package.json files, click here.
To learn more about naming, including how npm protects you against typosquat confusion, click here
Last modified February 13, 2023 Found a typo? Send a pull request!
It's important to communicate the extent of changes in a new release of code, because sometimes updates can break code that a package needs (called dependencies).Semantic versioning (semver) is a standard that was designed to solve this problem.
If a project is going to be shared with others, it should start at 1.0.0, (though some projects on npm don't follow this rule).
After this, changes should be handled as follows:
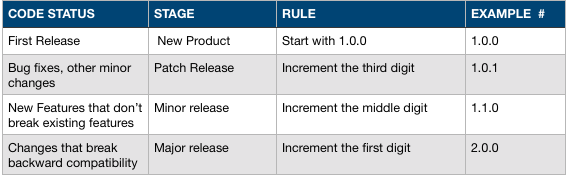
If you were starting with a package 1.0.4, this is how you would specify the ranges:
1.0 or 1.0.x or ~1.0.41 or 1.x or ^1.0.4* or xFor more about using semantic versioning with package.json files, see Chapter 5.
For another way to label releases, learn about npm dist tags, and how they relate to semantic versioning.
Last modified February 13, 2023 Found a typo? Send a pull request!
Requires npm version 2 or greater
Scopes are used to group related packages together, and to create a namespace, like a domain, for npm modules. This is explained in more detail here.
If a package's name begins with @, then it is a scoped package. The scope is everything in between the @ and the slash.
@scope/project-name
Each npm user has their own scope.
@username/project-name
You can find more in depth information about scopes in the CLI documentation.
To create a scoped package, you simply use a package name that starts with your scope.
If you use npm init, you can add your scope as an option to that command.
npm init --scope=username
If you use the same scope all the time, you will probably want to set this option in your .npmrc file.
npm config set scope username
By default, scoped packages are private. To publish private modules, you need to be a paid private modules user.
Public scoped modules are free and don't require a paid subscription. To publish a public scoped module, set the access option when publishing it. This option will remain set for all subsequent publishes.
npm publish --access=public
To use a scoped package, simply include the scope wherever you use the package name.
In package.json:
On the command line:
npm install @username/project-name --saveIn a require statement:
var projectName = For information about using scoped private modules, visit npmjs.com/private-modules.
Last modified February 13, 2023 Found a typo? Send a pull request!
Distribution tags (dist-tags) supplement semantic versioning (e.g., v0.12). Use them to organize and label different versions of packages. In addition to being more human-readable than semver numbering, tags allow publishers to distribute their packages more effectively.
To add a tag to a specific version of your package, use:
npm dist-tag add <pkg>@<version> [<tag>]
By default, npm publish will tag your package with the latest tag. If you
use the --tag flag, you can specify another tag to use. For example, the
following will publish your package with the beta tag:
npm publish --tag beta
Like npm publish, npm install <pkg> will use the latest tag by default.
To override this behavior, use npm install <pkg>@<tag>. The following example will install the somepkg at the version that has been tagged with beta.
npm install somepkg@beta
Because dist-tags share the same namespace as semver, avoid using tag names that may cause a conflict. The best practice is to avoid using tags beginning with a number or the letter "v".
See this CLI doc for more about tags. See Chapter 13 for more about semantic versioning.
Last modified February 13, 2023 Found a typo? Send a pull request!
Requires npm version 5.5.1 or greater
To meet the increasing need for strong digital security, npm introduced two-factor authentication (2FA) with version 5.5.1. Two-factor authentication prevents unauthorized access to your account by confirming your identity using two methods:
For example, if your bank uses 2FA, the first time you logged in to your online banking system, the bank sent a code to your cell phone number, then prompted you to enter the code online. This proved that the cell phone was in your possession, and linked it to your account for authentication. After that, whenever the bank detects anything unusual, such as a login from a different laptop, it will send a temporary code to your phone that you must enter before you can login. This provides an extra layer of security because, even if someone obtains your login credentials, they are unlikely to have your device in their possession as well. Even if someone finds your phone, they are unlikely to also be able to hack your laptop's password.
Two-factor authentication multiplies the protection against attacks, and we recommend that you implement this with your npm account.
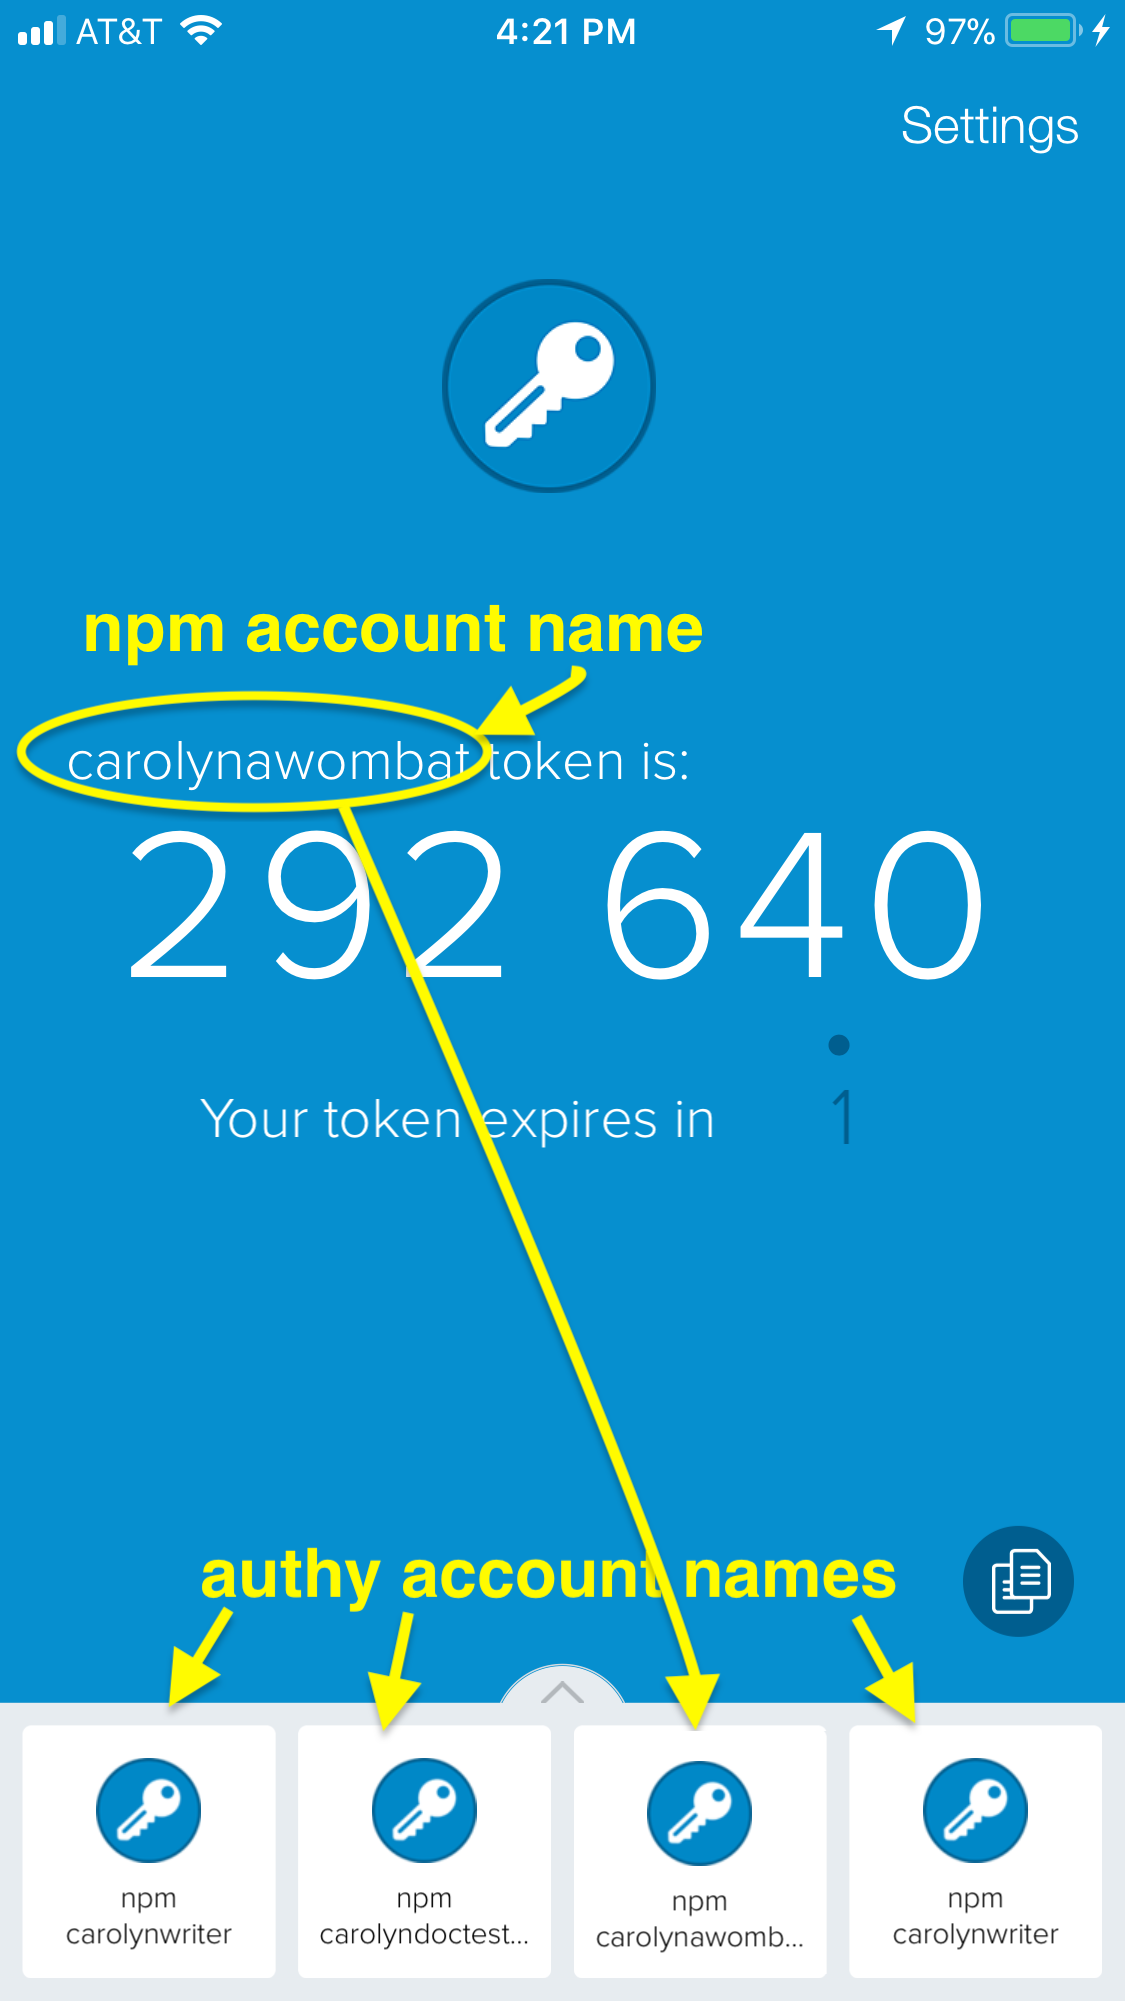
To enable 2FA with your npm account, you will need an application that can generate a One Time Password, or OTP. For example, Authy or Google Authenticator, can generate one time passwords (OTP's). These products use a Time-Based One-Time Password Algorithm (TOTP) to create temporary codes. Install the application on a mobile device or a second laptop that will always be available when you work in your npm account. (Note: npm does not use SMS (text-to-phone) as a method for authenticating users.)
There are two levels of authentication, auth-only and auth-and-writes.
If you enable 2FA in auth-only mode, npm will require an OTP when you:
If you enable 2FA in auth-and-writes mode, which is the default, npm will require an OTP when you:
To add the OTP to a command, append it as shown:
npm owner add <user > --otp=123456
Other examples are listed below.
To require two-factor authentication, type the command that meets the level of security you wish to apply (auth-and-writes is the default).
    npm profile enable-2fa
    npm profile enable-2fa auth-and-writes
    npm profile enable-2fa auth-only
npm will return this message:
npm notice profile Enabling two factor authentication for auth-and-writes
or this message:
> npm notice profile Enabling two factor authentication for auth-only
depending on the setting you provided.
Next, npm will display a QR code:
This will configure the authenticator app for future use, linking authentication to the device that generated the authentication.
Using your authenticator app, enter an OTP at the prompt shown:
Add an OTP code from your authenticator:
After you have entered the one-time password, npm will display this message:
2FA successfully enabled.
Below are your recovery codes, please print these out.
You will need these to recover access to your account
if you lose your authentication device.
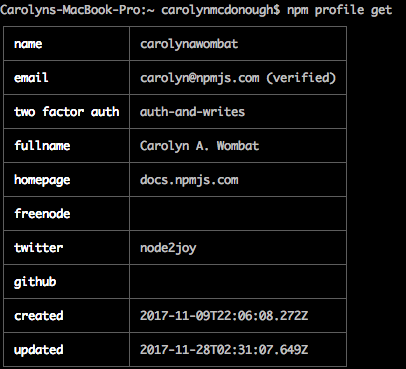
After you have applied two-factor authentication, you can use the npm profile get command to confirm that it has been set.
Once you have installed 2FA, you will need to enter an OTP for security-relevant commands. For example, whenever you use the command npm profile set you will need to enter an OTP before you can set or change a value, such as your fullname:
$npm profile set fullname Carolyn A. Wombat
Enter OTP: 567452
Set fullname to Carolyn A. Wombat
Use `npm profile get' to confirm the new setting.

Note to our readers: We have reset the account used in screen shots; neither the QR nor the codes are still active. But thank you to those alert and kind wombats who have asked us about this.
As described above, after you set up two-factor authentication, a series of recovery codes will appear on your screen. Please print them and save them as described. Note: Some authenticator applications provide a method for you to store recovery codes.
Tip: Save these codes in a different location than the device you use to authenticate. For example, if you get your OTP from a tablet, don't save the codes in a case with your tablet.
The recovery procedure is explained below.
To remove 2FA from your profile, type this command:
npm profile disable-2fa
npm will prompt for your password:
> npm password:
Enter your npm password as prompted, then npm will display:
>Enter one-time password from your authenticator: 123456
npm will confirm:
Two factor authentication disabled.
If you have enabled 2FA auth-and-writes, you will need to send the OTP from the command line for certain commands. To do this, append --otp=123456 (where 123456 is the code generated by your authenticator) at the end of the command. Here are a few examples:
npm publish [<tarball>|<folder>][--tag <tag>] --otp=123456
npm owner add <user > --otp=123456
npm owner rm <user> --otp=123456
npm dist-tags add <pkg>@<version> [<tag>] --otp=123456
npm access edit [<package>) --otp=123456
npm unpublish [<@scope>/]<pkg>[@<version>] --otp=123456
If you cannot locate the device that provided second-factor authentication:
npm profile disable-2fa and enter your npm password if prompted. >Enter one-time password from your authenticator:
npm profile enable-2fa to re-enable 2FA, assign a different device to your account, and generate new recovery codes.If you have misplaced your recovery codes, please contact npm customer support.
If you are entering what seems to be a valid OTP but you see an error, be sure that you are using the correct authenticator account. In the screen shot below, the current account in Authy was set incorrectly because the developer had multiple npm test accounts. This will cause the OTP to fail. Also, as stated earlier, when you reset 2fa after it has been disabled, the authenticator might create a second account with the same name. Please see the authenticator documentation to delete the old account.
Settings you define using the Command Line Interface (CLI) will also apply to the website. At this time, you cannot activate 2FA from web interface.
Last modified February 13, 2023 Found a typo? Send a pull request!
Requires npm version 5.5.1 or greater
Whenever you login to npm, a security token is generated. Tokens authenticate your account, and give you rights to publish and access your modules.
Because a token is simply a hexadecimal string, you can use the token in other tools, such as continuous integration testing environments, so that the tool can run with the access it needs to complete tasks. For example, Travis-CI provides an environment variable that you can assign to a token value. This gives Travis-CI the ability to run npm as your npm user, including the ability to install private packages to which you have access.
Read this chapter to learn how to manage security tokens.
Note: There are additional steps required if you wish to use tokens for testing and other special purposes. These steps are not in the scope of this chapter.
Token commands empower you to:
To view the tokens associated with your account, type:
npm token list.
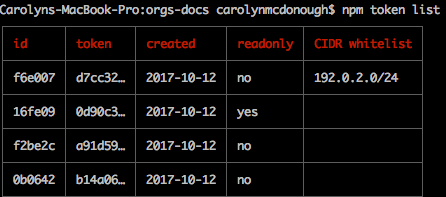
The following table explains the token list.
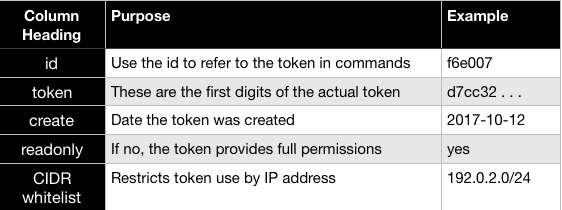
A token can be both read-only as well as CIDR-whitelisted.
If you have enabled two-factor authentication on your profile, you have implemented an additional layer of security.
Note: The token list shows a truncated version of the token. View the npmrc file if you need to see the full token.
npm token create [--read-only] [--cidr=list]
Before you create a new token, decide which type of token you want:
The default setting for new tokens is full-permission.
When a token is read-only, it cannot be used to make changes to a package. If a token is not explicitly set to read-only, it has full permissions, including publish and modification rights.
To create a new full permission token, type:
'npm token create'
If you have set up two-factor authentication, you will be prompted for your npm password, followed by an OTP. npm will display this table:
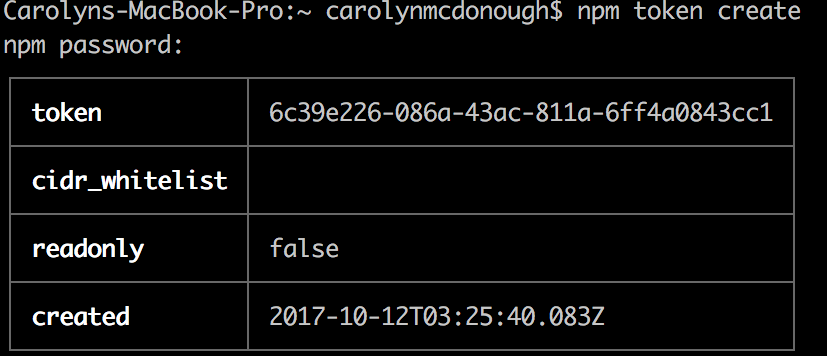
TIP: Save a screen shot of the token field, as this will be your only chance to view it.
Note that read-only defaults to false.
To create a new read-only token, type:
npm token create --read-only
If you have set up two-factor authentication, you will be prompted for an npm password, followed by an OTP. npm will display this table:

Note that read-only is set to true.
To limit the token so that it can only be used from specified ip addresses, you can create a CIDR-restricted token. CIDR is an acronym for Classless Inter-Domain Routing. The CIDR Wiki page will get you started.
Using a CIDR restriction makes it possible for you to force anyone or any system using the token to either physically or remotely be within the specified ip address range.
npm token create --[--cidr=list]
example.:
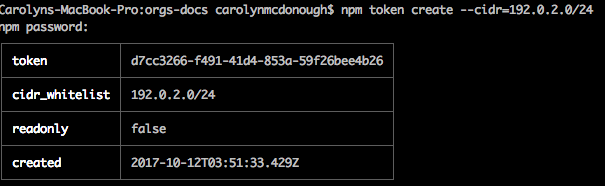
npm token create --cidr=192.0.2.0/24
If you have set up two-factor authentication, you will be prompted for an npm password, followed by an OTP. npm will display this table:
If you see a message like this one:
npm ERR! CIDR whitelist contains invalid CIDR entry: X.X.X.X./YY,Z.Z.. . .
(where the string returned is the one you entered) please ensure that the CIDR string is valid and in the appropriate format. Note: npm only supports IPv4 at this time.
To create a CIDR-restricted token that is also read-only, type:
npm token create --read-only --cidr=list
You can delete (revoke) a token, regardless of when it was created. This allows you to gain control of access you may wish to take back.
The command to delete a token is:
npm token delete
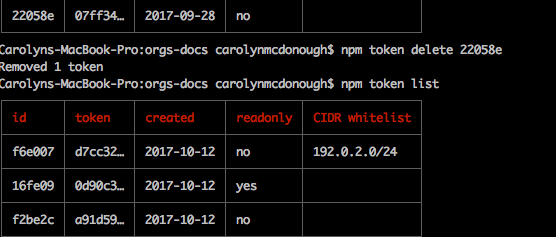
Here are the steps:
npm token listnpm will report 'Removed 1 token'
Type 'npm token list' to confirm that the token has been removed.
The following screen shot demonstrates these steps:
Note: All tokens shown in screen illustrations have been revoked.
Note: In certain cases, there may be a delay of up to an hour before a token is successfully revoked. npm is currently working to make revocation occur immediately in all cases.
Last modified February 13, 2023 Found a typo? Send a pull request!
Requires npm version 5.5.1 or greater.
To view and set profile properties from the Command Line Interface (CLI), use these commands:
npm profile get
npm profile set <prop> <value>
To see your current profile settings, type:
npm profile get
npm displays your profile settings in a table:
You can set or modify the following profile properties from the command line:
To set a password, type:
npm profile set password
npm will prompt you for your current password, then you can set the new password.
The password must follow these guidelines:
These rules protect your password by making it difficult to guess.
To set other values, append them to the end of the line as shown:
$npm profile set fullname nori pat marsupial
npm will prompt for credentials, including a one-time-password if you have enabled two-factor authentication. npm will then confirm that the change has occurred:
Set fullname to nori pat marsupial
You can also enable and disable two-factor authentication from the command line, using the steps described here.
Enable two-factor authentication if you would like to make it more difficult for attackers to gain access to your account and your publishing rights.
Please refer to the command line documentation for more details and examples.
Last modified February 13, 2023 Found a typo? Send a pull request!
Node.js and npm have very specific definitions of packages and modules, which are easy to mix up. We'll discuss those definitions here, make them distinct, and explain why certain default files are named the way they are.
package.json.
This can happen in a bunch of different ways! For more info, see
"What is a package?, below.require(). Again, there are several configurations that allow this to
happen. For more info, see "What is a module?", below.package?A package is any of the following:
package.json file.<name>@<version> that is published on the registry with (c).<name>@<tag> that points to (d).<name> that has a latest tag satisfying (e).git url that, when cloned, results in (a).Noting all these package possibilities, it follows that even if you never
publish your package to the public registry, you can still get a lot of
benefits of using npm:
Git urls can be of the form:
git://github.com/user/project.git#commit-ish
git+ssh://user@hostname:project.git#commit-ish
git+http://user@hostname/project/blah.git#commit-ish
git+https://user@hostname/project/blah.git#commit-ish
The commit-ish can be any tag, sha, or branch which can be supplied as
an argument to git checkout. The default is master.
module?A module is anything that can be loaded with require() in a Node.js
program. The following are all examples of things that can be
loaded as modules:
package.json file containing a main field.index.js file in it.Generally, npm packages that are used in Node.js program are loaded
with require, making them modules. However, there's no requirement
that an npm package be a module!
Some packages, e.g., cli packages, only contain an executable
command-line interface and don't provide a main field for use in
Node.js programs. These packages are not modules.
Almost all npm packages (at least, those that are Node programs)
contain many modules within them (because every file they load with
require() is a module).
In the context of a Node program, the module is also the thing that
was loaded from a file. For example, in the following program:
var req = require('request')
we might say that "The variable req refers to the request module".
So, why is it the node_modules folder, but package.json file?
Why not node_packages or module.json?
The package.json file defines the package. (See
"What is a package?", above.)
The node_modules folder is the place Node.js looks for modules.
(See "What is a module?", above.)
For example, if you create a file at node_modules/foo.js and then
had a program that did var f = require('foo.js'), it would load
the module. However, foo.js is not a "package" in this case
because it does not have a package.json.
Alternatively, if you create a package which does not have an
index.js or a "main" field in the package.json file, then it is
not a module. Even if it's installed in node_modules, it can't be
an argument to require().
Last modified February 13, 2023 Found a typo? Send a pull request!
With npm private modules, you can use the npm registry to host your own private code and the npm command line to manage it. This makes it easy to use public modules like Express and Browserify side-by-side with your own private code.
You need a version of npm greater than 2.7.0, and you'll need to log in to npm again.
sudo npm install -g npmnpm loginAll private packages are scoped.
Scopes are a new feature of npm. If a package's name begins with @, then it is a scoped package. The scope is everything in between the @ and the slash.
@scope/project-name
When you sign up for private modules as an individual user, your scope is your username.
@username/project-name
If you use npm init to initialize your packages, you can pass in your scope like this:
npm init --scope=<your_scope>
If you use the same scope most of the time, you'll probably want to set it in your default configuration instead.
npm config set scope <your_scope>
Publishing your package is easy.
npm publish
By default, scoped packages are published as private. You can read more about this in the scopes documentation.
Once it's published, you should see it on the website with a private flag.
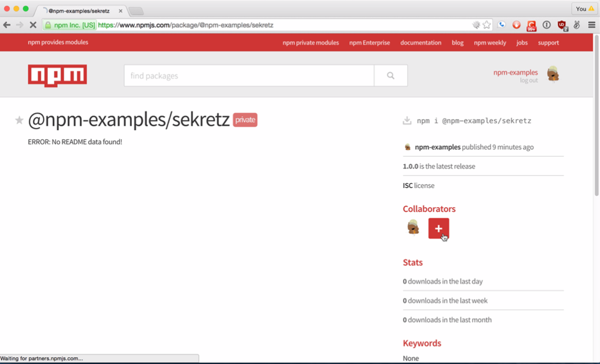
If you want to give access to someone, they need to be subscribed to private modules as well. Once they are, you can give them read or read-write access.
You can control access to the package on the access page. To get to the page, click on the Collaborators link or the plus button.

Add collaborators by entering the username and hitting enter.

You can also add collaborators on the command line:
npm owner add <user> <package name>To install a private module, you must have access to the package. Then you can use install with the scoped package name.
npm install @scope/project-name
You also use the scoped package name when requiring it.
var project = require('@scope/project-name')
All scoped packages default to private. This ensures that you don't make something public by accident. You can change this on the access page.

You can also manage package access via the command line:
npm access restricted <package_name>The package will be removed from listings on the site within a few minutes of making it private.
Last modified February 13, 2023 Found a typo? Send a pull request!
If you are using deployment servers or testing with CI servers, you'll need a way to download your private modules to those servers. To do this, you can set up an .npmrc file which will authenticate your server with npm.
One of the things that has changed in npm is that we now use auth tokens to authenticate in the CLI. To generate an auth token, you can log in on any machine. You'll end up with a line in your .npmrc file that looks like this:
//registry.npmjs.org/:_authToken=00000000-0000-0000-0000-000000000000
The token is not derived from your password, but changing your password will invalidate all tokens. The token will be valid until the password is changed. You can also invalidate a single token by logging out on a machine that is logged in with that token.
To make this more secure when pushing it up to the server, you can set this token as an environment variable on the server. For example, in Heroku you would do this:
heroku config:set NPM_TOKEN=00000000-0000-0000-0000-000000000000 --app=application_name
You will also need to add this to your environment variables on your development machine. In OSX or Linux, you would add this line to your ~/.profile:
export NPM_TOKEN="00000000-0000-0000-0000-000000000000"
and then refresh your environment variables:
source ~/.profile
.npmrcThen you can check in the .npmrc file, replacing your token with the environment variable.
//registry.npmjs.org/:_authToken=${NPM_TOKEN}
Last modified February 13, 2023 Found a typo? Send a pull request!
If you've read through Working with private modules, you'll know that in order to use private modules, you need to be logged in to npm via the npm CLI.
If you're using npm private modules in an environment where you're not directly able to log in, such as inside a CI Server or a Docker container, you'll need to get and export an npm token as an environment variable. That token should look like NPM_TOKEN=00000000-0000-0000-0000-000000000000.
The Getting an Authentication Token should help you generate that token.
If this is the workflow you need, please read the CI Server Config doc. If that works with your system then perfect.
If it doesn't, here we'll look at the problems with this workflow when running npm install inside a Docker container.
If you had the following Dockerfile:
FROM risingstack/alpine:3.3-v4.3.1-3.0.1

COPY package.json package.json
RUN npm install

# Add your source files
COPY . .
CMD npm start
Which will use the RisingStack Alpine Node.JS Docker image, copy the package.json into our container, installs dependencies, copies the source files and runs the start command as specified in the package.json.
In order to install private packages, you may think that we could just add a line before we run npm install, using the ENV parameter:
ENV NPM_TOKEN=00000000-0000-0000-0000-000000000000
However this doesn't work as you would expect, because you want the npm install to occur when you run docker build, and in this instance, ENV variables aren't used, they are set for runtime only.
We have to take advantage of a different way of passing environment variables to Docker, available since Docker 1.9. We'll use the slightly confusingly named ARG parameter.
A complete example that will allow us to use --build-arg to pass in our NPM_TOKEN requires adding a .npmrc file to the project. That file should contain the following content:
//registry.npmjs.org/:_authToken=${NPM_TOKEN}
The Dockerfile that takes advantage of this has a few more lines in it than our example earlier that allows us to use the .npmrc file and the ARG parameter.
FROM risingstack/alpine:3.3-v4.3.1-3.0.1

ARG NPM_TOKEN
COPY .npmrc .npmrc
COPY package.json package.json
RUN npm install
RUN rm -f .npmrc

# Add your source files
COPY . .
CMD npm start
This adds the expected ARG NPM_TOKEN, but also copies the .npmrc file, and removes it when npm install completes.
To build the image using this Dockerfile and the token, you can run the following (note the . at the end to give docker build the current directory as an argument):
docker build --build-arg NPM_TOKEN=${NPM_TOKEN} .
This will take your current NPM_TOKEN environment variable, and will build the docker image using it, so you can run npm install inside your container as the current logged in user!
Note: Even if you delete the .npmrc file, it'll be kept in the commit history - to clean your secret up entirely make sure to squash them.
Last modified February 13, 2023 Found a typo? Send a pull request!
npm access public [<package>]
npm access restricted [<package>]

npm access grant <read-only|read-write> <scope:team> [<package>]
npm access revoke <scope:team> [<package>]

npm access 2fa-required [<package>]
npm access 2fa-not-required [<package>]

npm access ls-packages [<user>|<scope>|<scope:team>]
npm access ls-collaborators [<package> [<user>]]
npm access edit [<package>]
Used to set access controls on private packages.
For all of the subcommands, npm access will perform actions on the packages
in the current working directory if no package name is passed to the
subcommand.
public / restricted: Set a package to be either publicly accessible or restricted.
grant / revoke: Add or remove the ability of users and teams to have read-only or read-write access to a package.
2fa-required / 2fa-not-required: Configure whether a package requires that anyone publishing it have two-factor authentication enabled on their account.
ls-packages: Show all of the packages a user or a team is able to access, along with the access level, except for read-only public packages (it won't print the whole registry listing)
ls-collaborators:
Show all of the access privileges for a package. Will only show permissions
for packages to which you have at least read access. If <user> is passed in,
the list is filtered only to teams that user happens to belong to.
edit:
Set the access privileges for a package at once using $EDITOR.
npm access always operates directly on the current registry, configurable
from the command line using --registry=<registry url>.
Unscoped packages are always public.
Scoped packages default to restricted, but you can either publish them as
public using npm publish --access=public, or set their access as public using
npm access public after the initial publish.
You must have privileges to set the access of a package:
If you have two-factor authentication enabled then you'll have to pass in an
otp with --otp when making access changes.
If your account is not paid, then attempts to publish scoped packages will fail
with an HTTP 402 status code (logically enough), unless you use
--access=public.
Management of teams and team memberships is done with the npm team command.
Last modified February 13, 2023 Found a typo? Send a pull request!
npm adduser [--registry=url] [--scope=@orgname] [--always-auth] [--auth-type=legacy]

aliases: login, add-user
Create or verify a user named <username> in the specified registry, and
save the credentials to the .npmrc file. If no registry is specified,
the default registry will be used (see npm-config).
The username, password, and email are read in from prompts.
To reset your password, go to https://www.npmjs.com/forgot
To change your email address, go to https://www.npmjs.com/email-edit
You may use this command multiple times with the same user account to authorize on a new machine. When authenticating on a new machine, the username, password and email address must all match with your existing record.
npm login is an alias to adduser and behaves exactly the same way.
Default: https://registry.npmjs.org/
The base URL of the npm package registry. If scope is also specified,
this registry will only be used for packages with that scope. scope defaults
to the scope of the project directory you're currently in, if any. See npm-scope.
Default: none
If specified, the user and login credentials given will be associated
with the specified scope. See npm-scope. You can use both at the same time,
e.g.
npm adduser --registry=http://myregistry.example.com --scope=@myco
This will set a registry for the given scope and login or create a user for that registry at the same time.
Default: false
If specified, save configuration indicating that all requests to the given
registry should include authorization information. Useful for private
registries. Can be used with --registry and / or --scope, e.g.
npm adduser --registry=http://private-registry.example.com --always-auth
This will ensure that all requests to that registry (including for tarballs)
include an authorization header. This setting may be necessary for use with
private registries where metadata and package tarballs are stored on hosts with
different hostnames. See always-auth in npm-config for more details on
always-auth. Registry-specific configuration of always-auth takes precedence
over any global configuration.
'legacy''legacy', 'sso', 'saml', 'oauth'What authentication strategy to use with adduser/login. Some npm registries
(for example, npmE) might support alternative auth strategies besides classic
username/password entry in legacy npm.
Last modified February 13, 2023 Found a typo? Send a pull request!
npm audit [--json|--parseable]
npm audit fix [--force|--package-lock-only|--dry-run|--production|--only=dev]
Scan your project for vulnerabilities and automatically install any compatible updates to vulnerable dependencies:
$ npm audit fix
Run audit fix without modifying node_modules, but still updating the
pkglock:
$ npm audit fix --package-lock-only
Skip updating devDependencies:
$ npm audit fix --only=prod
Have audit fix install semver-major updates to toplevel dependencies, not just
semver-compatible ones:
$ npm audit fix --force
Do a dry run to get an idea of what audit fix will do, and also output
install information in JSON format:
$ npm audit fix --dry-run --json
Scan your project for vulnerabilities and just show the details, without fixing anything:
$ npm audit
Get the detailed audit report in JSON format:
$ npm audit --json
Get the detailed audit report in plain text result, separated by tab characters, allowing for future reuse in scripting or command line post processing, like for example, selecting some of the columns printed:
$ npm audit --parseable
To parse columns, you can use for example awk, and just print some of them:
$ npm audit --parseable | awk -F $'\t' '{print $1,$4}'
The audit command submits a description of the dependencies configured in your project to your default registry and asks for a report of known vulnerabilities. The report returned includes instructions on how to act on this information.
You can also have npm automatically fix the vulnerabilities by running npm audit fix. Note that some vulnerabilities cannot be fixed automatically and
will require manual intervention or review. Also note that since npm audit fix
runs a full-fledged npm install under the hood, all configs that apply to the
installer will also apply to npm install -- so things like npm audit fix --package-lock-only will work as expected.
In order to ensure that potentially sensitive information is not included in the audit data bundle, some dependencies may have their names (and sometimes versions) replaced with opaque non-reversible identifiers. It is done for the following dependency types:
npm login --scope=@ourscope for.)The non-reversible identifiers are a sha256 of a session-specific UUID and the value being replaced, ensuring a consistent value within the payload that is different between runs.
Last modified February 13, 2023 Found a typo? Send a pull request!
npm bin [-g|--global]
列出 npm 安装可执行文件的文件夹。
Last modified February 13, 2023 Found a typo? Send a pull request!
npm bugs [<pkgname>]

aliases: issues
This command tries to guess at the likely location of a package's
bug tracker URL, and then tries to open it using the --browser
config param. If no package name is provided, it will search for
a package.json in the current folder and use the name property.
"open", Windows: "start", Others: "xdg-open"The browser that is called by the npm bugs command to open websites.
The base URL of the npm package registry.
Last modified February 13, 2023 Found a typo? Send a pull request!
npm build [<package-folder>]
<package-folder>:
在其根目录中包含一个 package.json 文件的文件夹。这是由 npm link 命令和 npm install 命令组成的管道命令。
它通常在安装过程中被调用,但是如果你需要直接运行它,请运行:
npm run-script build
Last modified February 13, 2023 Found a typo? Send a pull request!
npm bundle 命令在 1.0 版本中已被删除,原因很简单,已经不需要它了,
因为现在的默认行为是安装依赖包到本地空间。
现在直接用 npm install 命令替代 npm bundle 命令。
Last modified February 13, 2023 Found a typo? Send a pull request!
npm cache add <tarball file>
npm cache add <folder>
npm cache add <tarball url>
npm cache add <name>@<version>

npm cache clean [<path>]
aliases: npm cache clear, npm cache rm

npm cache verify
Used to add, list, or clean the npm cache folder.
add: Add the specified package to the local cache. This command is primarily intended to be used internally by npm, but it can provide a way to add data to the local installation cache explicitly.
clean: Delete all data out of the cache folder.
verify: Verify the contents of the cache folder, garbage collecting any unneeded data, and verifying the integrity of the cache index and all cached data.
npm stores cache data in an opaque directory within the configured cache,
named _cacache. This directory is a cacache-based content-addressable cache
that stores all http request data as well as other package-related data. This
directory is primarily accessed through pacote, the library responsible for
all package fetching as of npm@5.
All data that passes through the cache is fully verified for integrity on both
insertion and extraction. Cache corruption will either trigger an error, or
signal to pacote that the data must be refetched, which it will do
automatically. For this reason, it should never be necessary to clear the cache
for any reason other than reclaiming disk space, thus why clean now requires
--force to run.
There is currently no method exposed through npm to inspect or directly manage
the contents of this cache. In order to access it, cacache must be used
directly.
npm will not remove data by itself: the cache will grow as new packages are installed.
The npm cache is strictly a cache: it should not be relied upon as a persistent and reliable data store for package data. npm makes no guarantee that a previously-cached piece of data will be available later, and will automatically delete corrupted contents. The primary guarantee that the cache makes is that, if it does return data, that data will be exactly the data that was inserted.
To run an offline verification of existing cache contents, use npm cache verify.
Default: ~/.npm on Posix, or %AppData%/npm-cache on Windows.
The root cache folder.
Last modified February 13, 2023 Found a typo? Send a pull request!
npm ci
Make sure you have a package-lock and an up-to-date install:
$ cd ./my/npm/project
$ npm install
added 154 packages in 10s
$ ls | grep package-lock
Run npm ci in that project
$ npm ci
added 154 packages in 5s
Configure Travis to build using npm ci instead of npm install:
# .travis.yml
install:
- npm ci
# keep the npm cache around to speed up installs
cache:
  directories:
  - "$HOME/.npm"
This command is similar to npm-install, except it's meant to be used in
automated environments such as test platforms, continuous integration, and
deployment -- or any situation where you want to make sure you're doing a clean
install of your dependencies. It can be significantly faster than a regular npm
install by skipping certain user-oriented features. It is also more strict than
a regular install, which can help catch errors or inconsistencies caused by the
incrementally-installed local environments of most npm users.
In short, the main differences between using npm install and npm ci are:
package-lock.json or npm-shrinkwrap.json.package.json, npm ci will exit with an error, instead of updating the package lock.npm ci can only install entire projects at a time: individual dependencies cannot be added with this command.node_modules is already present, it will be automatically removed before npm ci begins its install.package.json or any of the package-locks: installs are essentially frozen.Last modified February 13, 2023 Found a typo? Send a pull request!
source <(npm completion)
Enables tab-completion in all npm commands.
The synopsis above loads the completions into your current shell. Adding it to your ~/.bashrc or ~/.zshrc will make the completions available everywhere:
npm completion >> ~/.bashrc
npm completion >> ~/.zshrc
You may of course also pipe the output of npm completion to a file
such as /usr/local/etc/bash_completion.d/npm or
/etc/bash_completion.d/npm if you have a system that will read
that file for you.
When COMP_CWORD, COMP_LINE, and COMP_POINT are defined in the
environment, npm completion acts in "plumbing mode", and outputs
completions based on the arguments.
Last modified February 13, 2023 Found a typo? Send a pull request!
npm config set <key> <value> [-g|--global]
npm config get <key>
npm config delete <key>
npm config list [-l] [--json]
npm config edit
npm get <key>
npm set <key> <value> [-g|--global]

aliases: c
npm gets its config settings from the command line, environment
variables, npmrc files, and in some cases, the package.json file.
See npmrc for more information about the npmrc files.
See npm-config for a more thorough discussion of the mechanisms
involved.
The npm config command can be used to update and edit the contents
of the user and global npmrc files.
Config supports the following sub-commands:
npm config set key value
Sets the config key to the value.
If value is omitted, then it sets it to "true".
npm config get key
Echo the config value to stdout.
npm config list
Show all the config settings. Use -l to also show defaults. Use --json
to show the settings in json format.
npm config delete key
Deletes the key from all configuration files.
npm config edit
Opens the config file in an editor. Use the --global flag to edit the
global config.
Last modified February 13, 2023 Found a typo? Send a pull request!
npm dedupe
npm ddp

aliases: find-dupes, ddp
Searches the local package tree and attempts to simplify the overall structure by moving dependencies further up the tree, where they can be more effectively shared by multiple dependent packages.
For example, consider this dependency graph:
a
+-- b <-- depends on c@1.0.x
|   `-- c@1.0.3
`-- d <-- depends on c@~1.0.9
    `-- c@1.0.10
In this case, npm-dedupe will transform the tree to:
a
+-- b
+-- d
`-- c@1.0.10
Because of the hierarchical nature of node's module lookup, b and d will both get their dependency met by the single c package at the root level of the tree.
The deduplication algorithm walks the tree, moving each dependency as far up in the tree as possible, even if duplicates are not found. This will result in both a flat and deduplicated tree.
If a suitable version exists at the target location in the tree already, then it will be left untouched, but the other duplicates will be deleted.
Arguments are ignored. Dedupe always acts on the entire tree.
Modules
Note that this operation transforms the dependency tree, but will never result in new modules being installed.
Last modified February 13, 2023 Found a typo? Send a pull request!
npm deprecate <pkg>[@<version>] <message>
此命令将更新 npm 注册表中指定包所对应的数据条目, 为尝试安装它的所有人提示版本作废的警告信息。
它适用于 版本范围 以及指定版本,因此你可以执行以下操作:
npm deprecate my-thing@"< 0.2.3" "critical bug fixed in v0.2.3"
请注意,你必须是包的所有者才能作废某些内容。请参阅 owner 和 adduser 帮助主题。
如需取消作废操作,可以为 message 参数指定一个空字符串("")。
注意,必须使用双引号,并且双引号之间不能有空格,这是为了
构造一个空字符串。
Last modified February 13, 2023 Found a typo? Send a pull request!
npm dist-tag add <pkg>@<version> [<tag>]
npm dist-tag rm <pkg> <tag>
npm dist-tag ls [<pkg>]

aliases: dist-tags
Add, remove, and enumerate distribution tags on a package:
add:
Tags the specified version of the package with the specified tag, or the
--tag config if not specified. If you have two-factor authentication on
auth-and-writes then you’ll need to include a one-time password on the
command line with --otp <one-time password>.
rm: Clear a tag that is no longer in use from the package.
ls: Show all of the dist-tags for a package, defaulting to the package in the current prefix.
This is the default action if none is specified.
A tag can be used when installing packages as a reference to a version instead of using a specific version number:
npm install <name>@<tag>
When installing dependencies, a preferred tagged version may be specified:
npm install --tag <tag>
This also applies to npm dedupe.
Publishing a package sets the latest tag to the published version unless the
--tag option is used. For example, npm publish --tag=beta.
By default, npm install <pkg> (without any @<version> or @<tag>
specifier) installs the latest tag.
Tags can be used to provide an alias instead of version numbers.
For example, a project might choose to have multiple streams of development
and use a different tag for each stream,
e.g., stable, beta, dev, canary.
By default, the latest tag is used by npm to identify the current version of
a package, and npm install <pkg> (without any @<version> or @<tag>
specifier) installs the latest tag. Typically, projects only use the latest
tag for stable release versions, and use other tags for unstable versions such
as prereleases.
The next tag is used by some projects to identify the upcoming version.
By default, other than latest, no tag has any special significance to npm
itself.
This command used to be known as npm tag, which only created new tags, and so
had a different syntax.
Tags must share a namespace with version numbers, because they are specified in
the same slot: npm install <pkg>@<version> vs npm install <pkg>@<tag>.
Tags that can be interpreted as valid semver ranges will be rejected. For
example, v1.4 cannot be used as a tag, because it is interpreted by semver as
>=1.4.0 <1.5.0. See https://github.com/npm/npm/issues/6082.
The simplest way to avoid semver problems with tags is to use tags that do not
begin with a number or the letter v.
Last modified February 13, 2023 Found a typo? Send a pull request!
npm docs [<pkgname> [<pkgname> ...]]
npm docs .
npm home [<pkgname> [<pkgname> ...]]
npm home .
This command tries to guess at the likely location of a package's
documentation URL, and then tries to open it using the --browser
config param. You can pass multiple package names at once. If no
package name is provided, it will search for a package.json in
the current folder and use the name property.
"open", Windows: "start", Others: "xdg-open"The browser that is called by the npm docs command to open websites.
The base URL of the npm package registry.
Last modified February 13, 2023 Found a typo? Send a pull request!
npm doctor
npm doctor runs a set of checks to ensure that your npm installation has
what it needs to manage your JavaScript packages. npm is mostly a standalone tool, but it does
have some basic requirements that must be met:
registry.npmjs.com, or another service that uses
the registry API, is available.node_modules (both locally and globally),
exist and can be written by the current user.Without all of these working properly, npm may not work properly. Many issues
are often attributable to things that are outside npm's code base, so npm doctor confirms that the npm installation is in a good state.
Also, in addition to this, there are also very many issue reports due to using
old versions of npm. Since npm is constantly improving, running npm@latest is
better than an old version.
npm doctor verifies the following items in your environment, and if there are
any recommended changes, it will display them.
npm pingBy default, npm installs from the primary npm registry, registry.npmjs.org.
npm doctor hits a special ping endpoint within the registry. This can also be
checked with npm ping. If this check fails, you may be using a proxy that
needs to be configured, or may need to talk to your IT staff to get access over
HTTPS to registry.npmjs.org.
This check is done against whichever registry you've configured (you can see
what that is by running npm config get registry), and if you're using a
private registry that doesn't support the /whoami endpoint supported by the
primary registry, this check may fail.
npm -vWhile Node.js may come bundled with a particular version of npm, it's the
policy of the CLI team that we recommend all users run npm@latest if they
can. As the CLI is maintained by a small team of contributors, there are only
resources for a single line of development, so npm's own long-term support
releases typically only receive critical security and regression fixes. The
team believes that the latest tested version of npm is almost always likely to
be the most functional and defect-free version of npm.
node -vFor most users, in most circumstances, the best version of Node will be the latest long-term support (LTS) release. Those of you who want access to new ECMAscript features or bleeding-edge changes to Node's standard library may be running a newer version, and some of you may be required to run an older version of Node because of enterprise change control policies. That's OK! But in general, the npm team recommends that most users run Node.js LTS.
npm config get registrySome of you may be installing from private package registries for your project
or company. That's great! Others of you may be following tutorials or
StackOverflow questions in an effort to troubleshoot problems you may be
having. Sometimes, this may entail changing the registry you're pointing at.
This part of npm doctor just lets you, and maybe whoever's helping you with
support, know that you're not using the default registry.
which gitWhile it's documented in the README, it may not be obvious that npm needs Git
installed to do many of the things that it does. Also, in some cases
– especially on Windows – you may have Git set up in such a way that it's not
accessible via your PATH so that npm can find it. This check ensures that Git
is available.
node_modules path, if you're running npm doctor with a project
directory, must be readable and writable by the user running npm.When an npm package is published, the publishing process generates a checksum
that npm uses at install time to verify that the package didn't get corrupted
in transit. npm doctor uses these checksums to validate the package tarballs
in your local cache (you can see where that cache is located with npm config get cache, and see what's in that cache with npm cache ls – probably more
than you were expecting!). In the event that there are corrupt packages in your
cache, you should probably run npm cache clean and reset the cache.
Last modified February 13, 2023 Found a typo? Send a pull request!
npm edit <pkg>[/<subpkg>...]
Selects a (sub)dependency in the current
working directory and opens the package folder in the default editor
(or whatever you've configured as the npm editor config -- see
npm-config.)
After it has been edited, the package is rebuilt so as to pick up any changes in compiled packages.
For instance, you can do npm install connect to install connect
into your package, and then npm edit connect to make a few
changes to your locally installed copy.
EDITOR environment variable if set, or "vi" on Posix,
or "notepad" on Windows.The command to run for npm edit or npm config edit.
Last modified February 13, 2023 Found a typo? Send a pull request!
npm explore <pkg> [ -- <command>]
Spawn a subshell in the directory of the installed package specified.
If a command is specified, then it is run in the subshell, which then immediately terminates.
This is particularly handy in the case of git submodules in the
node_modules folder:
npm explore some-dependency -- git pull origin master
Note that the package is not automatically rebuilt afterwards, so be
sure to use npm rebuild <pkg> if you make any changes.
The shell to run for the npm explore command.
Last modified February 13, 2023 Found a typo? Send a pull request!
npm help <term> [<terms..>]
If supplied a topic, then show the appropriate documentation page.
If the topic does not exist, or if multiple terms are provided, then run
the help-search command to find a match. Note that, if help-search
finds a single subject, then it will run help on that topic, so unique
matches are equivalent to specifying a topic name.
The program to use to view help content.
Set to "browser" to view html help content in the default web browser.
Last modified February 13, 2023 Found a typo? Send a pull request!
npm help-search <text>
This command will search the npm markdown documentation files for the terms provided, and then list the results, sorted by relevance.
If only one result is found, then it will show that help topic.
If the argument to npm help is not a known help topic, then it will
call help-search. It is rarely if ever necessary to call this
command directly.
If true, the "long" flag will cause help-search to output context around where the terms were found in the documentation.
If false, then help-search will just list out the help topics found.
Last modified February 13, 2023 Found a typo? Send a pull request!
npm hook ls [pkg]
npm hook add <entity> <url> <secret>
npm hook update <id> <url> [secret]
npm hook rm <id>
Add a hook to watch a package for changes:
$ npm hook add lodash https://example.com/ my-shared-secret
Add a hook to watch packages belonging to the user substack:
$ npm hook add ~substack https://example.com/ my-shared-secret
Add a hook to watch packages in the scope @npm
$ npm hook add @npm https://example.com/ my-shared-secret
List all your active hooks:
$ npm hook ls
List your active hooks for the lodash package:
$ npm hook ls lodash
Update an existing hook's url:
$ npm hook update id-deadbeef https://my-new-website.here/
Remove a hook:
$ npm hook rm id-deadbeef
Allows you to manage npm hooks, including adding, removing, listing, and updating.
Hooks allow you to configure URL endpoints that will be notified whenever a change happens to any of the supported entity types. Three different types of entities can be watched by hooks: packages, owners, and scopes.
To create a package hook, simply reference the package name.
To create an owner hook, prefix the owner name with ~ (as in, ~youruser).
To create a scope hook, prefix the scope name with @ (as in, @yourscope).
The hook id used by update and rm are the IDs listed in npm hook ls for
that particular hook.
The shared secret will be sent along to the URL endpoint so you can verify the request came from your own configured hook.
Last modified February 13, 2023 Found a typo? Send a pull request!
npm init [--force|-f|--yes|-y|--scope]
npm init <@scope> (same as `npx <@scope>/create`)
npm init [<@scope>/]<name> (same as `npx [<@scope>/]create-<name>`)
Create a new React-based project using create-react-app:
$ npm init react-app ./my-react-app
Create a new esm-compatible package using create-esm:
$ mkdir my-esm-lib && cd my-esm-lib
$ npm init esm --yes
Generate a plain old package.json using legacy init:
$ mkdir my-npm-pkg && cd my-npm-pkg
$ git init
$ npm init
Generate it without having it ask any questions:
$ npm init -y
npm init <initializer> can be used to set up a new or existing npm package.
initializer in this case is an npm package named create-<initializer>, which
will be installed by npx, and then have its main bin
executed -- presumably creating or updating package.json and running any other
initialization-related operations.
The init command is transformed to a corresponding npx operation as follows:
npm init foo -> npx create-foonpm init @usr/foo -> npx @usr/create-foonpm init @usr -> npx @usr/createAny additional options will be passed directly to the command, so npm init foo --hello will map to npx create-foo --hello.
If the initializer is omitted (by just calling npm init), init will fall back
to legacy init behavior. It will ask you a bunch of questions, and then write a
package.json for you. It will attempt to make reasonable guesses based on
existing fields, dependencies, and options selected. It is strictly additive, so
it will keep any fields and values that were already set. You can also use
-y/--yes to skip the questionnaire altogether. If you pass --scope, it
will create a scoped package.
Last modified February 13, 2023 Found a typo? Send a pull request!
npm install (with no args, in package dir)
npm install [<@scope>/]<name>
npm install [<@scope>/]<name>@<tag>
npm install [<@scope>/]<name>@<version>
npm install [<@scope>/]<name>@<version range>
npm install <git-host>:<git-user>/<repo-name>
npm install <git repo url>
npm install <tarball file>
npm install <tarball url>
npm install <folder>

alias: npm i
common options: [-P|--save-prod|-D|--save-dev|-O|--save-optional] [-E|--save-exact] [-B|--save-bundle] [--no-save] [--dry-run]
This command installs a package, and any packages that it depends on. If the
package has a package-lock or shrinkwrap file, the installation of dependencies
will be driven by that, with an npm-shrinkwrap.json taking precedence if both
files exist. See package-lock.json and npm-shrinkwrap.
A package is:
package.json file<name>@<version> that is published on the registry (see npm-registry) with (c)<name>@<tag> (see npm-dist-tag) that points to (d)<name> that has a "latest" tag satisfying (e)<git remote url> that resolves to (a)Even if you never publish your package, you can still get a lot of benefits of using npm if you just want to write a node program (a), and perhaps if you also want to be able to easily install it elsewhere after packing it up into a tarball (b).
npm install (in package directory, no arguments):
Install the dependencies in the local node_modules folder.
In global mode (ie, with -g or --global appended to the command),
it installs the current package context (ie, the current working
directory) as a global package.
By default, npm install will install all modules listed as dependencies
in package.json.
With the --production flag (or when the NODE_ENV environment variable
is set to production), npm will not install modules listed in
devDependencies.
NOTE: The
--productionflag has no particular meaning when adding a dependency to a project.
npm install <folder>:
Install the package in the directory as a symlink in the current project.
Its dependencies will be installed before it's linked. If <folder> sits
inside the root of your project, its dependencies may be hoisted to the
toplevel node_modules as they would for other types of dependencies.
npm install <tarball file>:
Install a package that is sitting on the filesystem. Note: if you just want
to link a dev directory into your npm root, you can do this more easily by
using npm link.
Tarball requirements:
.tar, .tar.gz, or .tgz as
the extension.package/). npm strips one directory layer when installing the package (an equivalent of tar x --strip-components=1 is run).package.json file with name and version properties.Example:
npm install ./package.tgz
npm install <tarball url>:
Fetch the tarball url, and then install it. In order to distinguish between this and other options, the argument must start with "http://" or "https://"
Example:
npm install https://github.com/indexzero/forever/tarball/v0.5.6
npm install [<@scope>/]<name>:
Do a <name>@<tag> install, where <tag> is the "tag" config. (See
npm-config. The config's default value is latest.)
In most cases, this will install the version of the modules tagged as
latest on the npm registry.
Example:
npm install sax
npm install saves any specified packages into dependencies by default.
Additionally, you can control where and how they get saved with some
additional flags:
-P, --save-prod: Package will appear in your dependencies. This is the
default unless -D or -O are present.
-D, --save-dev: Package will appear in your devDependencies.
-O, --save-optional: Package will appear in your optionalDependencies.
--no-save: Prevents saving to dependencies.
When using any of the above options to save dependencies to your package.json, there are two additional, optional flags:
-E, --save-exact: Saved dependencies will be configured with an
exact version rather than using npm's default semver range
operator.
-B, --save-bundle: Saved dependencies will also be added to your bundleDependencies list.
Further, if you have an npm-shrinkwrap.json or package-lock.json then it
will be updated as well.
<scope> is optional. The package will be downloaded from the registry
associated with the specified scope. If no registry is associated with
the given scope the default registry is assumed. See npm-scope.
Note: if you do not include the @-symbol on your scope name, npm will interpret this as a GitHub repository instead, see below. Scopes names must also be followed by a slash.
Examples:
    npm install sax
    npm install githubname/reponame
    npm install @myorg/privatepackage
    npm install node-tap --save-dev
    npm install dtrace-provider --save-optional
    npm install readable-stream --save-exact
    npm install ansi-regex --save-bundle
Note: If there is a file or folder named <name> in the current
working directory, then it will try to install that, and only try to
fetch the package by name if it is not valid.
npm install [<@scope>/]<name>@<tag>:
Install the version of the package that is referenced by the specified tag. If the tag does not exist in the registry data for that package, then this will fail.
Example:
    npm install sax@latest
    npm install @myorg/mypackage@latest
npm install [<@scope>/]<name>@<version>:
Install the specified version of the package. This will fail if the version has not been published to the registry.
Example:
    npm install sax@0.1.1
    npm install @myorg/privatepackage@1.5.0
npm install [<@scope>/]<name>@<version range>:
Install a version of the package matching the specified version range. This
will follow the same rules for resolving dependencies described in package.json.
Note that most version ranges must be put in quotes so that your shell will treat it as a single argument.
Example:
    npm install sax@">=0.1.0 <0.2.0"
    npm install @myorg/privatepackage@">=0.1.0 <0.2.0"
npm install <git remote url>:
Installs the package from the hosted git provider, cloning it with git.
For a full git remote url, only that URL will be attempted.
<protocol>://[<user>[:<password>]@]<hostname>[:<port>][:][/]<path>[#<commit-ish> | #semver:<semver>]
<protocol> is one of git, git+ssh, git+http, git+https, or
git+file.
If #<commit-ish> is provided, it will be used to clone exactly that
commit. If the commit-ish has the format #semver:<semver>, <semver> can
be any valid semver range or exact version, and npm will look for any tags
or refs matching that range in the remote repository, much as it would for a
registry dependency. If neither #<commit-ish> or #semver:<semver> is
specified, then the default branch of the repository is used.
If the repository makes use of submodules, those submodules will be cloned as well.
If the package being installed contains a prepare script, its
dependencies and devDependencies will be installed, and the prepare
script will be run, before the package is packaged and installed.
The following git environment variables are recognized by npm and will be added to the environment when running git:
GIT_ASKPASSGIT_EXEC_PATHGIT_PROXY_COMMANDGIT_SSHGIT_SSH_COMMANDGIT_SSL_CAINFOGIT_SSL_NO_VERIFYSee the git man page for details.
Examples:
    npm install git+ssh://git@github.com:npm/cli.git#v1.0.27
    npm install git+ssh://git@github.com:npm/cli#semver:^5.0
    npm install git+https://isaacs@github.com/npm/cli.git
    npm install git://github.com/npm/cli.git#v1.0.27
    GIT_SSH_COMMAND='ssh -i ~/.ssh/custom_ident' npm install git+ssh://git@github.com:npm/cli.git
npm install <githubname>/<githubrepo>[#<commit-ish>]:
npm install github:<githubname>/<githubrepo>[#<commit-ish>]:
Install the package at https://github.com/githubname/githubrepo by
attempting to clone it using git.
If #<commit-ish> is provided, it will be used to clone exactly that
commit. If the commit-ish has the format #semver:<semver>, <semver> can
be any valid semver range or exact version, and npm will look for any tags
or refs matching that range in the remote repository, much as it would for a
registry dependency. If neither #<commit-ish> or #semver:<semver> is
specified, then master is used.
As with regular git dependencies, dependencies and devDependencies will
be installed if the package has a prepare script, before the package is
done installing.
Examples:
    npm install mygithubuser/myproject
    npm install github:mygithubuser/myproject
npm install gist:[<githubname>/]<gistID>[#<commit-ish>|#semver:<semver>]:
Install the package at https://gist.github.com/gistID by attempting to
clone it using git. The GitHub username associated with the gist is
optional and will not be saved in package.json.
As with regular git dependencies, dependencies and devDependencies will
be installed if the package has a prepare script, before the package is
done installing.
Example:
npm install gist:101a11beef
npm install bitbucket:<bitbucketname>/<bitbucketrepo>[#<commit-ish>]:
Install the package at https://bitbucket.org/bitbucketname/bitbucketrepo
by attempting to clone it using git.
If #<commit-ish> is provided, it will be used to clone exactly that
commit. If the commit-ish has the format #semver:<semver>, <semver> can
be any valid semver range or exact version, and npm will look for any tags
or refs matching that range in the remote repository, much as it would for a
registry dependency. If neither #<commit-ish> or #semver:<semver> is
specified, then master is used.
As with regular git dependencies, dependencies and devDependencies will
be installed if the package has a prepare script, before the package is
done installing.
Example:
npm install bitbucket:mybitbucketuser/myproject
npm install gitlab:<gitlabname>/<gitlabrepo>[#<commit-ish>]:
Install the package at https://gitlab.com/gitlabname/gitlabrepo
by attempting to clone it using git.
If #<commit-ish> is provided, it will be used to clone exactly that
commit. If the commit-ish has the format #semver:<semver>, <semver> can
be any valid semver range or exact version, and npm will look for any tags
or refs matching that range in the remote repository, much as it would for a
registry dependency. If neither #<commit-ish> or #semver:<semver> is
specified, then master is used.
As with regular git dependencies, dependencies and devDependencies will
be installed if the package has a prepare script, before the package is
done installing.
Example:
    npm install gitlab:mygitlabuser/myproject
    npm install gitlab:myusr/myproj#semver:^5.0
You may combine multiple arguments, and even multiple types of arguments. For example:
npm install sax@">=0.1.0 <0.2.0" bench supervisor
The --tag argument will apply to all of the specified install targets. If a
tag with the given name exists, the tagged version is preferred over newer
versions.
The --dry-run argument will report in the usual way what the install would
have done without actually installing anything.
The --package-lock-only argument will only update the package-lock.json,
instead of checking node_modules and downloading dependencies.
The -f or --force argument will force npm to fetch remote resources even if a
local copy exists on disk.
npm install sax --force
The -g or --global argument will cause npm to install the package globally
rather than locally. See npm-folders.
The --global-style argument will cause npm to install the package into
your local node_modules folder with the same layout it uses with the
global node_modules folder. Only your direct dependencies will show in
node_modules and everything they depend on will be flattened in their
node_modules folders. This obviously will eliminate some deduping.
The --ignore-scripts argument will cause npm to not execute any
scripts defined in the package.json. See npm-scripts.
The --legacy-bundling argument will cause npm to install the package such
that versions of npm prior to 1.4, such as the one included with node 0.8,
can install the package. This eliminates all automatic deduping.
The --link argument will cause npm to link global installs into the
local space in some cases.
The --no-bin-links argument will prevent npm from creating symlinks for
any binaries the package might contain.
The --no-optional argument will prevent optional dependencies from
being installed.
The --no-shrinkwrap argument, which will ignore an available
package lock or shrinkwrap file and use the package.json instead.
The --no-package-lock argument will prevent npm from creating a
package-lock.json file. When running with package-lock's disabled npm
will not automatically prune your node modules when installing.
The --nodedir=/path/to/node/source argument will allow npm to find the
node source code so that npm can compile native modules.
The --only={prod[uction]|dev[elopment]} argument will cause either only
devDependencies or only non-devDependencies to be installed regardless of the NODE_ENV.
The --no-audit argument can be used to disable sending of audit reports to
the configured registries. See npm-audit for details on what is sent.
See npm-config. Many of the configuration params have some
effect on installation, since that's most of what npm does.
To install a package, npm uses the following algorithm:
load the existing node_modules tree from disk
clone the tree
fetch the package.json and assorted metadata and add it to the clone
walk the clone and add any missing dependencies
  dependencies will be added as close to the top as is possible
  without breaking any other modules
compare the original tree with the cloned tree and make a list of
actions to take to convert one to the other
execute all of the actions, deepest first
  kinds of actions are install, update, remove and move
For this package{dep} structure: A{B,C}, B{C}, C{D},
this algorithm produces:
A
+-- B
+-- C
+-- D
That is, the dependency from B to C is satisfied by the fact that A already caused C to be installed at a higher level. D is still installed at the top level because nothing conflicts with it.
For A{B,C}, B{C,D@1}, C{D@2}, this algorithm produces:
A
+-- B
+-- C
   `-- D@2
+-- D@1
Because B's D@1 will be installed in the top level, C now has to install D@2 privately for itself. This algorithm is deterministic, but different trees may be produced if two dependencies are requested for installation in a different order.
See npm-folders for a more detailed description of the specific folder structures that npm creates.
npm will refuse to install any package with an identical name to the
current package. This can be overridden with the --force flag, but in
most cases can simply be addressed by changing the local package name.
There are some very rare and pathological edge-cases where a cycle can cause npm to try to install a never-ending tree of packages. Here is the simplest case:
A -> B -> A' -> B' -> A -> B -> A' -> B' -> A -> ...
where A is some version of a package, and A' is a different version
of the same package. Because B depends on a different version of A
than the one that is already in the tree, it must install a separate
copy. The same is true of A', which must install B'. Because B'
depends on the original version of A, which has been overridden, the
cycle falls into infinite regress.
To avoid this situation, npm flat-out refuses to install any
name@version that is already present anywhere in the tree of package
folder ancestors. A more correct, but more complex, solution would be
to symlink the existing version into the new location. If this ever
affects a real use-case, it will be investigated.
Last modified February 13, 2023 Found a typo? Send a pull request!
npm install-ci-test

alias: npm cit
This command runs an npm ci followed immediately by an npm test.
Last modified February 13, 2023 Found a typo? Send a pull request!
npm install-test (with no args, in package dir)
npm install-test [<@scope>/]<name>
npm install-test [<@scope>/]<name>@<tag>
npm install-test [<@scope>/]<name>@<version>
npm install-test [<@scope>/]<name>@<version range>
npm install-test <tarball file>
npm install-test <tarball url>
npm install-test <folder>

alias: npm it
common options: [--save|--save-dev|--save-optional] [--save-exact] [--dry-run]
此命令首先运行 npm install 命令,紧接着运行 npm test 命令。
它与 npm install 命令所能接受的参数完全相同。
Last modified February 13, 2023 Found a typo? Send a pull request!
npm link (in package dir)
npm link [<@scope>/]<pkg>[@<version>]

alias: npm ln
Package linking is a two-step process.
First, npm link in a package folder will create a symlink in the global folder
{prefix}/lib/node_modules/<package> that links to the package where the npm link command was executed. (see npm-config for the value of prefix). It
will also link any bins in the package to {prefix}/bin/{name}.
Next, in some other location, npm link package-name will create a
symbolic link from globally-installed package-name to node_modules/
of the current folder.
Note that package-name is taken from package.json,
not from directory name.
The package name can be optionally prefixed with a scope. See npm-scope.
The scope must be preceded by an @-symbol and followed by a slash.
When creating tarballs for npm publish, the linked packages are
"snapshotted" to their current state by resolving the symbolic links.
This is handy for installing your own stuff, so that you can work on it and test it iteratively without having to continually rebuild.
For example:
cd ~/projects/node-redis    # go into the package directory
npm link                    # creates global link
cd ~/projects/node-bloggy   # go into some other package directory.
npm link redis              # link-install the package
Now, any changes to ~/projects/node-redis will be reflected in ~/projects/node-bloggy/node_modules/node-redis/. Note that the link should be to the package name, not the directory name for that package.
You may also shortcut the two steps in one. For example, to do the above use-case in a shorter way:
cd ~/projects/node-bloggy  # go into the dir of your main project
npm link ../node-redis     # link the dir of your dependency
The second line is the equivalent of doing:
(cd ../node-redis; npm link)
npm link redis
That is, it first creates a global link, and then links the global
installation target into your project's node_modules folder.
Note that in this case, you are referring to the directory name, node-redis,
rather than the package name redis.
If your linked package is scoped (see npm-scope) your link command must
include that scope, e.g.
npm link @myorg/privatepackage
Last modified February 13, 2023 Found a typo? Send a pull request!
npm logout [--registry=<url>] [--scope=<@scope>]
When logged into a registry that supports token-based authentication, tell the server to end this token's session. This will invalidate the token everywhere you're using it, not just for the current environment.
When logged into a legacy registry that uses username and password authentication, this will clear the credentials in your user configuration. In this case, it will only affect the current environment.
If --scope is provided, this will find the credentials for the registry
connected to that scope, if set.
Default: https://registry.npmjs.org/
The base URL of the npm package registry. If scope is also specified,
it takes precedence.
Default: The scope of your current project, if any, otherwise none.
If specified, you will be logged out of the specified scope. See npm-scope.
npm logout --scope=@myco
Last modified February 13, 2023 Found a typo? Send a pull request!
npm ls [[<@scope>/]<pkg> ...]

aliases: list, la, ll
This command will print to stdout all the versions of packages that are installed, as well as their dependencies, in a tree-structure.
Positional arguments are name@version-range identifiers, which will
limit the results to only the paths to the packages named. Note that
nested packages will also show the paths to the specified packages.
For example, running npm ls promzard in npm's source tree will show:
npm@@VERSION@ /path/to/npm
└─┬ init-package-json@0.0.4
  └── promzard@0.1.5
It will print out extraneous, missing, and invalid packages.
If a project specifies git urls for dependencies these are shown in parentheses after the name@version to make it easier for users to recognize potential forks of a project.
The tree shown is the logical dependency tree, based on package dependencies, not the physical layout of your node_modules folder.
When run as ll or la, it shows extended information by default.
Show information in JSON format.
Show extended information.
Show parseable output instead of tree view.
List packages in the global install prefix instead of in the current project.
Max display depth of the dependency tree.
Display only the dependency tree for packages in dependencies.
Display only the dependency tree for packages in devDependencies.
When "dev" or "development", is an alias to dev.
When "prod" or "production", is an alias to production.
Display only dependencies which are linked
Last modified February 13, 2023 Found a typo? Send a pull request!
npm <command> [args]
@VERSION@
npm is the package manager for the Node JavaScript platform. It puts modules in place so that node can find them, and manages dependency conflicts intelligently.
It is extremely configurable to support a wide variety of use cases. Most commonly, it is used to publish, discover, install, and develop node programs.
Run npm help to get a list of available commands.
npm is configured to use npm, Inc.'s public registry at https://registry.npmjs.org by default. Use of the npm public registry is subject to terms of use available at https://www.npmjs.com/policies/terms.
You can configure npm to use any compatible registry you like, and even run your own registry. Use of someone else's registry may be governed by their terms of use.
You probably got npm because you want to install stuff.
Use npm install blerg to install the latest version of "blerg". Check out
npm-install for more info. It can do a lot of stuff.
Use the npm search command to show everything that's available.
Use npm ls to show everything you've installed.
If a package references to another package with a git URL, npm depends on a preinstalled git.
If one of the packages npm tries to install is a native node module and requires compiling of C++ Code, npm will use node-gyp for that task. For a Unix system, node-gyp needs Python, make and a buildchain like GCC. On Windows, Python and Microsoft Visual Studio C++ are needed. Python 3 is not supported by node-gyp. For more information visit the node-gyp repository and the node-gyp Wiki.
See npm-folders to learn about where npm puts stuff.
In particular, npm has two modes of operation:
prefix/lib/node_modules and bins are installed in prefix/bin../node_modules, and bins are installed to ./node_modules/.bin.Local mode is the default. Use -g or --global on any command to
operate in global mode instead.
If you're using npm to develop and publish your code, check out the following help topics:
package.json.npm link to do this.npm installnpm publish command to upload your code to the registry.npm is extremely configurable. It reads its configuration options from 5 places.
--key val. All keys take a value, even if they
are booleans (the config parser doesn't know what the options are at
the time of parsing). If no value is provided, then the option is set
to boolean true.npm_config_. For example, export npm_config_key=val.userconfig option is set in the cli
or env, then that will be used instead.globalconfig option is set in the cli, env, or user config,
then that file is parsed instead.See npm-config for much much more information.
Patches welcome!
If you would like to contribute, but don't know what to work on, read the contributing guidelines and check the issues list.
When you find issues, please report them:
Be sure to follow the template and bug reporting guidelines. You can also ask for help in the support forum if you're unsure if it's actually a bug or are having trouble coming up with a detailed reproduction to report.
Isaac Z. Schlueter :: isaacs :: @izs :: i@izs.me
Last modified February 13, 2023 Found a typo? Send a pull request!
npm org set <orgname> <username> [developer | admin | owner]
npm org rm <orgname> <username>
npm org ls <orgname> [<username>]
Add a new developer to an org:
$ npm org set my-org @mx-smith
Add a new admin to an org (or change a developer to an admin):
$ npm org set my-org @mx-santos admin
Remove a user from an org:
$ npm org rm my-org mx-santos
List all users in an org:
$ npm org ls my-org
List all users in JSON format:
$ npm org ls my-org --json
See what role a user has in an org:
$ npm org ls my-org @mx-santos
You can use the npm org commands to manage and view users of an organization.
It supports adding and removing users, changing their roles, listing them, and
finding specific ones and their roles.
Last modified February 13, 2023 Found a typo? Send a pull request!
npm outdated [[<@scope>/]<pkg> ...]
This command will check the registry to see if any (or, specific) installed packages are currently outdated.
In the output:
wanted is the maximum version of the package that satisfies the semver
range specified in package.json. If there's no available semver range (i.e.
you're running npm outdated --global, or the package isn't included in
package.json), then wanted shows the currently-installed version.latest is the version of the package tagged as latest in the registry.
Running npm publish with no special configuration will publish the package
with a dist-tag of latest. This may or may not be the maximum version of
the package, or the most-recently published version of the package, depending
on how the package's developer manages the latest dist-tag.location is where in the dependency tree the package is located. Note that
npm outdated defaults to a depth of 0, so unless you override that, you'll
always be seeing only top-level dependencies that are outdated.package type (when using --long / -l) tells you whether this package is
a dependency or a devDependency. Packages not included in package.json
are always marked dependencies.homepage (when using --long / -l) is the homepage value contained in the package's package.json$ npm outdated
Package Current Wanted Latest Location
glob 5.0.15 5.0.15 6.0.1 test-outdated-output
nothingness 0.0.3 git git test-outdated-output
npm 3.5.1 3.5.2 3.5.1 test-outdated-output
local-dev 0.0.3 linked linked test-outdated-output
once 1.3.2 1.3.3 1.3.3 test-outdated-output
With these dependencies:
A few things to note:
glob requires ^5, which prevents npm from installing glob@6, which is
outside the semver range.npm outdated and
npm update have to fetch Git repos to check. This is why currently doing a
reinstall of a Git dependency always forces a new clone and install.npm@3.5.2 is marked as "wanted", but "latest" is npm@3.5.1 because npm
uses dist-tags to manage its latest and next release channels. npm update
will install the newest version, but npm install npm (with no semver range)
will install whatever's tagged as latest.once is just plain out of date. Reinstalling node_modules from scratch or
running npm update will bring it up to spec.Show information in JSON format.
Show extended information.
Show parseable output instead of tree view.
Check packages in the global install prefix instead of in the current project.
Max depth for checking dependency tree.
Last modified February 13, 2023 Found a typo? Send a pull request!
npm owner add <user> [<@scope>/]<pkg>
npm owner rm <user> [<@scope>/]<pkg>
npm owner ls [<@scope>/]<pkg>

aliases: author
Manage ownership of published packages.
Note that there is only one level of access. Either you can modify a package, or you can't. Future versions may contain more fine-grained access levels, but that is not implemented at this time.
If you have two-factor authentication enabled with auth-and-writes then
you'll need to include an otp on the command line when changing ownership
with --otp.
Last modified February 13, 2023 Found a typo? Send a pull request!
npm pack [[<@scope>/]<pkg>...] [--dry-run]
For anything that's installable (that is, a package folder, tarball,
tarball url, name@tag, name@version, name, or scoped name), this
command will fetch it to the cache, and then copy the tarball to the
current working directory as <name>-<version>.tgz, and then write
the filenames out to stdout.
If the same package is specified multiple times, then the file will be overwritten the second time.
If no arguments are supplied, then npm packs the current package folder.
The --dry-run argument will do everything that pack usually does without
actually packing anything. Reports on what would have gone into the tarball.
Last modified February 13, 2023 Found a typo? Send a pull request!
npm ping [--registry <registry>]
Ping 已配置的或给定的 npm 注册表地址并进行身份验证。 如果 ping 执行成功,则会输出类似下面的内容:
Ping success: {*Details about registry*}
否则将输出:
Ping error: {*Detail about error}
Last modified February 13, 2023 Found a typo? Send a pull request!
npm prefix [-g]
打印本地目录前缀。如果没有 -g 参数,它是包含 package.json 文件或 node_modules 目录的最近的父目录。
如果带有 -g 参数,它就是全局目录前缀。更多细节可参考 npm-config 。
Last modified February 13, 2023 Found a typo? Send a pull request!
npm profile get [--json|--parseable] [<property>]
npm profile set [--json|--parseable] <property> <value>
npm profile set password
npm profile enable-2fa [auth-and-writes|auth-only]
npm profile disable-2fa
Change your profile information on the registry. This not be available if you're using a non-npmjs registry.
npm profile get [<property>]:
Display all of the properties of your profile, or one or more specific
properties. It looks like:+-----------------+---------------------------+
| name | example |
+-----------------+---------------------------+
| email | me@example.com (verified) |
+-----------------+---------------------------+
| two factor auth | auth-and-writes |
+-----------------+---------------------------+
| fullname | Example User |
+-----------------+---------------------------+
| homepage | |
+-----------------+---------------------------+
| freenode | |
+-----------------+---------------------------+
| twitter | |
+-----------------+---------------------------+
| github | |
+-----------------+---------------------------+
| created | 2015-02-26T01:38:35.892Z |
+-----------------+---------------------------+
| updated | 2017-10-02T21:29:45.922Z |
+-----------------+---------------------------+
npm profile set <property> <value>:
Set the value of a profile property. You can set the following properties this way:
email, fullname, homepage, freenode, twitter, github
npm profile set password:
Change your password. This is interactive, you'll be prompted for your
current password and a new password. You'll also be prompted for an OTP
if you have two-factor authentication enabled.
npm profile enable-2fa [auth-and-writes|auth-only]:
Enables two-factor authentication. Defaults to auth-and-writes mode. Modes are:
auth-only: Require an OTP when logging in or making changes to your
account's authentication. The OTP will be required on both the website
and the command line.auth-and-writes: Requires an OTP at all the times auth-only does, and also requires one when
publishing a module, setting the latest dist-tag, or changing access
via npm access and npm owner.npm profile disable-2fa:
Disables two-factor authentication.
All of the npm profile subcommands accept --json and --parseable and
will tailor their output based on those. Some of these commands may not be
available on non npmjs.com registries.
Last modified February 13, 2023 Found a typo? Send a pull request!
npm prune [[<@scope>/]<pkg>...] [--production] [--dry-run] [--json]
此命令移除“无关”的包。如果提供了包名,那么只有名称匹配的那个包才会被移除。
无关的包指的是没有在父包的依赖关系列表中列出的包。
如果指定了 --production 参数,或者将 NODE_ENV 环境变量
设置为 production,这个命令将移除
devDependencies 配置信息中列出的包。设置 --no-production
将会取消 NODE_ENV 为 production 的设置。
If the --dry-run flag is used then no changes will actually be made.
If the --json flag is used then the changes npm prune made (or would
have made with --dry-run) are printed as a JSON object.
In normal operation with package-locks enabled, extraneous modules are
pruned automatically when modules are installed and you'll only need
this command with the --production flag.
If you've disabled package-locks then extraneous modules will not be removed
and it's up to you to run npm prune from time-to-time to remove them.
Last modified February 13, 2023 Found a typo? Send a pull request!
npm publish [<tarball>|<folder>] [--tag <tag>] [--access <public|restricted>] [--otp otpcode] [--dry-run]

Publishes '.' if no argument supplied
Sets tag 'latest' if no --tag specified
Publishes a package to the registry so that it can be installed by name. All
files in the package directory are included if no local .gitignore or
.npmignore file exists. If both files exist and a file is ignored by
.gitignore but not by .npmignore then it will be included. See
npm-developers for full details on what's included in the published
package, as well as details on how the package is built.
By default npm will publish to the public registry. This can be overridden by
specifying a different default registry or using a npm-scope in the name
(see package.json).
<folder>:
A folder containing a package.json file
<tarball>:
A url or file path to a gzipped tar archive containing a single folder
with a package.json file inside.
[--tag <tag>]
Registers the published package with the given tag, such that npm install <name>@<tag> will install this version. By default, npm publish updates
and npm install installs the latest tag. See npm-dist-tag for
details about tags.
[--access <public|restricted>]
Tells the registry whether this package should be published as public or
restricted. Only applies to scoped packages, which default to restricted.
If you don't have a paid account, you must publish with --access public
to publish scoped packages.
[--otp <otpcode>]
If you have two-factor authentication enabled in auth-and-writes mode
then you can provide a code from your authenticator with this. If you
don't include this and you're running from a TTY then you'll be prompted.
[--dry-run]
As of npm@6, does everything publish would do except actually publishing
to the registry. Reports the details of what would have been published.
Fails if the package name and version combination already exists in the specified registry.
Once a package is published with a given name and version, that specific name and version combination can never be used again, even if it is removed with npm-unpublish.
As of npm@5, both a sha1sum and an integrity field with a sha512sum of the
tarball will be submitted to the registry during publication. Subsequent
installs will use the strongest supported algorithm to verify downloads.
Similar to --dry-run see npm-pack, which figures out the files to be
included and packs them into a tarball to be uploaded to the registry.
Last modified February 13, 2023 Found a typo? Send a pull request!
npm rebuild [[<@scope>/<name>]...]

alias: npm rb
因为必须使用新的二进制文件重新编译所有 C++ 插件。
Last modified February 13, 2023 Found a typo? Send a pull request!
npm repo [<pkg>]
此命令尝试猜测指定包的源码仓库的 URL ,然后再使用 --browser 配置参数打开它。
如果没有提供包名称,它将在当前文件夹中搜索package.json 文件,
并使用其 name 属性的值。
"open", Windows: "start", Others: "xdg-open"npm repo 命令打开网站页面时所调用的浏览器。
Last modified February 13, 2023 Found a typo? Send a pull request!
npm restart [-- <args>]
This restarts a package.
This runs a package's "stop", "restart", and "start" scripts, and associated pre- and post- scripts, in the order given below:
Note that the "restart" script is run in addition to the "stop" and "start" scripts, not instead of them.
This is the behavior as of npm major version 2. A change in this
behavior will be accompanied by an increase in major version number
Last modified February 13, 2023 Found a typo? Send a pull request!
npm root [-g]
在标准输出上将有效的 node_modules 文件夹打印出来。
Last modified February 13, 2023 Found a typo? Send a pull request!
npm run-script <command> [--silent] [-- <args>...]

alias: npm run
This runs an arbitrary command from a package's "scripts" object. If no
"command" is provided, it will list the available scripts. run[-script] is
used by the test, start, restart, and stop commands, but can be called
directly, as well. When the scripts in the package are printed out, they're
separated into lifecycle (test, start, restart) and directly-run scripts.
As of npm@2.0.0, you can
use custom arguments when executing scripts. The special option -- is used by
getopt to delimit the end of the options. npm will pass
all the arguments after the -- directly to your script:
npm run test -- --grep="pattern"
The arguments will only be passed to the script specified after npm run
and not to any pre or post script.
The env script is a special built-in command that can be used to list
environment variables that will be available to the script at runtime. If an
"env" command is defined in your package, it will take precedence over the
built-in.
In addition to the shell's pre-existing PATH, npm run adds
node_modules/.bin to the PATH provided to scripts. Any binaries provided by
locally-installed dependencies can be used without the node_modules/.bin
prefix. For example, if there is a devDependency on tap in your package,
you should write:
"scripts": {"test": "tap test/\*.js"}
instead of
"scripts": {"test": "node_modules/.bin/tap test/\*.js"}
to run your tests.
The actual shell your script is run within is platform dependent. By default,
on Unix-like systems it is the /bin/sh command, on Windows it is the cmd.exe.
The actual shell referred to by /bin/sh also depends on the system.
As of npm@5.1.0 you can
customize the shell with the script-shell configuration.
Scripts are run from the root of the module, regardless of what your current
working directory is when you call npm run. If you want your script to
use different behavior based on what subdirectory you're in, you can use the
INIT_CWD environment variable, which holds the full path you were in when
you ran npm run.
npm run sets the NODE environment variable to the node executable with
which npm is executed. Also, if the --scripts-prepend-node-path is passed,
the directory within which node resides is added to the
PATH. If --scripts-prepend-node-path=auto is passed (which has been the
default in npm v3), this is only performed when that node executable is
not found in the PATH.
If you try to run a script without having a node_modules directory and it fails,
you will be given a warning to run npm install, just in case you've forgotten.
You can use the --silent flag to prevent showing npm ERR! output on error.
You can use the --if-present flag to avoid exiting with a non-zero exit code
when the script is undefined. This lets you run potentially undefined scripts
without breaking the execution chain.
Last modified February 13, 2023 Found a typo? Send a pull request!
npm search [-l|--long] [--json] [--parseable] [--no-description] [search terms ...]

aliases: s, se, find
Search the registry for packages matching the search terms. npm search
performs a linear, incremental, lexically-ordered search through package
metadata for all files in the registry. If color is enabled, it will further
highlight the matches in the results.
Additionally, using the --searchopts and --searchexclude options paired with
more search terms will respectively include and exclude further patterns. The
main difference between --searchopts and the standard search terms is that the
former does not highlight results in the output and can be used for more
fine-grained filtering. Additionally, both of these can be added to .npmrc for
default search filtering behavior.
Search also allows targeting of maintainers in search results, by prefixing
their npm username with =.
If a term starts with /, then it's interpreted as a regular expression and
supports standard JavaScript RegExp syntax. A trailing / will be ignored in
this case. (Note that many regular expression characters must be escaped or
quoted in most shells.)
Used as --no-description, disables search matching in package descriptions and
suppresses display of that field in results.
Output search results as a JSON array.
Output search results as lines with tab-separated columns.
Display full package descriptions and other long text across multiple lines. When disabled (default) search results are truncated to fit neatly on a single line. Modules with extremely long names will fall on multiple lines.
Space-separated options that are always passed to search.
Space-separated options that limit the results from search.
The age of the cache, in seconds, before another registry request is made.
Search the specified registry for modules. If you have configured npm to point
to a different default registry, such as your internal private module
repository, npm search will default to that registry when searching. Pass a
different registry url such as the default above in order to override this
setting.
Last modified February 13, 2023 Found a typo? Send a pull request!
npm shrinkwrap
此命令将根据 package-lock.json 文件创建一个新的或覆盖已有的 npm-shrinkwrap.json 文件。
此命令创建和更新的文件将优先于任何其他现有或将有的 package-lock.json 文件。
更多关于 npm 依赖包锁定的设计和目的,请参阅 npm-package-locks 。
Last modified February 13, 2023 Found a typo? Send a pull request!
npm star [<pkg>...]
npm unstar [<pkg>...]
为一个包加星标("Starring")意味着你对这个包感兴趣。 这是一种你表达关注的方式。
减星标("Unstarring")与加星标相反。
这是一个布尔类型的操作。重复加或减星标无效。
Last modified February 13, 2023 Found a typo? Send a pull request!
npm stars [<user>]
如果你 strar 了很多不错的包,这个命令可以让你快速找到它们。
此命令也可以查看其他用户 star 过的包。
Last modified February 13, 2023 Found a typo? Send a pull request!
npm start [-- <args>]
在 package.json 文件中定义的 "scripts" 对象中查找 "start" 属性,
如果此属性定义了任何命令则执行之。
如果 "scripts" 对象中没有定义 "start" 属性,
默认执行 node server.js 命令。
自 npm@2.0.0 版本开始,
你可以在执行脚本时使用自定义参数。更多详细信息可以参考 npm-run-script 。
Last modified February 13, 2023 Found a typo? Send a pull request!
npm stop [-- <args>]
如果 package.json 文件中定义了 "stop" 脚本, 则执行。
Last modified February 13, 2023 Found a typo? Send a pull request!
npm team create <scope:team>
npm team destroy <scope:team>

npm team add <scope:team> <user>
npm team rm <scope:team> <user>

npm team ls <scope>|<scope:team>

npm team edit <scope:team>
Used to manage teams in organizations, and change team memberships. Does not handle permissions for packages.
Teams must always be fully qualified with the organization/scope they belong to
when operating on them, separated by a colon (:). That is, if you have a
developers team on a foo organization, you must always refer to that team as
foo:developers in these commands.
create / destroy: Create a new team, or destroy an existing one.
add / rm: Add a user to an existing team, or remove a user from a team they belong to.
ls: If performed on an organization name, will return a list of existing teams under that organization. If performed on a team, it will instead return a list of all users belonging to that particular team.
edit: Edit a current team.
npm team always operates directly on the current registry, configurable from
the command line using --registry=<registry url>.
In order to create teams and manage team membership, you must be a team admin under the given organization. Listing teams and team memberships may be done by any member of the organizations.
Organization creation and management of team admins and organization members is done through the website, not the npm CLI.
To use teams to manage permissions on packages belonging to your organization,
use the npm access command to grant or revoke the appropriate permissions.
Last modified February 13, 2023 Found a typo? Send a pull request!
  npm test [-- <args>]

  aliases: t, tst
如果 package.json 文件中定义了 "test" 脚本,则执行。
Last modified February 13, 2023 Found a typo? Send a pull request!
npm token list [--json|--parseable]
npm token create [--read-only] [--cidr=1.1.1.1/24,2.2.2.2/16]
npm token revoke <id|token>
This lets you list, create and revoke authentication tokens.
npm token list:
Shows a table of all active authentication tokens. You can request this as
JSON with --json or tab-separated values with --parseable.+--------+---------+------------+----------+----------------+
| id | token | created | read-only | CIDR whitelist |
+--------+---------+------------+----------+----------------+
| 7f3134 | 1fa9ba… | 2017-10-02 | yes | |
+--------+---------+------------+----------+----------------+
| c03241 | af7aef… | 2017-10-02 | no | 192.168.0.1/24 |
+--------+---------+------------+----------+----------------+
| e0cf92 | 3a436a… | 2017-10-02 | no | |
+--------+---------+------------+----------+----------------+
| 63eb9d | 74ef35… | 2017-09-28 | no | |
+--------+---------+------------+----------+----------------+
| 2daaa8 | cbad5f… | 2017-09-26 | no | |
+--------+---------+------------+----------+----------------+
| 68c2fe | 127e51… | 2017-09-23 | no | |
+--------+---------+------------+----------+----------------+
| 6334e1 | 1dadd1… | 2017-09-23 | no | |
+--------+---------+------------+----------+----------------+
npm token create [--read-only] [--cidr=<cidr-ranges>]:
Create a new authentication token. It can be --read-only or accept a list of
CIDR ranges to
limit use of this token to. This will prompt you for your password, and, if you have
two-factor authentication enabled, an otp.+----------------+--------------------------------------+
| token | a73c9572-f1b9-8983-983d-ba3ac3cc913d |
+----------------+--------------------------------------+
| cidr_whitelist | |
+----------------+--------------------------------------+
| readonly | false |
+----------------+--------------------------------------+
| created | 2017-10-02T07:52:24.838Z |
+----------------+--------------------------------------+
npm token revoke <token|id>:
This removes an authentication token, making it immediately unusable. This can accept
both complete tokens (as you get back from npm token create and will
find in your .npmrc) and ids as seen in the npm token list output.
This will NOT accept the truncated token found in npm token list output.Last modified February 13, 2023 Found a typo? Send a pull request!
npm uninstall [<@scope>/]<pkg>[@<version>]... [-S|--save|-D|--save-dev|-O|--save-optional|--no-save]

aliases: remove, rm, r, un, unlink
This uninstalls a package, completely removing everything npm installed on its behalf.
Example:
npm uninstall sax
In global mode (ie, with -g or --global appended to the command),
it uninstalls the current package context as a global package.
npm uninstall takes 3 exclusive, optional flags which save or update
the package version in your main package.json:
-S, --save: Package will be removed from your dependencies.
-D, --save-dev: Package will be removed from your devDependencies.
-O, --save-optional: Package will be removed from your optionalDependencies.
--no-save: Package will not be removed from your package.json file.
Further, if you have an npm-shrinkwrap.json then it will be updated as
well.
Scope is optional and follows the usual rules for npm-scope.
Examples:
npm uninstall sax --save
npm uninstall @myorg/privatepackage --save
npm uninstall node-tap --save-dev
npm uninstall dtrace-provider --save-optional
npm uninstall lodash --no-save
Last modified February 13, 2023 Found a typo? Send a pull request!
npm unpublish [<@scope>/]<pkg>[@<version>]
It is generally considered bad behavior to remove versions of a library that others are depending on!
Consider using the deprecate command
instead, if your intent is to encourage users to upgrade.
There is plenty of room on the registry.
This removes a package version from the registry, deleting its entry and removing the tarball.
If no version is specified, or if all versions are removed then the root package entry is removed from the registry entirely.
Even if a package version is unpublished, that specific name and version combination can never be reused. In order to publish the package again, a new version number must be used. Additionally, new versions of packages with every version unpublished may not be republished until 24 hours have passed.
With the default registry (registry.npmjs.org), unpublish is
only allowed with versions published in the last 72 hours. If you
are trying to unpublish a version published longer ago than that,
contact support@npmjs.com.
The scope is optional and follows the usual rules for npm-scope.
Last modified February 13, 2023 Found a typo? Send a pull request!
npm update [-g] [<pkg>...]

aliases: up, upgrade
This command will update all the packages listed to the latest version
(specified by the tag config), respecting semver.
It will also install missing packages. As with all commands that install
packages, the --dev flag will cause devDependencies to be processed
as well.
If the -g flag is specified, this command will update globally installed
packages.
If no package name is specified, all packages in the specified location (global or local) will be updated.
As of npm@2.6.1, the npm update will only inspect top-level packages.
Prior versions of npm would also recursively inspect all dependencies.
To get the old behavior, use npm --depth 9999 update.
As of npm@5.0.0, the npm update will change package.json to save the
new version as the minimum required dependency. To get the old behavior,
use npm update --no-save.
IMPORTANT VERSION NOTE: these examples assume npm@2.6.1 or later. For
older versions of npm, you must specify --depth 0 to get the behavior
described below.
For the examples below, assume that the current package is app and it depends
on dependencies, dep1 (dep2, .. etc.). The published versions of dep1 are:
{
  "dist-tags": { "latest": "1.2.2" },
  "versions": [
    "1.2.2",
    "1.2.1",
    "1.2.0",
    "1.1.2",
    "1.1.1",
    "1.0.0",
    "0.4.1",
    "0.4.0",
    "0.2.0"
  ]
}
If app's package.json contains:
"dependencies": {
  "dep1": "^1.1.1"
}
Then npm update will install dep1@1.2.2, because 1.2.2 is latest and
1.2.2 satisfies ^1.1.1.
However, if app's package.json contains:
"dependencies": {
  "dep1": "~1.1.1"
}
In this case, running npm update will install dep1@1.1.2. Even though the latest
tag points to 1.2.2, this version does not satisfy ~1.1.1, which is equivalent
to >=1.1.1 <1.2.0. So the highest-sorting version that satisfies ~1.1.1 is used,
which is 1.1.2.
Suppose app has a caret dependency on a version below 1.0.0, for example:
"dependencies": {
  "dep1": "^0.2.0"
}
npm update will install dep1@0.2.0, because there are no other
versions which satisfy ^0.2.0.
If the dependence were on ^0.4.0:
"dependencies": {
  "dep1": "^0.4.0"
}
Then npm update will install dep1@0.4.1, because that is the highest-sorting
version that satisfies ^0.4.0 (>= 0.4.0 <0.5.0)
npm update -g will apply the update action to each globally installed
package that is outdated -- that is, has a version that is different from
latest.
NOTE: If a package has been upgraded to a version newer than latest, it will
be downgraded.
Last modified February 13, 2023 Found a typo? Send a pull request!
npm version [<newversion> | major | minor | patch | premajor | preminor | prepatch | prerelease [--preid=<prerelease-id>] | from-git]

'npm [-v | --version]' to print npm version
'npm view <pkg> version' to view a package's published version
'npm ls' to inspect current package/dependency versions
Run this in a package directory to bump the version and write the new
data back to package.json, package-lock.json, and, if present, npm-shrinkwrap.json.
The newversion argument should be a valid semver string, a
valid second argument to semver.inc (one of patch, minor, major,
prepatch, preminor, premajor, prerelease), or from-git. In the second case,
the existing version will be incremented by 1 in the specified field.
from-git will try to read the latest git tag, and use that as the new npm version.
If run in a git repo, it will also create a version commit and tag.
This behavior is controlled by git-tag-version (see below), and can
be disabled on the command line by running npm --no-git-tag-version version.
It will fail if the working directory is not clean, unless the -f or
--force flag is set.
If supplied with -m or --message config option, npm will
use it as a commit message when creating a version commit. If the
message config contains %s then that will be replaced with the
resulting version number. For example:
npm version patch -m "Upgrade to %s for reasons"
If the sign-git-tag config is set, then the tag will be signed using
the -s flag to git. Note that you must have a default GPG key set up
in your git config for this to work properly. For example:
$ npm config set sign-git-tag true
$ npm version patch

You need a passphrase to unlock the secret key for
user: "isaacs (http://blog.izs.me/) <i@izs.me>"
2048-bit RSA key, ID 6C481CF6, created 2010-08-31

Enter passphrase:
If preversion, version, or postversion are in the scripts property of
the package.json, they will be executed as part of running npm version.
The exact order of execution is as follows:
--force flag is set.preversion script. These scripts have access to the old version in package.json.
A typical use would be running your full test suite before deploying.
Any files you want added to the commit should be explicitly added using git add.version in package.json as requested (patch, minor, major, etc).version script. These scripts have access to the new version in package.json
(so they can incorporate it into file headers in generated files for example).
Again, scripts should explicitly add generated files to the commit using git add.postversion script. Use it to clean up the file system or automatically push
the commit and/or tag.Take the following example:
"scripts": {
  "preversion": "npm test",
  "version": "npm run build && git add -A dist",
  "postversion": "git push && git push --tags && rm -rf build/temp"
}
This runs all your tests, and proceeds only if they pass. Then runs your build script, and
adds everything in the dist directory to the commit. After the commit, it pushes the new commit
and tag up to the server, and deletes the build/temp directory.
Prevents throwing an error when npm version is used to set the new version
to the same value as the current version.
Commit and tag the version change.
Run git commit hooks when committing the version change.
Pass the -s flag to git to sign the tag.
Note that you must have a default GPG key set up in your git config for this to work properly.
Last modified February 13, 2023 Found a typo? Send a pull request!
npm view [<@scope>/]<name>[@<version>] [<field>[.<subfield>]...]

aliases: info, show, v
This command shows data about a package and prints it to the stream
referenced by the outfd config, which defaults to stdout.
To show the package registry entry for the connect package, you can do
this:
npm view connect
The default version is "latest" if unspecified.
Field names can be specified after the package descriptor.
For example, to show the dependencies of the ronn package at version
0.3.5, you could do the following:
npm view ronn@0.3.5 dependencies
You can view child fields by separating them with a period. To view the git repository URL for the latest version of npm, you could do this:
npm view npm repository.url
This makes it easy to view information about a dependency with a bit of shell scripting. For example, to view all the data about the version of opts that ronn depends on, you can do this:
npm view opts@$(npm view ronn dependencies.opts)
For fields that are arrays, requesting a non-numeric field will return all of the values from the objects in the list. For example, to get all the contributor names for the "express" project, you can do this:
npm view express contributors.email
You may also use numeric indices in square braces to specifically select an item in an array field. To just get the email address of the first contributor in the list, you can do this:
npm view express contributors[0].email
Multiple fields may be specified, and will be printed one after another. For example, to get all the contributor names and email addresses, you can do this:
npm view express contributors.name contributors.email
"Person" fields are shown as a string if they would be shown as an
object. So, for example, this will show the list of npm contributors in
the shortened string format. (See package.json for more on this.)
npm view npm contributors
If a version range is provided, then data will be printed for every matching version of the package. This will show which version of jsdom was required by each matching version of yui3:
npm view yui3@'>0.5.4' dependencies.jsdom
To show the connect package version history, you can do
this:
npm view connect versions
If only a single string field for a single version is output, then it will not be colorized or quoted, so as to enable piping the output to another command. If the field is an object, it will be output as a JavaScript object literal.
If the --json flag is given, the outputted fields will be JSON.
If the version range matches multiple versions, than each printed value will be prefixed with the version it applies to.
If multiple fields are requested, than each of them are prefixed with the field name.
Last modified February 13, 2023 Found a typo? Send a pull request!
npm whoami [--registry <registry>]
在标准输出上打印出 username 配置信息。
Last modified February 13, 2023 Found a typo? Send a pull request!
npm's coding style is a bit unconventional. It is not different for difference's sake, but rather a carefully crafted style that is designed to reduce visual clutter and make bugs more apparent.
If you want to contribute to npm (which is very encouraged), you should make your code conform to npm's style.
Note: this concerns npm's code not the specific packages that you can download from the npm registry.
Keep lines shorter than 80 characters. It's better for lines to be too short than to be too long. Break up long lists, objects, and other statements onto multiple lines.
Two-spaces. Tabs are better, but they look like hell in web browsers (and on GitHub), and node uses 2 spaces, so that's that.
Configure your editor appropriately.
Curly braces belong on the same line as the thing that necessitates them.
Bad:
function ()
{
Good:
function () {
If a block needs to wrap to the next line, use a curly brace. Don't use it if it doesn't.
Bad:
if (foo) { bar() }
while (foo)
  bar()
Good:
if (foo) bar()
while (foo) {
  bar()
}
Don't use them except in four situations:
for (;;) loops. They're actually required.while (something) ; (But you'd better have a good
reason for doing that.)case 'foo': doSomething(); break( or [ at the start of the line.
This prevents the expression from being interpreted
as a function call or property access, respectively.Some examples of good semicolon usage:
;(x || y).doSomething()
;[a, b, c].forEach(doSomething)
for (var i = 0; i < 10; i ++) {
  switch (state) {
    case 'begin': start(); continue
    case 'end': finish(); break
    default: throw new Error('unknown state')
  }
  end()
}
Note that starting lines with - and + also should be prefixed
with a semicolon, but this is much less common.
If there is a list of things separated by commas, and it wraps across multiple lines, put the comma at the start of the next line, directly below the token that starts the list. Put the final token in the list on a line by itself. For example:
var magicWords = [ 'abracadabra'
                 , 'gesundheit'
                 , 'ventrilo'
                 ]
  , spells = { 'fireball' : function () { setOnFire() }
             , 'water' : function () { putOut() }
             }
  , a = 1
  , b = 'abc'
  , etc
  , somethingElse
Use single quotes for strings except to avoid escaping.
Bad:
var notOk = "Just double quotes"
Good:
var ok = 'String contains "double" quotes'
var alsoOk = "String contains 'single' quotes or apostrophe"
Put a single space in front of ( for anything other than a function call.
Also use a single space wherever it makes things more readable.
Don't leave trailing whitespace at the end of lines. Don't indent empty lines. Don't use more spaces than are helpful.
Use named functions. They make stack traces a lot easier to read.
Use the asynchronous/non-blocking versions of things as much as possible. It might make more sense for npm to use the synchronous fs APIs, but this way, the fs and http and child process stuff all uses the same callback-passing methodology.
The callback should always be the last argument in the list. Its first argument is the Error or null.
Be very careful never to ever ever throw anything. It's worse than useless. Just send the error message back as the first argument to the callback.
Always create a new Error object with your message. Don't just return a string message to the callback. Stack traces are handy.
Logging is done using the npmlog utility.
Please clean up logs when they are no longer helpful. In particular, logging the same object over and over again is not helpful. Logs should report what's happening so that it's easier to track down where a fault occurs.
Use appropriate log levels. See npm-config and search for
"loglevel".
Use lowerCamelCase for multiword identifiers when they refer to objects,
functions, methods, properties, or anything not specified in this section.
Use UpperCamelCase for class names (things that you'd pass to "new").
Use all-lower-hyphen-css-case for multiword filenames and config keys.
Use named functions. They make stack traces easier to follow.
Use CAPS_SNAKE_CASE for constants, things that should never change
and are rarely used.
Use a single uppercase letter for function names where the function would normally be anonymous, but needs to call itself recursively. It makes it clear that it's a "throwaway" function.
Boolean variables and functions should always be either true or
false. Don't set it to 0 unless it's supposed to be a number.
When something is intentionally missing or removed, set it to null.
Don't set things to undefined. Reserve that value to mean "not yet
set to anything."
Boolean objects are forbidden.
Last modified February 13, 2023 Found a typo? Send a pull request!
npm gets its configuration values from the following sources, sorted by priority:
Putting --foo bar on the command line sets the foo configuration
parameter to "bar". A -- argument tells the cli parser to stop
reading flags. Using --flag without specifying any value will set
the value to true.
Example: --flag1 --flag2 will set both configuration parameters
to true, while --flag1 --flag2 bar will set flag1 to true,
and flag2 to bar. Finally, --flag1 --flag2 -- bar will set
both configuration parameters to true, and the bar is taken
as a command argument.
Any environment variables that start with npm_config_ will be
interpreted as a configuration parameter. For example, putting
npm_config_foo=bar in your environment will set the foo
configuration parameter to bar. Any environment configurations that
are not given a value will be given the value of true. Config
values are case-insensitive, so NPM_CONFIG_FOO=bar will work the
same. However, please note that inside npm-scripts
npm will set its own environment variables and Node will prefer
those lowercase versions over any uppercase ones that you might set.
For details see this issue.
Notice that you need to use underscores instead of dashes, so --allow-same-version
would become npm_config_allow_same_version=true.
The four relevant files are:
/path/to/my/project/.npmrc)$HOME/.npmrc; configurable via CLI
option --userconfig or environment variable $NPM_CONFIG_USERCONFIG)$PREFIX/etc/npmrc; configurable via
CLI option --globalconfig or environment variable $NPM_CONFIG_GLOBALCONFIG)/path/to/npm/npmrc)See npmrc for more details.
Run npm config ls -l to see a set of configuration parameters that are
internal to npm, and are defaults if nothing else is specified.
The following shorthands are parsed on the command-line:
-v: --version-h, -?, --help, -H: --usage-s, --silent: --loglevel silent-q, --quiet: --loglevel warn-d: --loglevel info-dd, --verbose: --loglevel verbose-ddd: --loglevel silly-g: --global-C: --prefix-l: --long-m: --message-p, --porcelain: --parseable-reg: --registry-f: --force-desc: --description-S: --save-P: --save-prod-D: --save-dev-O: --save-optional-B: --save-bundle-E: --save-exact-y: --yes-n: --yes falsell and la commands: ls --longIf the specified configuration param resolves unambiguously to a known configuration parameter, then it is expanded to that configuration parameter. For example:
npm ls --par
# same as:
npm ls --parseable
If multiple single-character shorthands are strung together, and the resulting combination is unambiguously not some other configuration param, then it is expanded to its various component pieces. For example:
npm ls -gpld
# same as:
npm ls --global --parseable --long --loglevel info
When running scripts (see npm-scripts) the package.json "config"
keys are overwritten in the environment if there is a config param of
<name>[@<version>]:<key>. For example, if the package.json has
this:
{ "name" : "foo"
, "config" : { "port" : "8080" }
, "scripts" : { "start" : "node server.js" } }
and the server.js is this:
http.createServer(...).listen(process.env.npm_package_config_port)
then the user could change the behavior by doing:
npm config set foo:port 80
See package.json for more information.
restrictedWhen publishing scoped packages, the access level defaults to restricted. If
you want your scoped package to be publicly viewable (and installable) set
--access=public. The only valid values for access are public and
restricted. Unscoped packages always have an access level of public.
Prevents throwing an error when npm version is used to set the new version
to the same value as the current version.
Force npm to always require authentication when accessing the registry,
even for GET requests.
When "dev" or "development" and running local npm shrinkwrap,
npm outdated, or npm update, is an alias for --dev.
When "true" submit audit reports alongside npm install runs to the default
registry and all registries configured for scopes. See the documentation
for npm-audit for details on what is submitted.
"low"'low', 'moderate', 'high', 'critical'The minimum level of vulnerability for npm audit to exit with
a non-zero exit code.
'legacy''legacy', 'sso', 'saml', 'oauth'What authentication strategy to use with adduser/login.
trueTells npm to create symlinks (or .cmd shims on Windows) for package
executables.
Set to false to have it not do this. This can be used to work around the fact that some file systems don't support symlinks, even on ostensibly Unix systems.
"open", Windows: "start", Others: "xdg-open"The browser that is called by the npm docs command to open websites.
The Certificate Authority signing certificate that is trusted for SSL connections to the registry. Values should be in PEM format (Windows calls it "Base-64 encoded X.509 (.CER)") with newlines replaced by the string "\n". For example:
ca="-----BEGIN CERTIFICATE-----\nXXXX\nXXXX\n-----END CERTIFICATE-----"
Set to null to only allow "known" registrars, or to a specific CA cert
to trust only that specific signing authority.
Multiple CAs can be trusted by specifying an array of certificates:
ca[]="..."
ca[]="..."
See also the strict-ssl config.
nullA path to a file containing one or multiple Certificate Authority signing
certificates. Similar to the ca setting, but allows for multiple CA's, as
well as for the CA information to be stored in a file on disk.
%AppData%\npm-cache, Posix: ~/.npmThe location of npm's cache directory. See npm-cache
The number of ms before cache folder lockfiles are considered stale.
Number of times to retry to acquire a lock on cache folder lockfiles.
Number of ms to wait for cache lock files to expire.
DEPRECATED: This option has been deprecated in favor of --prefer-online.
--cache-max=0 is an alias for --prefer-online.
DEPRECATED: This option has been deprecated in favor of --prefer-offline.
--cache-min=9999 (or bigger) is an alias for --prefer-offline.
nullA client certificate to pass when accessing the registry. Values should be in PEM format (Windows calls it "Base-64 encoded X.509 (.CER)") with newlines replaced by the string "\n". For example:
cert="-----BEGIN CERTIFICATE-----\nXXXX\nXXXX\n-----END CERTIFICATE-----"
It is not the path to a certificate file (and there is no "certfile" option).
nullThis is a list of CIDR address to be used when configuring limited access tokens with the npm token create command.
"always"If false, never shows colors. If "always" then always shows colors.
If true, then only prints color codes for tty file descriptors.
This option can also be changed using the environment: colors are
disabled when the environment variable NO_COLOR is set to any value.
The depth to go when recursing directories for npm ls,
npm cache ls, and npm outdated.
For npm outdated, a setting of Infinity will be treated as 0
since that gives more useful information. To show the outdated status
of all packages and dependents, use a large integer value,
e.g., npm outdated --depth 9999
Show the description in npm search
Install dev-dependencies along with packages.
Indicates that you don't want npm to make any changes and that it should
only report what it would have done. This can be passed into any of the
commands that modify your local installation, eg, install, update,
dedupe, uninstall. This is NOT currently honored by some network related
commands, eg dist-tags, owner, etc.
EDITOR environment variable if set, or "vi" on Posix,
or "notepad" on Windows.The command to run for npm edit or npm config edit.
If set to true, then npm will stubbornly refuse to install (or even consider installing) any package that claims to not be compatible with the current Node.js version.
Makes various commands more forceful.
The "retries" config for the retry module to use when fetching
packages from the registry.
The "factor" config for the retry module to use when fetching
packages.
The "minTimeout" config for the retry module to use when fetching
packages.
The "maxTimeout" config for the retry module to use when fetching
packages.
"git"The command to use for git commands. If git is installed on the
computer, but is not in the PATH, then set this to the full path to
the git binary.
trueTag the commit when using the npm version command.
trueRun git commit hooks when using the npm version command.
Operates in "global" mode, so that packages are installed into the
prefix folder instead of the current working directory. See
npm-folders for more on the differences in behavior.
{prefix}/lib/node_modules folder, instead of the
current working directory.{prefix}/bin{prefix}/share/manThe config file to read for global config options.
Causes npm to install the package into your local node_modules folder with
the same layout it uses with the global node_modules folder. Only your
direct dependencies will show in node_modules and everything they depend
on will be flattened in their node_modules folders. This obviously will
eliminate some deduping. If used with legacy-bundling, legacy-bundling will be
preferred.
The group to use when running package scripts in global mode as the root user.
"npm"The string that starts all the debugging log output.
A proxy to use for outgoing https requests. If the HTTPS_PROXY or
https_proxy or HTTP_PROXY or http_proxy environment variables are set,
proxy settings will be honored by the underlying request library.
If true, npm will not exit with an error code when run-script is invoked for
a script that isn't defined in the scripts section of package.json. This
option can be used when it's desirable to optionally run a script when it's
present and fail if the script fails. This is useful, for example, when running
scripts that may only apply for some builds in an otherwise generic CI setup.
If true, npm will not run prepublish scripts.
If true, npm does not run scripts specified in package.json files.
A module that will be loaded by the npm init command. See the
documentation for the
init-package-json module
for more information, or npm-init.
The value npm init should use by default for the package author's name.
The value npm init should use by default for the package author's email.
The value npm init should use by default for the package author's homepage.
The value npm init should use by default for the package license.
The value that npm init should use by default for the package
version number, if not already set in package.json.
Whether or not to output JSON data, rather than the normal output.
This feature is currently experimental, and the output data structures for many
commands is either not implemented in JSON yet, or subject to change. Only the
output from npm ls --json and npm search --json are currently valid.
nullA client key to pass when accessing the registry. Values should be in PEM format with newlines replaced by the string "\n". For example:
key="-----BEGIN PRIVATE KEY-----\nXXXX\nXXXX\n-----END PRIVATE KEY-----"
It is not the path to a key file (and there is no "keyfile" option).
Causes npm to install the package such that versions of npm prior to 1.4,
such as the one included with node 0.8, can install the package. This
eliminates all automatic deduping. If used with global-style this option
will be preferred.
If true, then local installs will link if there is a suitable globally installed package.
Note that this means that local installs can cause things to be installed into the global space at the same time. The link is only done if one of the two conditions are met:
The IP address of the local interface to use when making connections to the npm registry. Must be IPv4 in versions of Node prior to 0.12.
What level of logs to report. On failure, all logs are written to
npm-debug.log in the current working directory.
Any logs of a higher level than the setting are shown. The default is "notice".
This is the stream that is passed to the npmlog module at run time.
It cannot be set from the command line, but if you are using npm programmatically, you may wish to send logs to somewhere other than stderr.
If the color config is set to true, then this stream will receive
colored output if it is a TTY.
The maximum number of log files to store.
Show extended information in npm ls and npm search.
The maximum number of connections to use per origin (protocol/host/port
combination). Passed to the http Agent used to make the request.
Commit message which is used by npm version when creating version commit.
Any "%s" in the message will be replaced with the version number.
registry (which defaults to "https://registry.npmjs.org/")The registry you want to send cli metrics to if send-metrics is true.
Options to pass through to Node.js via the NODE_OPTIONS environment
variable. This does not impact how npm itself is executed but it does
impact how lifecycle scripts are called.
The node version to use when checking a package's engines map.
A comma-separated string or an array of domain extensions that a proxy should not be used for.
Force offline mode: no network requests will be done during install. To allow
the CLI to fill in missing cache data, see --prefer-offline.
A node module to require() when npm loads. Useful for programmatic
usage.
When "dev" or "development" and running local npm install without any
arguments, only devDependencies (and their dependencies) are installed.
When "dev" or "development" and running local npm ls, npm outdated, or
npm update, is an alias for --dev.
When "prod" or "production" and running local npm install without any
arguments, only non-devDependencies (and their dependencies) are
installed.
When "prod" or "production" and running local npm ls, npm outdated, or
npm update, is an alias for --production.
Attempt to install packages in the optionalDependencies object. Note
that if these packages fail to install, the overall installation
process is not aborted.
This is a one-time password from a two-factor authenticator. It's needed
when publishing or changing package permissions with npm access.
If set to false, then ignore package-lock.json files when installing. This
will also prevent writing package-lock.json if save is true.
When package package-locks are disabled, automatic pruning of extraneous
modules will also be disabled. To remove extraneous modules with
package-locks disabled use npm prune.
This option is an alias for --shrinkwrap.
If set to true, it will update only the package-lock.json,
instead of checking node_modules and downloading dependencies.
Output parseable results from commands that write to
standard output. For npm search, this will be tab-separated table format.
If true, staleness checks for cached data will be bypassed, but missing data
will be requested from the server. To force full offline mode, use --offline.
This option is effectively equivalent to --cache-min=9999999.
If true, staleness checks for cached data will be forced, making the CLI look for updates immediately even for fresh package data.
The location to install global items. If set on the command line, then it forces non-global commands to run in the specified folder.
The "prerelease identifier" to use as a prefix for the "prerelease" part of a
semver. Like the rc in 1.2.0-rc.8.
Set to true to run in "production" mode.
npm install without any arguments.When set to true, npm will display a progress bar during time intensive
operations, if process.stderr is a TTY.
Set to false to suppress the progress bar.
A proxy to use for outgoing http requests. If the HTTP_PROXY or
http_proxy environment variables are set, proxy settings will be
honored by the underlying request library.
This is used to mark a token as unable to publish when configuring limited access tokens with the npm token create command.
Rebuild bundled dependencies after installation.
The base URL of the npm package registry.
Remove failed installs.
Save installed packages to a package.json file as dependencies.
When used with the npm rm command, it removes it from the dependencies
object.
Only works if there is already a package.json file present.
If a package would be saved at install time by the use of --save,
--save-dev, or --save-optional, then also put it in the
bundleDependencies list.
When used with the npm rm command, it removes it from the
bundledDependencies list.
Makes sure that a package will be saved into dependencies specifically. This
is useful if a package already exists in devDependencies or
optionalDependencies, but you want to move it to be a production dep. This is
also the default behavior if --save is true, and neither --save-dev or
--save-optional are true.
Save installed packages to a package.json file as devDependencies.
When used with the npm rm command, it removes it from the
devDependencies object.
Only works if there is already a package.json file present.
Dependencies saved to package.json using --save, --save-dev or
--save-optional will be configured with an exact version rather than
using npm's default semver range operator.
Save installed packages to a package.json file as optionalDependencies.
When used with the npm rm command, it removes it from the
devDependencies object.
Only works if there is already a package.json file present.
Configure how versions of packages installed to a package.json file via
--save or --save-dev get prefixed.
For example if a package has version 1.2.3, by default its version is
set to ^1.2.3 which allows minor upgrades for that package, but after
npm config set save-prefix='~' it would be set to ~1.2.3 which only allows
patch upgrades.
Associate an operation with a scope for a scoped registry. Useful when logging
in to a private registry for the first time:
npm login --scope=@organization --registry=registry.organization.com, which
will cause @organization to be mapped to the registry for future installation
of packages specified according to the pattern @organization/package.
nullThe shell to use for scripts run with the npm run command.
"auto" or "warn-only"If set to true, add the directory in which the current node executable
resides to the PATH environment variable when running scripts,
even if that means that npm will invoke a different node executable than
the one which it is running.
If set to false, never modify PATH with that.
If set to "warn-only", never modify PATH but print a warning if npm thinks
that you may want to run it with true, e.g. because the node executable
in the PATH is not the one npm was invoked with.
If set to auto, only add that directory to the PATH environment variable
if the node executable with which npm was invoked and the one that is found
first on the PATH are different.
Space-separated options that limit the results from search.
Space-separated options that are always passed to search.
Number of items to limit search results to. Will not apply at all to legacy searches.
The age of the cache, in seconds, before another registry request is made if using legacy search endpoint.
If true, success/failure metrics will be reported to the registry stored in
metrics-registry. These requests contain the number of successful and
failing runs of the npm CLI and the time period overwhich those counts were
gathered. No identifying information is included in these requests.
The shell to run for the npm explore command.
If set to false, then ignore npm-shrinkwrap.json files when installing. This
will also prevent writing npm-shrinkwrap.json if save is true.
This option is an alias for --package-lock.
If set to true, then the npm version command will commit the new package
version using -S to add a signature.
Note that git requires you to have set up GPG keys in your git configs for this to work properly.
If set to true, then the npm version command will tag the version
using -s to add a signature.
Note that git requires you to have set up GPG keys in your git configs for this to work properly.
When used with SSO-enabled auth-types, configures how regularly the registry
should be polled while the user is completing authentication.
If --auth-type=sso, the type of SSO type to use.
Whether or not to do SSL key validation when making requests to the registry via https.
See also the ca config.
If you ask npm to install a package and don't tell it a specific version, then it will install the specified tag.
Also the tag that is added to the package@version specified by the npm tag command, if no explicit tag is given.
"v"If set, alters the prefix used when tagging a new version when performing a
version increment using npm-version. To remove the prefix altogether, set it
to the empty string: "".
Because other tools may rely on the convention that npm version tags look like
v1.0.0, only use this property if it is absolutely necessary. In
particular, use care when overriding this setting for public packages.
falseIf true, writes an npm-debug log to _logs and timing information to
_timing.json, both in your cache. _timing.json is a newline delimited
list of JSON objects. You can quickly view it with this
json command line:
json -g < ~/.npm/_timing.json.
Where to store temporary files and folders. All temp files are deleted on success, but left behind on failure for forensic purposes.
When set to true, npm uses unicode characters in the tree output. When false, it uses ascii characters to draw trees.
Set to true to suppress the UID/GID switching when running package scripts. If set explicitly to false, then installing as a non-root user will fail.
Set to false to suppress the update notification when using an older version of npm than the latest.
Set to show short usage output (like the -H output)
instead of complete help when doing npm-help.
The UID to set to when running package scripts as root.
The location of user-level configuration settings.
The "umask" value to use when setting the file creation mode on files and folders.
Folders and executables are given a mode which is 0777 masked against
this value. Other files are given a mode which is 0666 masked against
this value. Thus, the defaults are 0755 and 0644 respectively.
Sets a User-Agent to the request header
If true, output the npm version and exit successfully.
Only relevant when specified explicitly on the command line.
If true, output the npm version as well as node's process.versions map, and
exit successfully.
Only relevant when specified explicitly on the command line.
The program to use to view help content.
Set to "browser" to view html help content in the default web browser.
Last modified February 13, 2023 Found a typo? Send a pull request!
So, you've decided to use npm to develop (and maybe publish/deploy) your project.
Fantastic!
There are a few things that you need to do above the simple steps that your users will do to install your program.
These are man pages. If you install npm, you should be able to
then do man npm-thing to get the documentation on a particular
topic, or npm help thing to see the same information.
packageA package is:
<name>@<version> that is published on the registry with (c)<name>@<tag> that points to (d)<name> that has a "latest" tag satisfying (e)git url that, when cloned, results in (a).Even if you never publish your package, you can still get a lot of benefits of using npm if you just want to write a node program (a), and perhaps if you also want to be able to easily install it elsewhere after packing it up into a tarball (b).
Git urls can be of the form:
git://github.com/user/project.git#commit-ish
git+ssh://user@hostname:project.git#commit-ish
git+http://user@hostname/project/blah.git#commit-ish
git+https://user@hostname/project/blah.git#commit-ish
The commit-ish can be any tag, sha, or branch which can be supplied as
an argument to git checkout. The default is master.
You need to have a package.json file in the root of your project to do
much of anything with npm. That is basically the whole interface.
See package.json for details about what goes in that file. At the very
least, you need:
name: This should be a string that identifies your project. Please do not use the name to specify that it runs on node, or is in JavaScript. You can use the "engines" field to explicitly state the versions of node (or whatever else) that your program requires, and it's pretty well assumed that it's JavaScript.
It does not necessarily need to match your github repository name.
So, node-foo and bar-js are bad names. foo or bar are better.
version: A semver-compatible version.
engines: Specify the versions of node (or whatever else) that your program runs on. The node API changes a lot, and there may be bugs or new functionality that you depend on. Be explicit.
author: Take some credit.
scripts:
If you have a special compilation or installation script, then you
should put it in the scripts object. You should definitely have at
least a basic smoke-test command as the "scripts.test" field.
See npm-scripts.
main: If you have a single module that serves as the entry point to your program (like what the "foo" package gives you at require("foo")), then you need to specify that in the "main" field.
directories: This is an object mapping names to folders. The best ones to include are "lib" and "doc", but if you use "man" to specify a folder full of man pages, they'll get installed just like these ones.
You can use npm init in the root of your package in order to get you
started with a pretty basic package.json file. See npm-init for
more info.
Use a .npmignore file to keep stuff out of your package. If there's
no .npmignore file, but there is a .gitignore file, then npm will
ignore the stuff matched by the .gitignore file. If you want to
include something that is excluded by your .gitignore file, you can
create an empty .npmignore file to override it. Like git, npm looks
for .npmignore and .gitignore files in all subdirectories of your
package, not only the root directory.
.npmignore files follow the same pattern rules
as .gitignore files:
# are ignored./ to specify a directory.!.By default, the following paths and files are ignored, so there's no
need to add them to .npmignore explicitly:
.*.swp._*.DS_Store.git.hg.npmrc.lock-wscript.svn.wafpickle-*config.gypiCVSnpm-debug.logAdditionally, everything in node_modules is ignored, except for
bundled dependencies. npm automatically handles this for you, so don't
bother adding node_modules to .npmignore.
The following paths and files are never ignored, so adding them to
.npmignore is pointless:
package.jsonREADME (and its variants)CHANGELOG (and its variants)LICENSE / LICENCEIf, given the structure of your project, you find .npmignore to be a
maintenance headache, you might instead try populating the files
property of package.json, which is an array of file or directory names
that should be included in your package. Sometimes a whitelist is easier
to manage than a blacklist.
.npmignore or files config worksIf you want to double check that your package will include only the files
you intend it to when published, you can run the npm pack command locally
which will generate a tarball in the working directory, the same way it
does for publishing.
npm link is designed to install a development package and see the
changes in real time without having to keep re-installing it. (You do
need to either re-link or npm rebuild -g to update compiled packages,
of course.)
More info at npm-link.
This is important.
If you can not install it locally, you'll have problems trying to publish it. Or, worse yet, you'll be able to publish it, but you'll be publishing a broken or pointless package. So don't do that.
In the root of your package, do this:
npm install . -g
That'll show you that it's working. If you'd rather just create a symlink package that points to your working directory, then do this:
npm link
Use npm ls -g to see if it's there.
To test a local install, go into some other folder, and then do:
cd ../some-other-folder
npm install ../my-package
to install it locally into the node_modules folder in that other place.
Then go into the node-repl, and try using require("my-thing") to bring in your module's main module.
Create a user with the adduser command. It works like this:
npm adduser
and then follow the prompts.
This is documented better in npm-adduser.
This part's easy. In the root of your folder, do this:
npm publish
You can give publish a url to a tarball, or a filename of a tarball, or a path to a folder.
Note that pretty much everything in that folder will be exposed
by default. So, if you have secret stuff in there, use a
.npmignore file to list out the globs to ignore, or publish
from a fresh checkout.
Send emails, write blogs, blab in IRC.
Tell the world how easy it is to install your program!
Last modified February 13, 2023 Found a typo? Send a pull request!
This document describes the steps that you should take to resolve module name disputes with other npm publishers. It also describes special steps you should take about names you think infringe your trademarks.
This document is a clarification of the acceptable behavior outlined in the npm Code of Conduct, and nothing in this document should be interpreted to contradict any aspect of the npm Code of Conduct.
npm owner ls <pkgname>Don't squat on package names. Publish code or move out of the way.
There sometimes arise cases where a user publishes a module, and then later, some other user wants to use that name. Here are some common ways that happens (each of these is based on actual events.)
Alice writes a JavaScript module foo, which is not node-specific. Alice
doesn't use node at all. Yusuf wants to use foo in node, so he wraps it in
an npm module. Some time later, Alice starts using node, and wants to take
over management of her program.
Yusuf writes an npm module foo, and publishes it. Perhaps much later, Alice
finds a bug in foo, and fixes it. She sends a pull request to Yusuf, but
Yusuf doesn't have the time to deal with it, because he has a new job and a
new baby and is focused on his new Erlang project, and kind of not involved
with node any more. Alice would like to publish a new foo, but can't,
because the name is taken.
Yusuf writes a 10-line flow-control library, and calls it foo, and
publishes it to the npm registry. Being a simple little thing, it never
really has to be updated. Alice works for Foo Inc, the makers of the
critically acclaimed and widely-marketed foo JavaScript toolkit framework.
They publish it to npm as foojs, but people are routinely confused when
npm install foo is some different thing.
Yusuf writes a parser for the widely-known foo file format, because he
needs it for work. Then, he gets a new job, and never updates the prototype.
Later on, Alice writes a much more complete foo parser, but can't publish,
because Yusuf's foo is in the way.
npm owner ls foo. This will tell Alice the email address of the owner
(Yusuf).
Alice emails Yusuf, explaining the situation as respectfully as possible,
and what she would like to do with the module name. She adds the npm support
staff support@npmjs.com to the CC list of the email. Mention in the email
that Yusuf can run npm owner add alice foo to add Alice as an owner of the
foo package.
After a reasonable amount of time, if Yusuf has not responded, or if Yusuf and Alice can't come to any sort of resolution, email support support@npmjs.com and we'll sort it out. ("Reasonable" is usually at least 4 weeks.)
In almost every case so far, the parties involved have been able to reach an amicable resolution without any major intervention. Most people really do want to be reasonable, and are probably not even aware that they're in your way.
Module ecosystems are most vibrant and powerful when they are as self-directed as possible. If an admin one day deletes something you had worked on, then that is going to make most people quite upset, regardless of the justification. When humans solve their problems by talking to other humans with respect, everyone has the chance to end up feeling good about the interaction.
Some things are not allowed, and will be removed without discussion if they are brought to the attention of the npm registry admins, including but not limited to:
If you see bad behavior like this, please report it to abuse@npmjs.com right away. You are never expected to resolve abusive behavior on your own. We are here to help.
If you think another npm publisher is infringing your trademark, such as by using a confusingly similar package name, email abuse@npmjs.com with a link to the package or user account on https://www.npmjs.com/. Attach a copy of your trademark registration certificate.
If we see that the package's publisher is intentionally misleading others by
misusing your registered mark without permission, we will transfer the package
name to you. Otherwise, we will contact the package publisher and ask them to
clear up any confusion with changes to their package's README file or
metadata.
This is a living document and may be updated from time to time. Please refer to the git history for this document to view the changes.
Copyright (C) npm, Inc., All rights reserved
This document may be reused under a Creative Commons Attribution-ShareAlike License.
Last modified February 13, 2023 Found a typo? Send a pull request!
There are three levels of org users:
The super admin is the only person who can add users to the org because it impacts the monthly bill. The super admin will use the website to manage membership. Every org has a developers team that all users are automatically added to.
The team admin is the person who manages team creation, team membership, and package access for teams. The team admin grants package access to teams, not individuals.
The developer will be able to access packages based on the teams they are on. Access is either read-write or read-only.
There are two main commands:
npm team see npm-team for more detailsnpm access see npm-access for more detailsnpm team ls <org>:developers
Each org is automatically given a developers team, so you can see the whole list of team members in your org. This team automatically gets read-write access to all packages, but you can change that with the access command.
Create a new team:
npm team create <org:team>
npm team add <org:team> <user>
npm init --scope=<org>
to scope it for your org & publish as usual
npm access grant <read-only|read-write> <org:team> [<package>]
npm access revoke <org:team> [<package>]
npm access ls-packages <org> <user>
npm access ls-packages <org:team>
npm access ls-collaborators <pkg>
Last modified February 13, 2023 Found a typo? Send a pull request!
To resolve packages by name and version, npm talks to a registry website that implements the CommonJS Package Registry specification for reading package info.
npm is configured to use npm, Inc.'s public registry at https://registry.npmjs.org by default. Use of the npm public registry is subject to terms of use available at https://www.npmjs.com/policies/terms.
You can configure npm to use any compatible registry you like, and even run your own registry. Use of someone else's registry may be governed by their terms of use.
npm's package registry implementation supports several write APIs as well, to allow for publishing packages and managing user account information.
The npm public registry is powered by a CouchDB database, of which there is a public mirror at https://skimdb.npmjs.com/registry. The code for the couchapp is available at https://github.com/npm/npm-registry-couchapp.
The registry URL used is determined by the scope of the package (see
npm-scope). If no scope is specified, the default registry is used, which is
supplied by the registry config parameter. See npm-config,
npmrc, and npm-config for more on managing npm's configuration.
Yes.
When making requests of the registry npm adds two headers with information about your environment:
Npm-Scope – If your project is scoped, this header will contain its
scope. In the future npm hopes to build registry features that use this
information to allow you to customize your experience for your
organization.Npm-In-CI – Set to "true" if npm believes this install is running in a
continuous integration environment, "false" otherwise. This is detected by
looking for the following environment variables: CI, TDDIUM,
JENKINS_URL, bamboo.buildKey. If you'd like to learn more you may find
the original PR
interesting.
This is used to gather better metrics on how npm is used by humans, versus
build farms.The npm registry does not try to correlate the information in these headers with any authenticated accounts that may be used in the same requests.
Yes!
The easiest way is to replicate the couch database, and use the same (or similar) design doc to implement the APIs.
If you set up continuous replication from the official CouchDB, and then set your internal CouchDB as the registry config, then you'll be able to read any published packages, in addition to your private ones, and by default will only publish internally.
If you then want to publish a package for the whole world to see, you can
simply override the --registry option for that publish command.
Set "private": true in your package.json to prevent it from being
published at all, or
"publishConfig":{"registry":"http://my-internal-registry.local"}
to force it to be published only to your internal registry.
See package.json for more info on what goes in the package.json file.
No. If you want things to be public, then publish them into the public registry using npm. What little security there is would be for nought otherwise.
No, but it's way easier. Basically, yes, you do, or you have to effectively implement the entire CouchDB API anyway.
Yes, head over to https://www.npmjs.com/
Last modified February 13, 2023 Found a typo? Send a pull request!
So sad to see you go.
sudo npm uninstall npm -g
Or, if that fails, get the npm source code, and do:
sudo make uninstall
Usually, the above instructions are sufficient. That will remove npm, but leave behind anything you've installed.
If that doesn't work, or if you require more drastic measures, continue reading.
Note that this is only necessary for globally-installed packages. Local
installs are completely contained within a project's node_modules
folder. Delete that folder, and everything is gone (unless a package's
install script is particularly ill-behaved).
This assumes that you installed node and npm in the default place. If
you configured node with a different --prefix, or installed npm with a
different prefix setting, then adjust the paths accordingly, replacing
/usr/local with your install prefix.
To remove everything npm-related manually:
rm -rf /usr/local/{lib/node{,/.npm,_modules},bin,share/man}/npm*
If you installed things with npm, then your best bet is to uninstall them with npm first, and then install them again once you have a proper install. This can help find any symlinks that are lying around:
ls -laF /usr/local/{lib/node{,/.npm},bin,share/man} | grep npm
Prior to version 0.3, npm used shim files for executables and node modules. To track those down, you can do the following:
find /usr/local/{lib/node,bin} -exec grep -l npm \{\} \; ;
(This is also in the README file.)
Last modified February 13, 2023 Found a typo? Send a pull request!
All npm packages have a name. Some package names also have a scope. A scope
follows the usual rules for package names (URL-safe characters, no leading dots
or underscores). When used in package names, scopes are preceded by an @ symbol
and followed by a slash, e.g.
@somescope/somepackagename
Scopes are a way of grouping related packages together, and also affect a few things about the way npm treats the package.
Each npm user/organization has their own scope, and only you can add packages in your scope. This means you don't have to worry about someone taking your package name ahead of you. Thus it is also a good way to signal official packages for organizations.
Scoped packages can be published and installed as of npm@2 and are supported
by the primary npm registry. Unscoped packages can depend on scoped packages and
vice versa. The npm client is backwards-compatible with unscoped registries,
so it can be used to work with scoped and unscoped registries at the same time.
Scoped packages are installed to a sub-folder of the regular installation
folder, e.g. if your other packages are installed in node_modules/packagename,
scoped modules will be installed in node_modules/@myorg/packagename. The scope
folder (@myorg) is simply the name of the scope preceded by an @ symbol, and can
contain any number of scoped packages.
A scoped package is installed by referencing it by name, preceded by an
@ symbol, in npm install:
npm install @myorg/mypackage
Or in package.json:
"dependencies": {
  "@myorg/mypackage": "^1.3.0"
}
Note that if the @ symbol is omitted, in either case, npm will instead attempt to
install from GitHub; see npm-install.
Because scoped packages are installed into a scope folder, you have to include the name of the scope when requiring them in your code, e.g.
require('@myorg/mypackage')
There is nothing special about the way Node treats scope folders. This
simply requires the mypackage module in the folder named @myorg.
Scoped packages can be published from the CLI as of npm@2 and can be
published to any registry that supports them, including the primary npm
registry.
(As of 2015-04-19, and with npm 2.0 or better, the primary npm registry does support scoped packages.)
If you wish, you may associate a scope with a registry; see below.
To publish a public scoped package, you must specify --access public with
the initial publication. This will publish the package and set access
to public as if you had run npm access public after publishing.
To publish a private scoped package to the npm registry, you must have an npm Private Modules account.
You can then publish the module with npm publish or npm publish --access restricted, and it will be present in the npm registry, with
restricted access. You can then change the access permissions, if
desired, with npm access or on the npmjs.com website.
Scopes can be associated with a separate registry. This allows you to seamlessly use a mix of packages from the primary npm registry and one or more private registries, such as npm Enterprise.
You can associate a scope with a registry at login, e.g.
npm login --registry=http://reg.example.com --scope=@myco
Scopes have a many-to-one relationship with registries: one registry can host multiple scopes, but a scope only ever points to one registry.
You can also associate a scope with a registry using npm config:
npm config set @myco:registry http://reg.example.com
Once a scope is associated with a registry, any npm install for a package
with that scope will request packages from that registry instead. Any
npm publish for a package name that contains the scope will be published to
that registry instead.
Last modified February 13, 2023 Found a typo? Send a pull request!
npm supports the "scripts" property of the package.json file, for the following scripts:
npm install without any arguments. (See below)npm install without any arguments, and when installing git dependencies (See
below). This is run AFTER prepublish, but BEFORE prepublishOnly.npm publish. (See
below.)npm pack, npm publish, and when
installing git dependencies)npm test command.npm stop command.npm start command.npm restart command. Note: npm restart will run the
stop and start scripts if no restart script is provided.npm shrinkwrap command.Additionally, arbitrary scripts can be executed by running npm run-script <stage>. Pre and post commands with matching
names will be run for those as well (e.g. premyscript, myscript,
postmyscript). Scripts from dependencies can be run with
npm explore <pkg> -- npm run <stage>.
Since npm@1.1.71, the npm CLI has run the prepublish script for both npm publish and npm install, because it's a convenient way to prepare a package
for use (some common use cases are described in the section below). It has
also turned out to be, in practice, very
confusing. As of npm@4.0.0, a new
event has been introduced, prepare, that preserves this existing behavior. A
new event, prepublishOnly has been added as a transitional strategy to
allow users to avoid the confusing behavior of existing npm versions and only
run on npm publish (for instance, running the tests one last time to ensure
they're in good shape).
See https://github.com/npm/npm/issues/10074 for a much lengthier justification, with further reading, for this change.
If you need to perform operations on your package before it is used, in a way
that is not dependent on the operating system or architecture of the
target system, use a prepublish script. This includes
tasks such as:
The advantage of doing these things at prepublish time is that they can be done once, in a
single place, thus reducing complexity and variability.
Additionally, this means that:
coffee-script as a devDependency, and thus
your users don't need to have it installed.curl or wget or
other system tools on the target machines.npm will default some script values based on package contents.
"start": "node server.js":
If there is a server.js file in the root of your package, then npm
will default the start command to node server.js.
"install": "node-gyp rebuild":
If there is a binding.gyp file in the root of your package and you
haven't defined your own install or preinstall scripts, npm will
default the install command to compile using node-gyp.
If npm was invoked with root privileges, then it will change the uid
to the user account or uid specified by the user config, which
defaults to nobody. Set the unsafe-perm flag to run scripts with
root privileges.
Package scripts run in an environment where many pieces of information are made available regarding the setup of npm and the current state of the process.
If you depend on modules that define executable scripts, like test
suites, then those executables will be added to the PATH for
executing the scripts. So, if your package.json has this:
{ "name" : "foo"
, "dependencies" : { "bar" : "0.1.x" }
, "scripts": { "start" : "bar ./test" } }
then you could run npm start to execute the bar script, which is
exported into the node_modules/.bin directory on npm install.
The package.json fields are tacked onto the npm_package_ prefix. So,
for instance, if you had {"name":"foo", "version":"1.2.5"} in your
package.json file, then your package scripts would have the
npm_package_name environment variable set to "foo", and the
npm_package_version set to "1.2.5". You can access these variables
in your code with process.env.npm_package_name and
process.env.npm_package_version, and so on for other fields.
Configuration parameters are put in the environment with the
npm_config_ prefix. For instance, you can view the effective root
config by checking the npm_config_root environment variable.
The package.json "config" keys are overwritten in the environment if
there is a config param of <name>[@<version>]:<key>. For example,
if the package.json has this:
{ "name" : "foo"
, "config" : { "port" : "8080" }
, "scripts" : { "start" : "node server.js" } }
and the server.js is this:
http.createServer(...).listen(process.env.npm_package_config_port)
then the user could change the behavior by doing:
npm config set foo:port 80
Lastly, the npm_lifecycle_event environment variable is set to
whichever stage of the cycle is being executed. So, you could have a
single script used for different parts of the process which switches
based on what's currently happening.
Objects are flattened following this format, so if you had
{"scripts":{"install":"foo.js"}} in your package.json, then you'd
see this in the script:
process.env.npm_package_scripts_install === "foo.js"
For example, if your package.json contains this:
{ "scripts" :
  { "install" : "scripts/install.js"
  , "postinstall" : "scripts/install.js"
  , "uninstall" : "scripts/uninstall.js"
  }
}
then scripts/install.js will be called for the install
and post-install stages of the lifecycle, and scripts/uninstall.js
will be called when the package is uninstalled. Since
scripts/install.js is running for two different phases, it would
be wise in this case to look at the npm_lifecycle_event environment
variable.
If you want to run a make command, you can do so. This works just fine:
{ "scripts" :
  { "preinstall" : "./configure"
  , "install" : "make && make install"
  , "test" : "make test"
  }
}
Scripts are run by passing the line as a script argument to sh.
If the script exits with a code other than 0, then this will abort the process.
Note that these script files don't have to be nodejs or even javascript programs. They just have to be some kind of executable file.
If you want to run a specific script at a specific lifecycle event for ALL packages, then you can use a hook script.
Place an executable file at node_modules/.hooks/{eventname}, and
it'll get run for all packages when they are going through that point
in the package lifecycle for any packages installed in that root.
Hook scripts are run exactly the same way as package.json scripts. That is, they are in a separate child process, with the env described above.
package.json to see all the things that you can specify and enable
by simply describing your package appropriately. In general, this
will lead to a more robust and consistent state.npm_config_binroot environment variable is set to /home/user/bin, then
don't try to install executables into /usr/local/bin. The user
probably set it up that way for a reason.install. Use a .gyp file for compilation, and prepublish
for anything else. You should almost never have to explicitly set a
preinstall or install script. If you are doing this, please consider if
there is another option. The only valid use of install or preinstall
scripts is for compilation which must be done on the target architecture.Last modified February 13, 2023 Found a typo? Send a pull request!
npm install --save semverAs a node module:
const semver = semver // '1.2.3'semver // nullsemver // '1.2.3'semver // truesemver // falsesemver // truesemver // '2.0.0'semver // '42.6.7'As a command-line utility:
$ semver -h

A JavaScript implementation of the http://semver.org/ specification
Copyright Isaac Z. Schlueter

Usage: semver [options] <version> [<version> [...]]
Prints valid versions sorted by SemVer precedence

Options:
-r --range <range>
        Print versions that match the specified range.

-i --increment [<level>]
        Increment a version by the specified level.  Level can
        be one of: major, minor, patch, premajor, preminor,
        prepatch, or prerelease.  Default level is 'patch'.
        Only one version may be specified.

--preid <identifier>
        Identifier to be used to prefix premajor, preminor,
        prepatch or prerelease version increments.

-l --loose
        Interpret versions and ranges loosely

-p --include-prerelease
        Always include prerelease versions in range matching

-c --coerce
        Coerce a string into SemVer if possible
        (does not imply --loose)

Program exits successfully if any valid version satisfies
all supplied ranges, and prints all satisfying versions.

If no satisfying versions are found, then exits failure.

Versions are printed in ascending order, so supplying
multiple versions to the utility will just sort them.
A "version" is described by the v2.0.0 specification found at
http://semver.org/.
A leading "=" or "v" character is stripped off and ignored.
A version range is a set of comparators which specify versions
that satisfy the range.
A comparator is composed of an operator and a version. The set
of primitive operators is:
< Less than<= Less than or equal to> Greater than>= Greater than or equal to= Equal. If no operator is specified, then equality is assumed,
so this operator is optional, but MAY be included.For example, the comparator >=1.2.7 would match the versions
1.2.7, 1.2.8, 2.5.3, and 1.3.9, but not the versions 1.2.6
or 1.1.0.
Comparators can be joined by whitespace to form a comparator set,
which is satisfied by the intersection of all of the comparators
it includes.
A range is composed of one or more comparator sets, joined by ||. A
version matches a range if and only if every comparator in at least
one of the ||-separated comparator sets is satisfied by the version.
For example, the range >=1.2.7 <1.3.0 would match the versions
1.2.7, 1.2.8, and 1.2.99, but not the versions 1.2.6, 1.3.0,
or 1.1.0.
The range 1.2.7 || >=1.2.9 <2.0.0 would match the versions 1.2.7,
1.2.9, and 1.4.6, but not the versions 1.2.8 or 2.0.0.
If a version has a prerelease tag (for example, 1.2.3-alpha.3) then
it will only be allowed to satisfy comparator sets if at least one
comparator with the same [major, minor, patch] tuple also has a
prerelease tag.
For example, the range >1.2.3-alpha.3 would be allowed to match the
version 1.2.3-alpha.7, but it would not be satisfied by
3.4.5-alpha.9, even though 3.4.5-alpha.9 is technically "greater
than" 1.2.3-alpha.3 according to the SemVer sort rules. The version
range only accepts prerelease tags on the 1.2.3 version. The
version 3.4.5 would satisfy the range, because it does not have a
prerelease flag, and 3.4.5 is greater than 1.2.3-alpha.7.
The purpose for this behavior is twofold. First, prerelease versions frequently are updated very quickly, and contain many breaking changes that are (by the author's design) not yet fit for public consumption. Therefore, by default, they are excluded from range matching semantics.
Second, a user who has opted into using a prerelease version has clearly indicated the intent to use that specific set of alpha/beta/rc versions. By including a prerelease tag in the range, the user is indicating that they are aware of the risk. However, it is still not appropriate to assume that they have opted into taking a similar risk on the next set of prerelease versions.
The method .inc takes an additional identifier string argument that
will append the value of the string as a prerelease identifier:
semver// '1.2.4-beta.0'command-line example:
$ semver 1.2.3 -i prerelease --preid beta1.2.4-beta.0Which then can be used to increment further:
$ semver 1.2.4-beta.0 -i prerelease1.2.4-beta.1Advanced range syntax desugars to primitive comparators in deterministic ways.
Advanced ranges may be combined in the same way as primitive
comparators using white space or ||.
X.Y.Z - A.B.CSpecifies an inclusive set.
1.2.3 - 2.3.4 := >=1.2.3 <=2.3.4If a partial version is provided as the first version in the inclusive range, then the missing pieces are replaced with zeroes.
1.2 - 2.3.4 := >=1.2.0 <=2.3.4If a partial version is provided as the second version in the inclusive range, then all versions that start with the supplied parts of the tuple are accepted, but nothing that would be greater than the provided tuple parts.
1.2.3 - 2.3 := >=1.2.3 <2.4.01.2.3 - 2 := >=1.2.3 <3.0.01.2.x 1.X 1.2.* *Any of X, x, or * may be used to "stand in" for one of the
numeric values in the [major, minor, patch] tuple.
* := >=0.0.0 (Any version satisfies)1.x := >=1.0.0 <2.0.0 (Matching major version)1.2.x := >=1.2.0 <1.3.0 (Matching major and minor versions)A partial version range is treated as an X-Range, so the special character is in fact optional.
"" (empty string) := * := >=0.0.01 := 1.x.x := >=1.0.0 <2.0.01.2 := 1.2.x := >=1.2.0 <1.3.0~1.2.3 ~1.2 ~1Allows patch-level changes if a minor version is specified on the comparator. Allows minor-level changes if not.
~1.2.3 := >=1.2.3 <1.(2+1).0 := >=1.2.3 <1.3.0~1.2 := >=1.2.0 <1.(2+1).0 := >=1.2.0 <1.3.0 (Same as 1.2.x)~1 := >=1.0.0 <(1+1).0.0 := >=1.0.0 <2.0.0 (Same as 1.x)~0.2.3 := >=0.2.3 <0.(2+1).0 := >=0.2.3 <0.3.0~0.2 := >=0.2.0 <0.(2+1).0 := >=0.2.0 <0.3.0 (Same as 0.2.x)~0 := >=0.0.0 <(0+1).0.0 := >=0.0.0 <1.0.0 (Same as 0.x)~1.2.3-beta.2 := >=1.2.3-beta.2 <1.3.0 Note that prereleases in
the 1.2.3 version will be allowed, if they are greater than or
equal to beta.2. So, 1.2.3-beta.4 would be allowed, but
1.2.4-beta.2 would not, because it is a prerelease of a
different [major, minor, patch] tuple.^1.2.3 ^0.2.5 ^0.0.4Allows changes that do not modify the left-most non-zero digit in the
[major, minor, patch] tuple. In other words, this allows patch and
minor updates for versions 1.0.0 and above, patch updates for
versions 0.X >=0.1.0, and no updates for versions 0.0.X.
Many authors treat a 0.x version as if the x were the major
"breaking-change" indicator.
Caret ranges are ideal when an author may make breaking changes
between 0.2.4 and 0.3.0 releases, which is a common practice.
However, it presumes that there will not be breaking changes between
0.2.4 and 0.2.5. It allows for changes that are presumed to be
additive (but non-breaking), according to commonly observed practices.
^1.2.3 := >=1.2.3 <2.0.0^0.2.3 := >=0.2.3 <0.3.0^0.0.3 := >=0.0.3 <0.0.4^1.2.3-beta.2 := >=1.2.3-beta.2 <2.0.0 Note that prereleases in
the 1.2.3 version will be allowed, if they are greater than or
equal to beta.2. So, 1.2.3-beta.4 would be allowed, but
1.2.4-beta.2 would not, because it is a prerelease of a
different [major, minor, patch] tuple.^0.0.3-beta := >=0.0.3-beta <0.0.4 Note that prereleases in the
0.0.3 version only will be allowed, if they are greater than or
equal to beta. So, 0.0.3-pr.2 would be allowed.When parsing caret ranges, a missing patch value desugars to the
number 0, but will allow flexibility within that value, even if the
major and minor versions are both 0.
^1.2.x := >=1.2.0 <2.0.0^0.0.x := >=0.0.0 <0.1.0^0.0 := >=0.0.0 <0.1.0A missing minor and patch values will desugar to zero, but also
allow flexibility within those values, even if the major version is
zero.
^1.x := >=1.0.0 <2.0.0^0.x := >=0.0.0 <1.0.0Putting all this together, here is a Backus-Naur grammar for ranges, for the benefit of parser authors:
range-set ::= range ( logical-or range ) *logical-or ::= ( ' ' ) * '||' ( ' ' ) *range ::= hyphen | simple ( ' ' simple ) * | ''hyphen ::= partial ' - ' partialsimple ::= primitive | partial | tilde | caretprimitive ::= ( '<' | '>' | '>=' | '<=' | '=' ) partialpartial ::= xr ( '.' xr ( '.' xr qualifier ? )? )?xr ::= 'x' | 'X' | '*' | nrnr ::= '0' | ['1'-'9'] ( ['0'-'9'] ) *tilde ::= '~' partialcaret ::= '^' partialqualifier ::= ( '-' pre )? ( '+' build )?pre ::= partsbuild ::= partsparts ::= part ( '.' part ) *part ::= nr | [-0-9A-Za-z]+All methods and classes take a final options object argument. All
options in this object are false by default. The options supported
are:
loose Be more forgiving about not-quite-valid semver strings.
(Any resulting output will always be 100% strict compliant, of
course.) For backwards compatibility reasons, if the options
argument is a boolean value instead of an object, it is interpreted
to be the loose param.includePrerelease Set to suppress the default
behavior of
excluding prerelease tagged versions from ranges unless they are
explicitly opted into.Strict-mode Comparators and Ranges will be strict about the SemVer strings that they parse.
valid(v): Return the parsed version, or null if it's not valid.inc(v, release): Return the version incremented by the release
type (major, premajor, minor, preminor, patch,
prepatch, or prerelease), or null if it's not valid
premajor in one call will bump the version up to the next major
version and down to a prerelease of that major version.
preminor, and prepatch work the same way.prerelease will work the
same as prepatch. It increments the patch version, then makes a
prerelease. If the input version is already a prerelease it simply
increments it.prerelease(v): Returns an array of prerelease components, or null
if none exist. Example: prerelease('1.2.3-alpha.1') -> ['alpha', 1]major(v): Return the major version number.minor(v): Return the minor version number.patch(v): Return the patch version number.intersects(r1, r2, loose): Return true if the two supplied ranges
or comparators intersect.gt(v1, v2): v1 > v2gte(v1, v2): v1 >= v2lt(v1, v2): v1 < v2lte(v1, v2): v1 <= v2eq(v1, v2): v1 == v2 This is true if they're logically equivalent,
even if they're not the exact same string. You already know how to
compare strings.neq(v1, v2): v1 != v2 The opposite of eq.cmp(v1, comparator, v2): Pass in a comparison string, and it'll call
the corresponding function above. "===" and "!==" do simple
string comparison, but are included for completeness. Throws if an
invalid comparison string is provided.compare(v1, v2): Return 0 if v1 == v2, or 1 if v1 is greater, or -1 if
v2 is greater. Sorts in ascending order if passed to Array.sort().rcompare(v1, v2): The reverse of compare. Sorts an array of versions
in descending order when passed to Array.sort().diff(v1, v2): Returns difference between two versions by the release type
(major, premajor, minor, preminor, patch, prepatch, or prerelease),
or null if the versions are the same.intersects(comparator): Return true if the comparators intersectvalidRange(range): Return the valid range or null if it's not validsatisfies(version, range): Return true if the version satisfies the
range.maxSatisfying(versions, range): Return the highest version in the list
that satisfies the range, or null if none of them do.minSatisfying(versions, range): Return the lowest version in the list
that satisfies the range, or null if none of them do.gtr(version, range): Return true if version is greater than all the
versions possible in the range.ltr(version, range): Return true if version is less than all the
versions possible in the range.outside(version, range, hilo): Return true if the version is outside
the bounds of the range in either the high or low direction. The
hilo argument must be either the string '>' or '<'. (This is
the function called by gtr and ltr.)intersects(range): Return true if any of the ranges comparators intersectNote that, since ranges may be non-contiguous, a version might not be
greater than a range, less than a range, or satisfy a range! For
example, the range 1.2 <1.2.9 || >2.0.0 would have a hole from 1.2.9
until 2.0.0, so the version 1.2.10 would not be greater than the
range (because 2.0.1 satisfies, which is higher), nor less than the
range (since 1.2.8 satisfies, which is lower), and it also does not
satisfy the range.
If you want to know if a version satisfies or does not satisfy a
range, use the satisfies(version, range) function.
coerce(version): Coerces a string to semver if possibleThis aims to provide a very forgiving translation of a non-semver
string to semver. It looks for the first digit in a string, and
consumes all remaining characters which satisfy at least a partial semver
(e.g., 1, 1.2, 1.2.3) up to the max permitted length (256 characters).
Longer versions are simply truncated (4.6.3.9.2-alpha2 becomes 4.6.3).
All surrounding text is simply ignored (v3.4 replaces v3.3.1 becomes 3.4.0).
Only text which lacks digits will fail coercion (version one is not valid).
The maximum length for any semver component considered for coercion is 16 characters;
longer components will be ignored (10000000000000000.4.7.4 becomes 4.7.4).
The maximum value for any semver component is Integer.MAX_SAFE_INTEGER || (2**53 - 1);
higher value components are invalid (9999999999999999.4.7.4 is likely invalid).
Last modified February 13, 2023 Found a typo? Send a pull request!
npm puts various things on your computer. That's its job.
This document will tell you what it puts where.
./node_modules of the current
package root.-g): puts stuff in /usr/local or wherever node
is installed.require() it.npm link.The prefix config defaults to the location where node is installed.
On most systems, this is /usr/local. On Windows, it's %AppData%\npm.
On Unix systems, it's one level up, since node is typically installed at
{prefix}/bin/node rather than {prefix}/node.exe.
When the global flag is set, npm installs things into this prefix.
When it is not set, it uses the root of the current package, or the
current working directory if not in a package already.
Packages are dropped into the node_modules folder under the prefix.
When installing locally, this means that you can
require("packagename") to load its main module, or
require("packagename/lib/path/to/sub/module") to load other modules.
Global installs on Unix systems go to {prefix}/lib/node_modules.
Global installs on Windows go to {prefix}/node_modules (that is, no
lib folder.)
Scoped packages are installed the same way, except they are grouped together
in a sub-folder of the relevant node_modules folder with the name of that
scope prefix by the @ symbol, e.g. npm install @myorg/package would place
the package in {prefix}/node_modules/@myorg/package. See scope for
more details.
If you wish to require() a package, then install it locally.
When in global mode, executables are linked into {prefix}/bin on Unix,
or directly into {prefix} on Windows.
When in local mode, executables are linked into
./node_modules/.bin so that they can be made available to scripts run
through npm. (For example, so that a test runner will be in the path
when you run npm test.)
When in global mode, man pages are linked into {prefix}/share/man.
When in local mode, man pages are not installed.
Man pages are not installed on Windows systems.
See npm-cache. Cache files are stored in ~/.npm on Posix, or
%AppData%/npm-cache on Windows.
This is controlled by the cache configuration param.
Temporary files are stored by default in the folder specified by the
tmp config, which defaults to the TMPDIR, TMP, or TEMP environment
variables, or /tmp on Unix and c:\windows\temp on Windows.
Temp files are given a unique folder under this root for each run of the program, and are deleted upon successful exit.
When installing locally, npm first tries to find an appropriate
prefix folder. This is so that npm install foo@1.2.3 will install
to the sensible root of your package, even if you happen to have cded
into some other folder.
Starting at the $PWD, npm will walk up the folder tree checking for a
folder that contains either a package.json file, or a node_modules
folder. If such a thing is found, then that is treated as the effective
"current directory" for the purpose of running npm commands. (This
behavior is inspired by and similar to git's .git-folder seeking
logic when running git commands in a working dir.)
If no package root is found, then the current folder is used.
When you run npm install foo@1.2.3, then the package is loaded into
the cache, and then unpacked into ./node_modules/foo. Then, any of
foo's dependencies are similarly unpacked into
./node_modules/foo/node_modules/....
Any bin files are symlinked to ./node_modules/.bin/, so that they may
be found by npm scripts when necessary.
If the global configuration is set to true, then npm will
install packages "globally".
For global installation, packages are installed roughly the same way, but using the folders described above.
Cycles are handled using the property of node's module system that it
walks up the directories looking for node_modules folders. So, at every
stage, if a package is already installed in an ancestor node_modules
folder, then it is not installed at the current location.
Consider the case above, where foo -> bar -> baz. Imagine if, in
addition to that, baz depended on bar, so you'd have:
foo -> bar -> baz -> bar -> baz .... However, since the folder
structure is: foo/node_modules/bar/node_modules/baz, there's no need to
put another copy of bar into .../baz/node_modules, since when it calls
require("bar"), it will get the copy that is installed in
foo/node_modules/bar.
This shortcut is only used if the exact same
version would be installed in multiple nested node_modules folders. It
is still possible to have a/node_modules/b/node_modules/a if the two
"a" packages are different versions. However, without repeating the
exact same package multiple times, an infinite regress will always be
prevented.
Another optimization can be made by installing dependencies at the highest level possible, below the localized "target" folder.
Consider this dependency graph:
foo
+-- blerg@1.2.5
+-- bar@1.2.3
|   +-- blerg@1.x (latest=1.3.7)
|   +-- baz@2.x
|   |   `-- quux@3.x
|   |       `-- bar@1.2.3 (cycle)
|   `-- asdf@*
`-- baz@1.2.3
    `-- quux@3.x
        `-- bar
In this case, we might expect a folder structure like this:
foo
+-- node_modules
    +-- blerg (1.2.5) <---[A]
    +-- bar (1.2.3) <---[B]
    |   `-- node_modules
    |       +-- baz (2.0.2) <---[C]
    |       |   `-- node_modules
    |       |       `-- quux (3.2.0)
    |       `-- asdf (2.3.4)
    `-- baz (1.2.3) <---[D]
        `-- node_modules
            `-- quux (3.2.0) <---[E]
Since foo depends directly on bar@1.2.3 and baz@1.2.3, those are
installed in foo's node_modules folder.
Even though the latest copy of blerg is 1.3.7, foo has a specific
dependency on version 1.2.5. So, that gets installed at [A]. Since the
parent installation of blerg satisfies bar's dependency on blerg@1.x,
it does not install another copy under [B].
Bar [B] also has dependencies on baz and asdf, so those are installed in
bar's node_modules folder. Because it depends on baz@2.x, it cannot
re-use the baz@1.2.3 installed in the parent node_modules folder [D],
and must install its own copy [C].
Underneath bar, the baz -> quux -> bar dependency creates a cycle.
However, because bar is already in quux's ancestry [B], it does not
unpack another copy of bar into that folder.
Underneath foo -> baz [D], quux's [E] folder tree is empty, because its
dependency on bar is satisfied by the parent folder copy installed at [B].
For a graphical breakdown of what is installed where, use npm ls.
Upon publishing, npm will look in the node_modules folder. If any of
the items there are not in the bundledDependencies array, then they will
not be included in the package tarball.
This allows a package maintainer to install all of their dependencies
(and dev dependencies) locally, but only re-publish those items that
cannot be found elsewhere. See package.json for more information.
Last modified February 13, 2023 Found a typo? Send a pull request!
npm gets its config settings from the command line, environment
variables, and npmrc files.
The npm config command can be used to update and edit the contents
of the user and global npmrc files.
For a list of available configuration options, see npm-config.
The four relevant files are:
All npm config files are an ini-formatted list of key = value
parameters. Environment variables can be replaced using
${VARIABLE_NAME}. For example:
prefix = ${HOME}/.npm-packages
Each of these files is loaded, and config options are resolved in priority order. For example, a setting in the userconfig file would override the setting in the globalconfig file.
Array values are specified by adding "[]" after the key name. For example:
key[] = "first value"
key[] = "second value"
Lines in .npmrc files are interpreted as comments when they begin with a ; or # character. .npmrc files are parsed by npm/ini, which specifies this comment syntax.
For example:
# last modified: 01 Jan 2016
; Set a new registry for a scoped package
@myscope:registry=https://mycustomregistry.example.org
When working locally in a project, a .npmrc file in the root of the
project (ie, a sibling of node_modules and package.json) will set
config values specific to this project.
Note that this only applies to the root of the project that you're running npm in. It has no effect when your module is published. For example, you can't publish a module that forces itself to install globally, or in a different location.
Additionally, this file is not read in global mode, such as when running
npm install -g.
$HOME/.npmrc (or the userconfig param, if set in the environment
or on the command line)
$PREFIX/etc/npmrc (or the globalconfig param, if set above):
This file is an ini-file formatted list of key = value parameters.
Environment variables can be replaced as above.
path/to/npm/itself/npmrc
This is an unchangeable "builtin" configuration file that npm keeps
consistent across updates. Set fields in here using the ./configure
script that comes with npm. This is primarily for distribution
maintainers to override default configs in a standard and consistent
manner.
Last modified February 13, 2023 Found a typo? Send a pull request!
package-lock.json is automatically generated for any operations where npm
modifies either the node_modules tree, or package.json. It describes the
exact tree that was generated, such that subsequent installs are able to
generate identical trees, regardless of intermediate dependency updates.
This file is intended to be committed into source repositories, and serves various purposes:
Describe a single representation of a dependency tree such that teammates, deployments, and continuous integration are guaranteed to install exactly the same dependencies.
Provide a facility for users to "time-travel" to previous states of node_modules without having to commit the directory itself.
To facilitate greater visibility of tree changes through readable source control diffs.
And optimize the installation process by allowing npm to skip repeated metadata resolutions for previously-installed packages.
One key detail about package-lock.json is that it cannot be published, and it
will be ignored if found in any place other than the toplevel package. It shares
a format with npm-shrinkwrap.json, which is essentially the same file, but
allows publication. This is not recommended unless deploying a CLI tool or
otherwise using the publication process for producing production packages.
If both package-lock.json and npm-shrinkwrap.json are present in the root of
a package, package-lock.json will be completely ignored.
The name of the package this is a package-lock for. This must match what's in
package.json.
The version of the package this is a package-lock for. This must match what's in
package.json.
An integer version, starting at 1 with the version number of this document
whose semantics were used when generating this package-lock.json.
This is a subresource
integrity value
created from the package.json. No preprocessing of the package.json should
be done. Subresource integrity strings can be produced by modules like
ssri.
Indicates that the install was done with the environment variable
NODE_PRESERVE_SYMLINKS enabled. The installer should insist that the value of
this property match that environment variable.
A mapping of package name to dependency object. Dependency objects have the following properties:
This is a specifier that uniquely identifies this package and should be usable in fetching a new copy of it.
1.2.3)git+https://example.com/foo/bar#115311855adb0789a0466714ed48a1499ffea97e)https://example.com/example-1.3.0.tgz)file:///opt/storage/example-1.3.0.tgz)file:libs/our-module)This is a Standard Subresource Integrity for this resource.
integrity that the registry provided, or if one wasn't provided the SHA1 in shasum.If true, this is the bundled dependency and will be installed by the parent module. When installing, this module will be extracted from the parent module during the extract phase, not installed as a separate dependency.
If true then this dependency is either a development dependency ONLY of the top level module or a transitive dependency of one. This is false for dependencies that are both a development dependency of the top level and a transitive dependency of a non-development dependency of the top level.
If true then this dependency is either an optional dependency ONLY of the top level module or a transitive dependency of one. This is false for dependencies that are both an optional dependency of the top level and a transitive dependency of a non-optional dependency of the top level.
All optional dependencies should be included even if they're uninstallable on the current platform.
This is a mapping of module name to version. This is a list of everything
this module requires, regardless of where it will be installed. The version
should match via normal matching rules a dependency either in our
dependencies or in a level higher than us.
The dependencies of this dependency, exactly as at the top level.
Last modified February 13, 2023 Found a typo? Send a pull request!
Conceptually, the "input" to npm-install is a package.json, while its
"output" is a fully-formed node_modules tree: a representation of the
dependencies you declared. In an ideal world, npm would work like a pure
function: the same package.json should produce the exact same node_modules
tree, any time. In some cases, this is indeed true. But in many others, npm is
unable to do this. There are multiple reasons for this:
different versions of npm (or other package managers) may have been used to install a package, each using slightly different installation algorithms.
a new version of a direct semver-range package may have been published since the last time your packages were installed, and thus a newer version will be used.
A dependency of one of your dependencies may have published a new version, which will update even if you used pinned dependency specifiers (1.2.3 instead of ^1.2.3)
The registry you installed from is no longer available, or allows mutation of versions (unlike the primary npm registry), and a different version of a package exists under the same version number now.
As an example, consider package A:
{
  "name": "A",
  "version": "0.1.0",
  "dependencies": {
    "B": "<0.1.0"
  }
}
package B:
{
  "name": "B",
  "version": "0.0.1",
  "dependencies": {
    "C": "<0.1.0"
  }
}
and package C:
{
  "name": "C",
  "version": "0.0.1"
}
If these are the only versions of A, B, and C available in the
registry, then a normal npm install A will install:
A@0.1.0
`-- B@0.0.1
    `-- C@0.0.1
However, if B@0.0.2 is published, then a fresh npm install A will
install:
A@0.1.0
`-- B@0.0.2
    `-- C@0.0.1
assuming the new version did not modify B's dependencies. Of course, the new version of B could include a new version of C and any number of new dependencies. If such changes are undesirable, the author of A could specify a dependency on B@0.0.1. However, if A's author and B's author are not the same person, there's no way for A's author to say that he or she does not want to pull in newly published versions of C when B hasn't changed at all.
To prevent this potential issue, npm uses package-lock.json or, if present, npm-shrinkwrap.json. These files are called package locks, or lockfiles.
Whenever you run npm install, npm generates or updates your package lock,
which will look something like this:
{
  "name": "A",
  "version": "0.1.0",
  ...metadata fields...
  "dependencies": {
    "B": {
      "version": "0.0.1",
      "resolved": "https://registry.npmjs.org/B/-/B-0.0.1.tgz",
      "integrity": "sha512-DeAdb33F+"
      "dependencies": {
        "C": {
          "version": "git://github.com/org/C.git#5c380ae319fc4efe9e7f2d9c78b0faa588fd99b4"
        }
      }
    }
  }
}
This file describes an exact, and more importantly reproducible
node_modules tree. Once it's present, any future installation will base its
work off this file, instead of recalculating dependency versions off
package.json.
The presence of a package lock changes the installation behavior such that:
The module tree described by the package lock is reproduced. This means reproducing the structure described in the file, using the specific files referenced in "resolved" if available, falling back to normal package resolution using "version" if one isn't.
The tree is walked and any missing dependencies are installed in the usual fashion.
If preshrinkwrap, shrinkwrap or postshrinkwrap are in the scripts
property of the package.json, they will be executed in order. preshrinkwrap
and shrinkwrap are executed before the shrinkwrap, postshrinkwrap is
executed afterwards. These scripts run for both package-lock.json and
npm-shrinkwrap.json. For example to run some postprocessing on the generated
file:
"scripts": {
  "postshrinkwrap": "json -I -e \"this.myMetadata = $MY_APP_METADATA\""
}
Using a locked package is no different than using any package without a package
lock: any commands that update node_modules and/or package.json's
dependencies will automatically sync the existing lockfile. This includes npm install, npm rm, npm update, etc. To prevent this update from happening,
you can use the --no-save option to prevent saving altogether, or
--no-shrinkwrap to allow package.json to be updated while leaving
package-lock.json or npm-shrinkwrap.json intact.
It is highly recommended you commit the generated package lock to source
control: this will allow anyone else on your team, your deployments, your
CI/continuous integration, and anyone else who runs npm install in your
package source to get the exact same dependency tree that you were developing
on. Additionally, the diffs from these changes are human-readable and will
inform you of any changes npm has made to your node_modules, so you can notice
if any transitive dependencies were updated, hoisted, etc.
Occasionally, two separate npm install will create package locks that cause
merge conflicts in source control systems. As of npm@5.7.0, these conflicts
can be resolved by manually fixing any package.json conflicts, and then
running npm install [--package-lock-only] again. npm will automatically
resolve any conflicts for you and write a merged package lock that includes all
the dependencies from both branches in a reasonable tree. If
--package-lock-only is provided, it will do this without also modifying your
local node_modules/.
To make this process seamless on git, consider installing
npm-merge-driver, which will teach git how
to do this itself without any user interaction. In short: $ npx npm-merge-driver install -g will let you do this, and even works with
pre-npm@5.7.0 versions of npm 5, albeit a bit more noisily. Note that if
package.json itself conflicts, you will have to resolve that by hand and run
npm install manually, even with the merge driver.
Last modified February 13, 2023 Found a typo? Send a pull request!
This document is all you need to know about what's required in your package.json file. It must be actual JSON, not just a JavaScript object literal.
A lot of the behavior described in this document is affected by the config
settings described in npm-config.
If you plan to publish your package, the most important things in your package.json are the name and version fields as they will be required. The name and version together form an identifier that is assumed to be completely unique. Changes to the package should come along with changes to the version. If you don't plan to publish your package, the name and version fields are optional.
The name is what your thing is called.
Some rules:
Some tips:
A name can be optionally prefixed by a scope, e.g. @myorg/mypackage. See
npm-scope for more detail.
If you plan to publish your package, the most important things in your package.json are the name and version fields as they will be required. The name and version together form an identifier that is assumed to be completely unique. Changes to the package should come along with changes to the version. If you don't plan to publish your package, the name and version fields are optional.
Version must be parseable by
node-semver, which is bundled
with npm as a dependency. (npm install semver to use it yourself.)
More on version numbers and ranges at semver.
Put a description in it. It's a string. This helps people discover your
package, as it's listed in npm search.
Put keywords in it. It's an array of strings. This helps people
discover your package as it's listed in npm search.
The url to the project homepage.
Example:
"homepage": "https://github.com/owner/project#readme"
The url to your project's issue tracker and / or the email address to which issues should be reported. These are helpful for people who encounter issues with your package.
It should look like this:
{ "url" : "https://github.com/owner/project/issues"
, "email" : "project@hostname.com"
}
You can specify either one or both values. If you want to provide only a url, you can specify the value for "bugs" as a simple string instead of an object.
If a url is provided, it will be used by the npm bugs command.
You should specify a license for your package so that people know how they are permitted to use it, and any restrictions you're placing on it.
If you're using a common license such as BSD-2-Clause or MIT, add a current SPDX license identifier for the license you're using, like this:
{ "license" : "BSD-3-Clause" }
You can check the full list of SPDX license IDs. Ideally you should pick one that is OSI approved.
If your package is licensed under multiple common licenses, use an SPDX license expression syntax version 2.0 string, like this:
{ "license" : "(ISC OR GPL-3.0)" }
If you are using a license that hasn't been assigned an SPDX identifier, or if you are using a custom license, use a string value like this one:
{ "license" : "SEE LICENSE IN <filename>" }
Then include a file named <filename> at the top level of the package.
Some old packages used license objects or a "licenses" property containing an array of license objects:
// Not valid metadata
{ "license" :
  { "type" : "ISC"
  , "url" : "https://opensource.org/licenses/ISC"
  }
}

// Not valid metadata
{ "licenses" :
  [
    { "type": "MIT"
    , "url": "https://www.opensource.org/licenses/mit-license.php"
    }
  , { "type": "Apache-2.0"
    , "url": "https://opensource.org/licenses/apache2.0.php"
    }
  ]
}
Those styles are now deprecated. Instead, use SPDX expressions, like this:
{ "license": "ISC" }

{ "license": "(MIT OR Apache-2.0)" }
Finally, if you do not wish to grant others the right to use a private or unpublished package under any terms:
{ "license": "UNLICENSED" }
Consider also setting "private": true to prevent accidental publication.
The "author" is one person. "contributors" is an array of people. A "person" is an object with a "name" field and optionally "url" and "email", like this:
{ "name" : "Barney Rubble"
, "email" : "b@rubble.com"
, "url" : "http://barnyrubble.tumblr.com/"
}
Or you can shorten that all into a single string, and npm will parse it for you:
"Barney Rubble <b@rubble.com> (http://barnyrubble.tumblr.com/)"
Both email and url are optional either way.
npm also sets a top-level "maintainers" field with your npm user info.
The optional files field is an array of file patterns that describes
the entries to be included when your package is installed as a
dependency. File patterns follow a similar syntax to .gitignore, but
reversed: including a file, directory, or glob pattern (*, **/*, and such)
will make it so that file is included in the tarball when it's packed. Omitting
the field will make it default to ["*"], which means it will include all files.
Some special files and directories are also included or excluded regardless of
whether they exist in the files array (see below).
You can also provide a .npmignore file in the root of your package or
in subdirectories, which will keep files from being included. At the
root of your package it will not override the "files" field, but in
subdirectories it will. The .npmignore file works just like a
.gitignore. If there is a .gitignore file, and .npmignore is
missing, .gitignore's contents will be used instead.
Files included with the "package.json#files" field cannot be excluded
through .npmignore or .gitignore.
Certain files are always included, regardless of settings:
package.jsonREADMECHANGES / CHANGELOG / HISTORYLICENSE / LICENCENOTICEREADME, CHANGES, LICENSE & NOTICE can have any case and extension.
Conversely, some files are always ignored:
.gitCVS.svn.hg.lock-wscript.wafpickle-N.*.swp.DS_Store._*npm-debug.log.npmrcnode_modulesconfig.gypi*.origpackage-lock.json (use shrinkwrap instead)The main field is a module ID that is the primary entry point to your program.
That is, if your package is named foo, and a user installs it, and then does
require("foo"), then your main module's exports object will be returned.
This should be a module ID relative to the root of your package folder.
For most modules, it makes the most sense to have a main script and often not much else.
If your module is meant to be used client-side the browser field should be
used instead of the main field. This is helpful to hint users that it might
rely on primitives that aren't available in Node.js modules. (e.g. window)
A lot of packages have one or more executable files that they'd like to install into the PATH. npm makes this pretty easy (in fact, it uses this feature to install the "npm" executable.)
To use this, supply a bin field in your package.json which is a map of
command name to local file name. On install, npm will symlink that file into
prefix/bin for global installs, or ./node_modules/.bin/ for local
installs.
For example, myapp could have this:
{ "bin" : { "myapp" : "./cli.js" } }
So, when you install myapp, it'll create a symlink from the cli.js script to
/usr/local/bin/myapp.
If you have a single executable, and its name should be the name of the package, then you can just supply it as a string. For example:
{ "name": "my-program"
, "version": "1.2.5"
, "bin": "./path/to/program" }
would be the same as this:
{ "name": "my-program"
, "version": "1.2.5"
, "bin" : { "my-program" : "./path/to/program" } }
Please make sure that your file(s) referenced in bin starts with
#!/usr/bin/env node, otherwise the scripts are started without the node
executable!
Specify either a single file or an array of filenames to put in place for the
man program to find.
If only a single file is provided, then it's installed such that it is the
result from man <pkgname>, regardless of its actual filename. For example:
{ "name" : "foo"
, "version" : "1.2.3"
, "description" : "A packaged foo fooer for fooing foos"
, "main" : "foo.js"
, "man" : "./man/doc.1"
}
would link the ./man/doc.1 file in such that it is the target for man foo
If the filename doesn't start with the package name, then it's prefixed. So, this:
{ "name" : "foo"
, "version" : "1.2.3"
, "description" : "A packaged foo fooer for fooing foos"
, "main" : "foo.js"
, "man" : [ "./man/foo.1", "./man/bar.1" ]
}
will create files to do man foo and man foo-bar.
Man files must end with a number, and optionally a .gz suffix if they are
compressed. The number dictates which man section the file is installed into.
{ "name" : "foo"
, "version" : "1.2.3"
, "description" : "A packaged foo fooer for fooing foos"
, "main" : "foo.js"
, "man" : [ "./man/foo.1", "./man/foo.2" ]
}
will create entries for man foo and man 2 foo
The CommonJS Packages spec details a
few ways that you can indicate the structure of your package using a directories
object. If you look at npm's package.json,
you'll see that it has directories for doc, lib, and man.
In the future, this information may be used in other creative ways.
Tell people where the bulk of your library is. Nothing special is done with the lib folder in any way, but it's useful meta info.
If you specify a bin directory in directories.bin, all the files in
that folder will be added.
Because of the way the bin directive works, specifying both a
bin path and setting directories.bin is an error. If you want to
specify individual files, use bin, and for all the files in an
existing bin directory, use directories.bin.
A folder that is full of man pages. Sugar to generate a "man" array by walking the folder.
Put markdown files in here. Eventually, these will be displayed nicely, maybe, someday.
Put example scripts in here. Someday, it might be exposed in some clever way.
Put your tests in here. It is currently not exposed, but it might be in the future.
Specify the place where your code lives. This is helpful for people who
want to contribute. If the git repo is on GitHub, then the npm docs
command will be able to find you.
Do it like this:
"repository": {
  "type" : "git",
  "url" : "https://github.com/npm/cli.git"
}

"repository": {
  "type" : "svn",
  "url" : "https://v8.googlecode.com/svn/trunk/"
}
The URL should be a publicly available (perhaps read-only) url that can be handed directly to a VCS program without any modification. It should not be a url to an html project page that you put in your browser. It's for computers.
For GitHub, GitHub gist, Bitbucket, or GitLab repositories you can use the same
shortcut syntax you use for npm install:
"repository": "npm/npm"

"repository": "github:user/repo"

"repository": "gist:11081aaa281"

"repository": "bitbucket:user/repo"

"repository": "gitlab:user/repo"
If the package.json for your package is not in the root directory (for example
if it is part of a monorepo), you can specify the directory in which it lives:
"repository": {
  "type" : "git",
  "url" : "https://github.com/facebook/react.git",
  "directory": "packages/react-dom"
}
The "scripts" property is a dictionary containing script commands that are run at various times in the lifecycle of your package. The key is the lifecycle event, and the value is the command to run at that point.
See npm-scripts to find out more about writing package scripts.
A "config" object can be used to set configuration parameters used in package scripts that persist across upgrades. For instance, if a package had the following:
{ "name" : "foo"
, "config" : { "port" : "8080" } }
and then had a "start" command that then referenced the
npm_package_config_port environment variable, then the user could
override that by doing npm config set foo:port 8001.
See npm-config and npm-scripts for more on package
configs.
Dependencies are specified in a simple object that maps a package name to a version range. The version range is a string which has one or more space-separated descriptors. Dependencies can also be identified with a tarball or git URL.
Please do not put test harnesses or transpilers in your
dependencies object. See devDependencies, below.
See semver for more details about specifying version ranges.
version Must match version exactly>version Must be greater than version>=version etc<version<=version~version "Approximately equivalent to version" See semver^version "Compatible with version" See semver1.2.x 1.2.0, 1.2.1, etc., but not 1.3.0http://... See 'URLs as Dependencies' below* Matches any version"" (just an empty string) Same as *version1 - version2 Same as >=version1 <=version2.range1 || range2 Passes if either range1 or range2 are satisfied.git... See 'Git URLs as Dependencies' belowuser/repo See 'GitHub URLs' belowtag A specific version tagged and published as tag See npm-dist-tagpath/path/path See Local Paths belowFor example, these are all valid:
{ "dependencies" :
  { "foo" : "1.0.0 - 2.9999.9999"
  , "bar" : ">=1.0.2 <2.1.2"
  , "baz" : ">1.0.2 <=2.3.4"
  , "boo" : "2.0.1"
  , "qux" : "<1.0.0 || >=2.3.1 <2.4.5 || >=2.5.2 <3.0.0"
  , "asd" : "http://asdf.com/asdf.tar.gz"
  , "til" : "~1.2"
  , "elf" : "~1.2.3"
  , "two" : "2.x"
  , "thr" : "3.3.x"
  , "lat" : "latest"
  , "dyl" : "file:../dyl"
  }
}
You may specify a tarball URL in place of a version range.
This tarball will be downloaded and installed locally to your package at install time.
Git urls are of the form:
<protocol>://[<user>[:<password>]@]<hostname>[:<port>][:][/]<path>[#<commit-ish> | #semver:<semver>]
<protocol> is one of git, git+ssh, git+http, git+https, or
git+file.
If #<commit-ish> is provided, it will be used to clone exactly that
commit. If the commit-ish has the format #semver:<semver>, <semver> can
be any valid semver range or exact version, and npm will look for any tags
or refs matching that range in the remote repository, much as it would for a
registry dependency. If neither #<commit-ish> or #semver:<semver> is
specified, then master is used.
Examples:
git+ssh://git@github.com:npm/cli.git#v1.0.27
git+ssh://git@github.com:npm/cli#semver:^5.0
git+https://isaacs@github.com/npm/cli.git
git://github.com/npm/cli.git#v1.0.27
As of version 1.1.65, you can refer to GitHub urls as just "foo":
"user/foo-project". Just as with git URLs, a commit-ish suffix can be
included. For example:
{
  "name": "foo",
  "version": "0.0.0",
  "dependencies": {
    "express": "expressjs/express",
    "mocha": "mochajs/mocha#4727d357ea",
    "module": "user/repo#feature\/branch"
  }
}
As of version 2.0.0 you can provide a path to a local directory that contains a
package. Local paths can be saved using npm install -S or
npm install --save, using any of these forms:
../foo/bar
~/foo/bar
./foo/bar
/foo/bar
in which case they will be normalized to a relative path and added to your
package.json. For example:
{
  "name": "baz",
  "dependencies": {
    "bar": "file:../foo/bar"
  }
}
This feature is helpful for local offline development and creating tests that require npm installing where you don't want to hit an external server, but should not be used when publishing packages to the public registry.
If someone is planning on downloading and using your module in their program, then they probably don't want or need to download and build the external test or documentation framework that you use.
In this case, it's best to map these additional items in a devDependencies
object.
These things will be installed when doing npm link or npm install
from the root of a package, and can be managed like any other npm
configuration param. See npm-config for more on the topic.
For build steps that are not platform-specific, such as compiling
CoffeeScript or other languages to JavaScript, use the prepare
script to do this, and make the required package a devDependency.
For example:
{ "name": "ethopia-waza",
  "description": "a delightfully fruity coffee varietal",
  "version": "1.2.3",
  "devDependencies": {
    "coffee-script": "~1.6.3"
  },
  "scripts": {
    "prepare": "coffee -o lib/ -c src/waza.coffee"
  },
  "main": "lib/waza.js"
}
The prepare script will be run before publishing, so that users
can consume the functionality without requiring them to compile it
themselves. In dev mode (ie, locally running npm install), it'll
run this script as well, so that you can test it easily.
In some cases, you want to express the compatibility of your package with a
host tool or library, while not necessarily doing a require of this host.
This is usually referred to as a plugin. Notably, your module may be exposing
a specific interface, expected and specified by the host documentation.
For example:
{
  "name": "tea-latte",
  "version": "1.3.5",
  "peerDependencies": {
    "tea": "2.x"
  }
}
This ensures your package tea-latte can be installed along with the second
major version of the host package tea only. npm install tea-latte could
possibly yield the following dependency graph:
├── tea-latte@1.3.5
└── tea@2.2.0
NOTE: npm versions 1 and 2 will automatically install peerDependencies if
they are not explicitly depended upon higher in the dependency tree. In the
next major version of npm (npm@3), this will no longer be the case. You will
receive a warning that the peerDependency is not installed instead. The
behavior in npms 1 & 2 was frequently confusing and could easily put you into
dependency hell, a situation that npm is designed to avoid as much as possible.
Trying to install another plugin with a conflicting requirement will cause an error. For this reason, make sure your plugin requirement is as broad as possible, and not to lock it down to specific patch versions.
Assuming the host complies with semver, only changes in
the host package's major version will break your plugin. Thus, if you've worked
with every 1.x version of the host package, use "^1.0" or "1.x" to express
this. If you depend on features introduced in 1.5.2, use ">= 1.5.2 < 2".
This defines an array of package names that will be bundled when publishing the package.
In cases where you need to preserve npm packages locally or have them
available through a single file download, you can bundle the packages in a
tarball file by specifying the package names in the bundledDependencies
array and executing npm pack.
For example:
If we define a package.json like this:
{
  "name": "awesome-web-framework",
  "version": "1.0.0",
  "bundledDependencies": [
    "renderized", "super-streams"
  ]
}
we can obtain awesome-web-framework-1.0.0.tgz file by running npm pack.
This file contains the dependencies renderized and super-streams which
can be installed in a new project by executing npm install awesome-web-framework-1.0.0.tgz.
If this is spelled "bundleDependencies", then that is also honored.
If a dependency can be used, but you would like npm to proceed if it cannot be
found or fails to install, then you may put it in the optionalDependencies
object. This is a map of package name to version or url, just like the
dependencies object. The difference is that build failures do not cause
installation to fail.
It is still your program's responsibility to handle the lack of the dependency. For example, something like this:
try {
  var foo = require('foo')
  var fooVersion = require('foo/package.json').version
} catch (er) {
  foo = null
}
if ( notGoodFooVersion(fooVersion) ) {
  foo = null
}

// .. then later in your program ..

if (foo) {
  foo.doFooThings()
}
Entries in optionalDependencies will override entries of the same name in
dependencies, so it's usually best to only put in one place.
You can specify the version of node that your stuff works on:
{ "engines" : { "node" : ">=0.10.3 <0.12" } }
And, like with dependencies, if you don't specify the version (or if you specify "*" as the version), then any version of node will do.
If you specify an "engines" field, then npm will require that "node" be somewhere on that list. If "engines" is omitted, then npm will just assume that it works on node.
You can also use the "engines" field to specify which versions of npm are capable of properly installing your program. For example:
{ "engines" : { "npm" : "~1.0.20" } }
Unless the user has set the engine-strict config flag, this
field is advisory only and will only produce warnings when your package is installed as a dependency.
This feature was removed in npm 3.0.0
Prior to npm 3.0.0, this feature was used to treat this package as if the
user had set engine-strict. It is no longer used.
You can specify which operating systems your module will run on:
"os" : [ "darwin", "linux" ]
You can also blacklist instead of whitelist operating systems, just prepend the blacklisted os with a '!':
"os" : [ "!win32" ]
The host operating system is determined by process.platform
It is allowed to both blacklist, and whitelist, although there isn't any good reason to do this.
If your code only runs on certain cpu architectures, you can specify which ones.
"cpu" : [ "x64", "ia32" ]
Like the os option, you can also blacklist architectures:
"cpu" : [ "!arm", "!mips" ]
The host architecture is determined by process.arch
DEPRECATED
This option used to trigger an npm warning, but it will no longer warn. It is purely there for informational purposes. It is now recommended that you install any binaries as local devDependencies wherever possible.
If you set "private": true in your package.json, then npm will refuse
to publish it.
This is a way to prevent accidental publication of private repositories. If
you would like to ensure that a given package is only ever published to a
specific registry (for example, an internal registry), then use the
publishConfig dictionary described below to override the registry config
param at publish-time.
This is a set of config values that will be used at publish-time. It's especially handy if you want to set the tag, registry or access, so that you can ensure that a given package is not tagged with "latest", published to the global public registry or that a scoped module is private by default.
Any config values can be overridden, but only "tag", "registry" and "access" probably matter for the purposes of publishing.
See npm-config to see the list of config options that can be
overridden.
npm will default some values based on package contents.
"scripts": {"start": "node server.js"}
If there is a server.js file in the root of your package, then npm
will default the start command to node server.js.
"scripts":{"install": "node-gyp rebuild"}
If there is a binding.gyp file in the root of your package and you have not defined an install or preinstall script, npm will
default the install command to compile using node-gyp.
"contributors": [...]
If there is an AUTHORS file in the root of your package, npm will
treat each line as a Name <email> (url) format, where email and url
are optional. Lines which start with a # or are blank, will be
ignored.
Last modified February 13, 2023 Found a typo? Send a pull request!
npm-shrinkwrap.json is a file created by npm-shrinkwrap. It is identical to
package-lock.json, with one major caveat: Unlike package-lock.json,
npm-shrinkwrap.json may be included when publishing a package.
The recommended use-case for npm-shrinkwrap.json is applications deployed
through the publishing process on the registry: for example, daemons and
command-line tools intended as global installs or devDependencies. It's
strongly discouraged for library authors to publish this file, since that would
prevent end users from having control over transitive dependency updates.
Additionally, if both package-lock.json and npm-shrinkwrap.json are present
in a package root, package-lock.json will be ignored in favor of this file.
For full details and description of the npm-shrinkwrap.json file format, refer
to the manual page for package-lock.json.
Last modified February 13, 2023 Found a typo? Send a pull request!
Node 0.4、0.6、0.10 和 iojs 都已不再被官方支持。
如果你所使用的 node 版本已不再被官方支持(例如 0.4、0.6 版本)或者是非稳定版(unstable,即版本号为奇数,例如 0.7.x、0.9.x、0.11.x),并且在使用过程中遇到了问题,那很有可能你的问题已经在 node LTS 版本中被解决了。
node -v
对于某些 Linux 分发版本(Debian/Ubuntu 和 RedHat/CentOS),其自带的 node 版本可能落后于当前稳定版。这里有一份 来自 NodeSource 的安装最新版本 node 的指导。
从 https://nodejs.org/download 下载最新的 msi 安装包并安装。
从 https://nodejs.org/download 地址下载并安装最新版本
或者通过 homebrew 安装
brew install node
Node.js 发布了很多版本,并且开发很活跃。管理这些版本的最佳方式是使用一个版本管理器。有很多版本管理器可供选择,下面列出一部分:
Last modified February 13, 2023 Found a typo? Send a pull request!
npm -v
(You may need to prefix these commands with sudo, especially on Linux, or OS X if you installed Node using its default installer.)
You can upgrade to the latest version of npm using:
npm install -g npm@latest
Or upgrade to the most recent release:
npm install -g npm@next
Microsoft wrote a small command line tool to automate the steps below. You can go and download it here - or stick with the manual path outlined below.
By default, npm is installed alongside node in C:\Program Files (x86)\nodejs. npm's globally installed packages (including, potentially, npm itself) are stored separately in a user-specific directory (which is currently C:\Users\<username>\AppData\Roaming\npm). Because the installer puts C:\Program Files (x86)\nodejs before C:\Users\<username>\AppData\Roaming\npm on your PATH, it will always use version of npm installed with node instead of the version of npm you installed using npm -g install npm@<version>. To get around this, you can do one of the following:
Option 1: edit your Windows installation's PATH to put %appdata%\npm before %ProgramFiles%\nodejs.
Remember that you'll need to restart cmd.exe (and potentially restart Windows) when you make changes to PATH or how npm is installed.
Option 2: remove both of
%ProgramFiles%\nodejs\npm%ProgramFiles%\nodejs\npm.cmdOption 3: Navigate to %ProgramFiles%\nodejs\node_modules\npm and copy the npmrcfile to another folder or the desktop.
Then open cmd.exe and run the following commands:
cd %ProgramFiles%\nodejsnpm install npm@latestIf you installed npm with the node.js installer, after doing one of the previous steps, do the following.
Option 1 or 2
%ProgramFiles%\nodejs\node_modules\npm and copy the file named npmrc in the new npm folder, which should be %appdata%\npm\node_modules\npm. This will tell the new npm where the global installed packages are.Option 3
%ProgramFiles%\nodejs\node_modules\npm(See also the point below if you're running Windows 7 and don't have the directory %appdata%\npm.)
The Node installer installs, directly into the npm folder, a special piece of Windows-specific configuration that tells npm where to install global packages. When npm is used to install itself, it is supposed to copy this special builtin configuration into the new install. There was a bug in some versions of npm that kept this from working, so you may need to go in and fix that up by hand. Run the following command to see where npm will install global packages to verify it is correct.
npm config get prefix -g
If it isn't set to <X>:\Users\<user>\AppData\Roaming\npm, you can run the below command to correct it:
npm config set prefix "${APPDATA}/npm" -g
Incidentally, if you would prefer that packages not be installed to your roaming profile (because you have a quota on your shared network, or it makes logging in or out from a domain sluggish), you can put it in your local app data instead:
npm config set prefix "${LOCALAPPDATA}/npm" -g
...as well as copying %APPDATA%\npm to %LOCALAPPDATA%\npm (and updating your %PATH%, of course).
Everyone who works on npm knows that this process is complicated and fraught, and we're working on making it simpler. Stay tuned.
Last modified February 13, 2023 Found a typo? Send a pull request!
重新安装 npm:
curl -L https://www.npmjs.org/install.sh | sh如果是 Windows 系统并且以前安装的 npm 损坏了,最简单的方法是从官方下载 node 安装包并重新安装。 (remember this note).
Last modified February 13, 2023 Found a typo? Send a pull request!
Sometimes npm's cache gets confused. You can reset it using:
npm cache clean
Last modified February 13, 2023 Found a typo? Send a pull request!
You have an outdated npm. Please update to the latest stable npm.
npm ERR! code EPERM
npm ERR! code EACCES
sudo chown -R $(whoami) "$HOME/.npm".sudo. e.g. sudo npm install express -g. (You'll probably need to fix cache permissions afterwards, as above).In your .travis.yml replace this:
before_install:- npm install -g npm@latest
with this:
before_install:- '[ "${TRAVIS_NODE_VERSION}" != "0.8" ] || npm install -g npm@1.4.28'- npm install -g npm@latest
This suggestion is based on this Travis issue and comes courtesy @simondean.
Error: ENOENT, stat 'C:\Users\<user>\AppData\Roaming\npm' on Windows 7This is a consequence of joyent/node#8141, and is an issue with the Node installer for Windows. The workaround is to ensure that C:\Users\<user>\AppData\Roaming\npm exists and is writable with your normal user account.
npm ERR! Error: ENOSPC, write
You are trying to install on a drive that either has no space, or has no permission to write.
npm config set tmp /path/to/big/drive/tmp ornpm ERR! not found: git
ENOGIT
You need to install git.
@drmyersii went through what sounds like a lot of painful trial and error to come up with a working solution involving Windows long paths and some custom Vagrant configuration:
This is the commit that I implemented it in, but I'll go ahead and post the main snippet of code here:
config.vm.provider "virtualbox" do |v|v.customize ["sharedfolder", "add", :id, "--name", "www", "--hostpath", (("//?/" + File.dirname(__FILE__) + "/www").gsub("/","\\"))]endconfig.vm.provision :shell, inline: "mkdir /home/vagrant/www"config.vm.provision :shell, inline: "mount -t vboxsf -o uid=`id -u vagrant`,gid=`getent group vagrant | cut -d: -f3` > www /home/vagrant/www", run: "always"In the code above, I am appending
\\?\to the current directory absolute path. This will actually force the Windows API to allow an increase in the MAX_PATH variable (normally capped at 260). Read more about max path. This is happening during the sharedfolder creation which is intentionally handled by VBoxManage and not Vagrant's "synced_folder" method. The last bit is pretty self-explanatory; we create the new shared folder and then make sure it's mounted each time the machine is accessed or touched since Vagrant likes to reload its mounts/shared folders on each load.
git: and ssh+git: URLs for GitHub repos, breaking proxies@LaurentGoderre fixed this with some Git trickery:
I fixed this issue for several of my colleagues by running the following two commands:
git config --global url."https://github.com/".insteadOf git@github.com:
git config --global url."https://".insteadOf git://
One thing we noticed is that the
.gitconfigused is not always the one expected so if you are on a machine that modified the home path to a shared drive, you need to ensure that your.gitconfigis the same on both your shared drive and inc:\users\[your user]\
npm ERR! Error: 7684:error:140770FC:SSL routines:SSL23_GET_SERVER_HELLO:unknown protocol:openssl\ssl\s23_clnt.c:787:
You are trying to talk SSL to an unencrypted endpoint. More often than not, this is due to a proxy configuration error (see also this helpful, if dated, guide). In this case, you do not want to disable strict-ssl – you may need to set up a CA / CA file for use with your proxy, but it's much better to take the time to figure that out than disabling SSL protection.
npm ERR! Error: SSL Error: CERT_UNTRUSTED
npm ERR! Error: SSL Error: UNABLE_TO_VERIFY_LEAF_SIGNATURE
This problem will happen if you're running Node 0.6. Please upgrade to node 0.8 or above. See this post for details.
You could also try these workarounds: npm config set ca "" or npm config set strict-ssl false
npm ERR! Error: SSL Error: SELF_SIGNED_CERT_IN_CHAIN
npm no longer supports its self-signed certificates
Either:
npm install npm -g --ca=""npm config set ca=""If this does not fix the problem, then you may have an SSL-intercepting proxy. (For example, https://github.com/npm/npm/issues/7439#issuecomment-76024878)
Unsolved. See https://github.com/npm/npm/issues/9282
npm http 404 https://registry.npmjs.org/faye-websocket/-/faye-websocket-0.7.0.tgz
npm ERR! fetch failed https://registry.npmjs.org/faye-websocket/-/faye-websocket-0.7.0.tgz
npm ERR! Error: 404 Not Found
npm http 500 https://registry.npmjs.org/phonegap
Error: Invalid JSON
npm ERR! SyntaxError: Unexpected token <
npm ERR! registry error parsing json
npm cache clean and/or try again later.package.json requests. Check npm's proxy configuration.package.json).ENOENT / ENOTEMPTY errors in outputnpm is written to use resources efficiently on install, and part of this is that it tries to do as many things concurrently as is practical. Sometimes this results in race conditions and other synchronization issues. As of npm 2.0.0, a very large number of these issues were addressed. If you see ENOENT lstat, ENOENT chmod, ENOTEMPTY unlink, or something similar in your log output, try updating npm to the latest version. If the problem persists, look at npm/npm#6043 and see if somebody has already discussed your issue.
cb() never called! when using shrinkwrapped dependenciesTake a look at issue #5920. We're working on fixing this one, but it's a fairly subtle race condition and it's taking us a little time. You might try moving your This has been fixed in versions of npm newer than npm-shrinkwrap.json file out of the way until we have this fixed.npm@2.1.5, so update to npm@latest.
npm login errorsSometimes npm login fails for no obvious reason. The first thing to do is to log in at https://www.npmjs.com/login and check that your e-mail address on npmjs.com matches the
email address you are giving to npm login.
If that's not the problem, or if you are seeing the message "may not mix password_sha and pbkdf2", then
~/.npmrc – e.g., by running sed -ie '/registry.npmjs.org/d' ~/.npmrcnpm loginand it generally seems to work.
See https://github.com/npm/npm/issues/6641#issuecomment-72984009 for the history of this issue.
npm hangs on Windows at addRemoteTarballCheck if you have two temp directories set in your .npmrc:
> npm config ls -l
Look for lines defining the tmp config variable. If you find more than one, remove all but one of them.
See https://github.com/npm/npm/issues/7590 for more about this unusual problem.
npm cache clean and trying again.npm install, use the -verbose option to have more details.Last modified February 13, 2023 Found a typo? Send a pull request!
npm is lots of things.
npm, Inc. is a company co-founded in 2014 by npm's creator, Isaac Z. Schlueter, along with Laurie Voss and Rod Boothby.
npm, Inc. is dedicated to the long term success of the JavaScript community, which includes the success of the open-source Node.js and npm projects.
At npm, Inc. we do three things to support this goal:
npm's mission is to take Open Source development to entirely new places. When everyone else is adding force, we work to reduce friction.
npm is not a typical product, and we are not a typical "work hard/play hard" startup. We are responsible adults with diverse backgrounds and interests, who take our careers and our lives seriously. We believe that the best way to iterate towards success is by taking care of ourselves, our families, our users, and one another. We aim for a sustainable approach to work and life, because that is the best way to maximize long-term speed, while retaining clarity of vision. Compassion is our strategy.
Our offices are in downtown Oakland, California.
You can reach us for support or any other questions via our contact form or at npm@npmjs.com.
Last modified February 13, 2023 Found a typo? Send a pull request!
Private modules are ordinary npm packages that only you, and people you select, can view, install, and publish. You publish them in your namespace or your team's namespace by giving them a name in package.json:
You publish them with npm publish just like any other package, and you install
them by name:
npm install @myuser/mypackageOnce installed, use them by requiring them by name, just like any other package:
var mypackage = ;npm and the registry make it easy to share small modules of useful code with the world. However, sometimes the code in your package is private, sensitive, or just too specific to your needs for you to want to publish it to the public registry. Private packages allow you to share your code with a specific set of users, rather than the registry as a whole.
Whether you work in a team or you work for clients, you want to be able to privately share your work using the dependency management and version management that npm provides. By allowing you to control who can see, install and publish packages, private packages make this easy.
Last modified February 13, 2023 Found a typo? Send a pull request!
Need to report a security vulnerability? Please contact us or email security@npmjs.com.
Our engineering team is well-versed in security best practices.
Our software is regularly audited by reputable third-party security firms, currently Lift Security.
We maintain a recent, production-ready OS that is regularly patched with the latest security fixes.
Our servers live behind a firewall that only allows expected traffic on limited ports.
Our services are fronted by a CDN that allows for protection from Distributed Denial of Service (DDoS) attacks.
All private data exchanged with npm from the command line and via the website is passed over encrypted connections (HTTPS and SSL).
npm's servers are hosted on Amazon Web Services. Physical security is maximized because nobody knows exactly which physical servers host our virtual ones.
All registry data and binaries are stored in multiple redundant, physically separate locations. All binaries and metadata are backed up to a third-party, off-site location. These backups are encrypted.
Employees of npm Inc. have access to package metadata and binaries for support and debugging purposes. Employees do not have access to the password for your npm account, which is always encrypted.
For more information about how we handle your personal data, you may wish to review our privacy policy.
For firms interested in greater levels of physical and operational security, npm Enterprise is a self-hosted version of the npm Registry that allows total control of the operation and policies of the registry.
If you have further questions or concerns about npm security, please contact us.
Last modified February 13, 2023 Found a typo? Send a pull request!
Did you miss one? Check out the npm weekly archive.
Last modified February 13, 2023 Found a typo? Send a pull request!